شرح ToolBar مع مثال في Android Studio
في Android Toolbar يشبه ActionBar (يسمى الآن أشرطة التطبيقات). شريط ToolBar عبارة عن مجموعة عرض يمكن وضعها في أي مكان في التخطيط layout . يمكننا بسهولة استبدال شريط العمل بشريط الأدوات ToolBar .
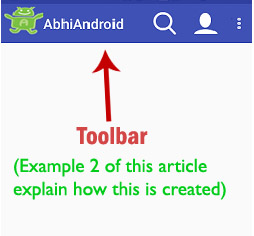
تم تقديم شريط الأدوات ToolBar في الماتريل ديزين Material Design في المستوى 21 لواجهة برمجة التطبيقات (Android 5.0 أي Lollipop). يوفر التصميم متعدد الأبعاد الكثير من الميزات الجديدة في Android والتي غيرت كثيرًا من أنماط التصميم المرئي فيما يتعلق بتصميم تطبيقات Android الحديثة.
يعد شريط الإجراءات تقليديًا جزءًا من ديكور نافذة معتم للنشاط يتم التحكم فيه بواسطة إطار العمل ولكن قد يتم وضع شريط الأدوات في أي مستوى من التداخل داخل تسلسل هرمي للعرض. يوفر شريط الأدوات ميزة أكثر من شريط الإجراءات. قد يحتوي شريط الأدوات على مجموعة من العناصر من البداية إلى النهاية.
ملاحظة مهمة: شريط الأدوات ToolBar أكثر مرونة من شريط الإجراءات. يمكننا بسهولة تعديل لونه وحجمه وموضعه. يمكننا أيضًا إضافة تسميات وشعارات وأيقونات تنقل وعروض أخرى فيها. في تصميم المواد ، قام Android بتحديث مكتبات دعم AppCompat حتى نتمكن من استخدام شريط الأدوات ToolBar في أجهزتنا التي تعمل على مستوى API 7 وما فوق. في AppCompat ، يتم تنفيذ شريط الأدوات ToolBar في فئة android.support.v7.widget.Toolbar.
تعريف مكتبة Design Support Library
لاستخدام شريط الأدوات ToolBar ، تحتاج إلى إضافة مكتبة design support في ملف البناء build.gradle.
Scripts Gradle> build.gradle (Module:App) -> dependencies الداخلية
compile 'com.android.support:design:24.1.1' // design support Library
عناصر شريط ToolBar في Android
يحتوي شريط ToolBar على ميزات أكثر من ActionBar ويمكننا بسهولة استبدال ActionBar بشريط ToolBar. في شريط ToolBar من البداية إلى النهاية ، قد يحتوي على مجموعة من العناصر. فيما يلي نصف كل عنصر من عناصر شريط ToolBar.
-
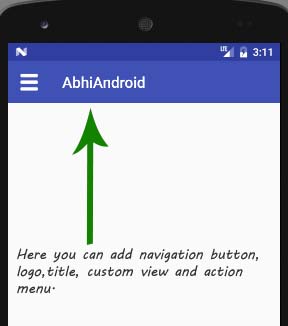 زر التنقل Navigation Button: قد يكون تبديل قائمة التنقل ، أو سهم لأعلى ، أو إغلاق ، أو تم ، أو طي ، أو أي حرف رسومي آخر من اختيار التطبيق.
 - صورة شعار العلامة التجارية Brand Logo Image قد تمتد إلى ارتفاع شريط الأدوات ToolBar ويمكن أن تكون واسعة بشكل عشوائي.
- العنوان والعنوان الفرعي Title and SubTitle : يجب أن يكون العنوان علامة إرشادية للوضع الحالي للتسلسل الهرمي للتنقل في شريط الأدوات والمحتوى الموجود هناك. يمثل العنوان الفرعي أي معلومات موسعة حول المحتوى الحالي. إذا كان التطبيق يستخدم شعارًا ، فيجب أن يفكر بشدة في حذف العنوان والعنوان الفرعي.
- طريقة عرض مخصصة واحدة أو أكثر: قد يضيف التطبيق طرق عرض فرعية عشوائية إلى شريط الأدوات ToolBar . إذا كان Toolbar.LayoutParams لعرض العنصر يشير إلى CENTER_HORIZONTAL Gravity ، فسيحاول العرض التوسيط ضمن المساحة المتوفرة المتبقية في شريط الأدوات ToolBar بعد قياس جميع العناصر الأخرى.
- قائمة الإجراءات Action Menu : سيتم تثبيت قائمة الإجراءات في نهاية شريط الأدوات ToolBar مما يوفر بعض الإجراءات المهمة أو النموذجية أو المتكررة جنبًا إلى جنب مع قائمة تجاوز اختيارية لإجراءات إضافية. تتم محاذاة أزرار الإجراءات عموديًا ضمن الحد الأدنى لارتفاع شريط الأدوات إذا قمنا بتعيينه.
كود XML لشريط الأدوات ToolBar الأساسي
<?xml version="1.0" encoding="utf-8"?>
  <android.support.v7.widget.Toolbar xmlns:android="http://schemas.android.com/apk/res/android"
  android:layout_width="match_parent"
  android:layout_height="wrap_content"
  android:background="@color/colorPrimary"
  android:theme="@style/ThemeOverlay.AppCompat.Dark">

  </android.support.v7.widget.Toolbar>
تعيين شريط الأدوات ToolBar على أنه شريط إجراءات
يمكننا بسهولة استبدال شريط ActionBar بشريط ToolBar باستخدام طريقة setSupportActionBar (). إليك رمز استبدال شريط الأدوات بشريط الأدوات.
 Toolbar toolbar = (Toolbar) findViewById(R.id.toolbar); // get the reference of Toolbar
  setSupportActionBar(toolbar); // Setting/replace toolbar as the ActionBar
سمات و خصائص شريط ToolBar في Android
الآن دعنا نناقش بعض السمات و الخصائص الشائعة لشريط الأدوات ToolBar التي تساعدنا على تكوينه في تخطيطنا (xml).
- id:
تُستخدم هذه السمة او الخاصية لتعيين معرف شريط ToolBar. المعرف يستخدم لتعريف شريط ToolBar بشكل فريد.
أدناه قمنا بتعيين معرف شريط الأدوات.
<?xml version="1.0" encoding="utf-8"?>
	  <android.support.v7.widget.Toolbar xmlns:android="http://schemas.android.com/apk/res/android"
	  android:layout_width="match_parent"
	  android:layout_height="wrap_content"
	  android:id="@+id/toolbar"
	  android:background="@color/colorPrimary"
	  android:theme="@style/ThemeOverlay.AppCompat.Dark">
	  </android.support.v7.widget.Toolbar>
<?xml version="1.0" encoding="utf-8"?>
	  <android.support.v7.widget.Toolbar xmlns:android="http://schemas.android.com/apk/res/android"
	  xmlns:app="http://schemas.android.com/apk/res-auto"
	  android:id="@+id/toolbar"
	  android:layout_width="match_parent"
	  android:layout_height="wrap_content"
	  android:background="@color/colorPrimary"
	  android:theme="@style/ThemeOverlay.AppCompat.Dark"
	  app:logo="@drawable/logo"><!-- logo for the Toolbar-->
	  </android.support.v7.widget.Toolbar>
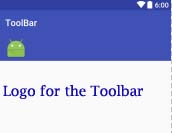
تُستخدم هذه السمة او الخاصية لتعيين او لتحديد سلسلة وصف المحتوى لوصف مظهر صورة الشعار المرتبطة. يمكننا أيضًا القيام بذلك برمجيًا باستخدام طريقة setLogoDescription ().
أدناه قمنا بتعيين وصف الشعار المعروض.
<?xml version="1.0" encoding="utf-8"?>
	  <android.support.v7.widget.Toolbar xmlns:android="http://schemas.android.com/apk/res/android"
	  xmlns:app="http://schemas.android.com/apk/res-auto"
	  android:id="@+id/toolbar"
	  android:layout_width="match_parent"
	  android:layout_height="wrap_content"
	  android:background="@color/colorPrimary"
	  android:theme="@style/ThemeOverlay.AppCompat.Dark"
	  app:logo="@drawable/logo"
	  app:logoDescription="LOGO"><!-- logo and logo description for the Toolbar-->
	  </android.support.v7.widget.Toolbar>
<?xml version="1.0" encoding="utf-8"?>
	  <android.support.v7.widget.Toolbar xmlns:android="http://schemas.android.com/apk/res/android"
	  xmlns:app="http://schemas.android.com/apk/res-auto"
	  android:id="@+id/toolbar"
	  android:layout_width="match_parent"
	  android:layout_height="wrap_content"
	  android:background="@color/colorPrimary"
	  android:theme="@style/ThemeOverlay.AppCompat.Dark"
	  app:navigationIcon="@drawable/logo"><!-- navigation icon for the Toolbar-->
	  </android.support.v7.widget.Toolbar>
![]()
تُستخدم هذه السمة او الخاصية لتعيين النص لوصف زر التنقل. يمكننا أيضًا القيام بذلك برمجيًا باستخدام طريقة setNavigationContentDescription ().
أدناه قمنا بتعيين وصف المحتوى للأيقونة المعروضة لزر التنقل.
<?xml version="1.0" encoding="utf-8"?>
	  <android.support.v7.widget.Toolbar xmlns:android="http://schemas.android.com/apk/res/android"
	  xmlns:app="http://schemas.android.com/apk/res-auto"
	  android:id="@+id/toolbar"
	  android:layout_width="match_parent"
	  android:layout_height="wrap_content"
	  android:background="@color/colorPrimary"
	  android:theme="@style/ThemeOverlay.AppCompat.Dark"
	  app:navigationContentDescription="Navigation Description"
	  app:navigationIcon="@drawable/logo">
	  <!-- navigation icon and description for the Toolbar-->
	  </android.support.v7.widget.Toolbar>
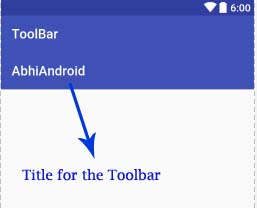
تُستخدم هذه السمة او الخاصية لتعيين عنوان شريط ToolBar . يمكننا أيضًا القيام بذلك برمجيًا باستخدام طريقة setTitle ().
أدناه قمنا بتعيين عنوان شريط الأدوات.
<?xml version="1.0" encoding="utf-8"?>
	  <android.support.v7.widget.Toolbar xmlns:android="http://schemas.android.com/apk/res/android"
	  xmlns:app="http://schemas.android.com/apk/res-auto"
	  android:id="@+id/toolbar"
	  android:layout_width="match_parent"
	  android:layout_height="wrap_content"
	  android:background="@color/colorPrimary"
	  android:theme="@style/ThemeOverlay.AppCompat.Dark"
	  app:title="AbhiAndroid">
	  <!-- title for the Toolbar-->
	  </android.support.v7.widget.Toolbar>
<?xml version="1.0" encoding="utf-8"?>
	  <android.support.v7.widget.Toolbar xmlns:android="http://schemas.android.com/apk/res/android"
	  xmlns:app="http://schemas.android.com/apk/res-auto"
	  android:id="@+id/toolbar"
	  android:layout_width="match_parent"
	  android:layout_height="wrap_content"
	  android:background="@color/colorPrimary"
	  android:theme="@style/ThemeOverlay.AppCompat.Dark"
	  app:titleTextColor="#F00"
	  app:title="AbhiAndroid">
	  <!-- title text color for the Toolbar-->
	  </android.support.v7.widget.Toolbar>
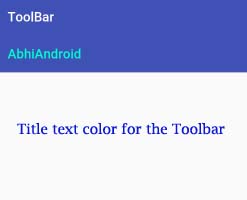
تُستخدم هذه السمة او الخاصية لتعيين العنوان الفرعي لشريط الأدوات ToolBar . يمكننا أيضًا القيام بذلك برمجيًا باستخدام طريقة setSubtitle ().
أدناه قمنا بتعيين العنوان الفرعي لشريط الأدوات ToolBar .
<?xml version="1.0" encoding="utf-8"?>
	  <android.support.v7.widget.Toolbar xmlns:android="http://schemas.android.com/apk/res/android"
	  xmlns:app="http://schemas.android.com/apk/res-auto"
	  android:id="@+id/toolbar"
	  android:layout_width="match_parent"
	  android:layout_height="wrap_content"
	  android:background="@color/colorPrimary"
	  android:theme="@style/ThemeOverlay.AppCompat.Dark"
	  app:subtitle="AbhiAndroid">
	  <!-- sub title for the Toolbar-->
	  </android.support.v7.widget.Toolbar>
<?xml version="1.0" encoding="utf-8"?>
	  <android.support.v7.widget.Toolbar xmlns:android="http://schemas.android.com/apk/res/android"
	  xmlns:app="http://schemas.android.com/apk/res-auto"
	  android:id="@+id/toolbar"
	  android:layout_width="match_parent"
	  android:layout_height="wrap_content"
	  android:background="@color/colorPrimary"
	  android:theme="@style/ThemeOverlay.AppCompat.Dark"
	  app:subtitle="AbhiAndroid"
	  app:subtitleTextColor="#F00">
	  <!-- sub title text  color for the Toolbar-->
	  </android.support.v7.widget.Toolbar>
طرق مهمة لشريط الأدوات ToolBar
دعنا نناقش بعض الطرق المهمة لشريط الأدوات والتي قد يتم استدعاؤها من أجل إضافة رموز الإجراءات لإدارة شريط الأدوات.
ملاحظة مهمة: لفهم وظائف شريط الأدوات أدناه بشكل صحيح ، يرجى قراءة المثال الثاني في هذه المقالة.
- setLogo (int resId): تُستخدم هذه الطريقة لإضافة شعار يمكن اضافته وتحديده من معرف drawable. أدناه قمنا بتعيين شعار قابل للرسم في شريط الأدوات الخاص بنا.
Toolbar toolbar = (Toolbar) findViewById(R.id.toolbar); // get the reference of Toolbar
	  setSupportActionBar(toolbar); // Setting/replace toolbar as the ActionBar
	  getSupportActionBar().setDisplayShowTitleEnabled(false); // hide the current title from the Toolbar
	  toolbar.setLogo(R.drawable.logo); // setting a logo in toolbar
- setLogo (Drawable drawable): تُستخدم هذه الطريقة أيضًا لإضافة شعار drawable في شريط الأدوات ToolBar الخاص بنا. في هذه الطريقة نقوم بتعيين كائن قابل للرسم. أدناه قمنا بتعيين شعار من drawable في شريط الأدوات الخاص بنا.
Toolbar toolbar = (Toolbar) findViewById(R.id.toolbar); // get the reference of Toolbar
	  setSupportActionBar(toolbar); // Setting/replace toolbar as the ActionBar
	  getSupportActionBar().setDisplayShowTitleEnabled(false); // hide the current title from the Toolbar
	  toolbar.setLogo(getResources().getDrawable(R.drawable.logo)); // setting a logo in toolbar
- getLogo ():
تُستخدم هذه الطريقة للحصول على رمز الشعار من شريط الأدوات ToolBar . تقوم هذه الطريقة بإرجاع الشعار من drawable الذي قمنا بتعيينه باستخدام طريقة setLogo ().
أدناه قمنا أولاً بتعيين الشعار القابل للرسم ثم نحصل عليه من شريط الأدوات ToolBar .Toolbar toolbar = (Toolbar) findViewById(R.id.toolbar); // get the reference of Toolbar setSupportActionBar(toolbar); // Setting/replace toolbar as the ActionBar toolbar.setLogo(getResources().getDrawable(R.drawable.logo)); // setting a logo in toolbar Drawable drawableLogo=toolbar.getLogo(); // get the drawable logo from Toolbar getSupportActionBar().setDisplayShowTitleEnabled(false); // hide the current title from the Toolbar
- setLogoDescription ( CharSequence description)
تُستخدم هذه الطريقة لتعيين وصف لشعار شريط الأدوات ToolBar من drawable .
أدناه قمنا بتعيين وصف لشعار شريط الأدوات ToolBar .Toolbar toolbar = (Toolbar) findViewById(R.id.toolbar); // get the reference of Toolbar setSupportActionBar(toolbar); // Setting/replace toolbar as the ActionBar toolbar.setLogo(getResources().getDrawable(R.drawable.logo)); // setting a logo in toolbar toolbar.setLogoDescription("LOGO"); // set description for the logo getSupportActionBar().setDisplayShowTitleEnabled(false); // hide the current title from the Toolbar - setLogoDescription(int resId) :
تُستخدم هذه الطريقة أيضًا لتعيين وصف الشعار drawable لشريط الأدوات ToolBar . تقوم هذه الطريقة بتعيين الوصف من ملف السلسلة.
أدناه قمنا بتعيين وصف لشعار شريط الأدوات ToolBar .Toolbar toolbar = (Toolbar) findViewById(R.id.toolbar); // get the reference of Toolbar setSupportActionBar(toolbar); // Setting/replace toolbar as the ActionBar toolbar.setLogo(getResources().getDrawable(R.drawable.logo)); // setting a logo in toolbar toolbar.setLogoDescription(getResources().getString(R.string.descrition)); // set description for the logo getSupportActionBar().setDisplayShowTitleEnabled(false); // hide the current title from the Toolbar
- getLogoDescription (): تُستخدم هذه الطريقة للحصول على وصف شعار شريط الأدوات ToolBar . تقوم هذه الطريقة بإرجاع الوصف في كائن CharSequence. أدناه ، قمنا أولاً بتعيين وصف شعار شريط الأدوات ثم نحصل عليه من شريط الأدوات.
Toolbar toolbar = (Toolbar) findViewById(R.id.toolbar); // get the reference of Toolbar setSupportActionBar(toolbar); // Setting/replace toolbar as the ActionBar toolbar.setLogo(getResources().getDrawable(R.drawable.logo)); // setting a logo in Toolbar toolbar.setLogoDescription("LOGO"); // set description for the logo CharSequence logoDescription=toolbar.getLogoDescription(); // get the logo description from Toolbar getSupportActionBar().setDisplayShowTitleEnabled(false); // hide the current title from the Toolbar - setNavigationIcon (int resId):
تُستخدم هذه الطريقة لتعيين الرمز من معرف المورد إلى زر التنقل في شريط الأدوات.
أدناه قمنا بتعيين رمز تنقل في شريط الأدوات من معرف المورد.Toolbar toolbar = (Toolbar) findViewById(R.id.toolbar); // get the reference of Toolbar setSupportActionBar(toolbar); // Setting/replace toolbar as the ActionBar toolbar.setNavigationIcon(R.mipmap.ic_launcher); // set icon for navigation button getSupportActionBar().setDisplayShowTitleEnabled(false); // hide the current title from the Toolbar
- setNavigationIcon (Drawable icon ): تُستخدم هذه الطريقة أيضًا لتعيين ايقونه زر التنقل. في هذه الطريقة ، قمنا بتعيين الايقونه من كائن drawable. أدناه قمنا بتعيين ايقونه drawable لزر التنقل.
Toolbar toolbar = (Toolbar) findViewById(R.id.toolbar); // get the reference of Toolbar
	  setSupportActionBar(toolbar); // Setting/replace toolbar as the ActionBar
	  toolbar.setNavigationIcon(getResources().getDrawable(R.drawable.logo)); // setting a navigation icon in Toolbar
	  getSupportActionBar().setDisplayShowTitleEnabled(false); // hide the current title from the Toolbar
- getNavigationIcon (): تُستخدم هذه الطريقة للحصول على ايقونه التنقل من شريط الأدوات الذي قمنا بتعيينه باستخدام طريقة setNavigationIcon (). تقوم هذه الطريقة بإرجاع كائن drawable. أدناه نقوم أولاً بتعيين ايقونه التنقل ثم نحصل عليه من شريط الأدوات ToolBar .
Toolbar toolbar = (Toolbar) findViewById(R.id.toolbar); // get the reference of Toolbar
	  setSupportActionBar(toolbar); // Setting/replace toolbar as the ActionBar
	  toolbar.setNavigationIcon(getResources().getDrawable(R.drawable.logo)); // setting a navigation icon in Toolbar
	  Drawable navigationIcon = toolbar.getNavigationIcon(); // get navigation icon from Toolbar
	  getSupportActionBar().setDisplayShowTitleEnabled(false); // hide the current title from the Toolbar
- setTitle ( int resId):
تُستخدم هذه الطريقة لتعيين عنوان شريط الأدوات ToolBar . في هذه الطريقة ، قمنا بتعيين ملف نصوص العنوان.
أدناه قمنا بتعيين عنوان شريط الأدوات ToolBar .Toolbar toolbar = (Toolbar) findViewById(R.id.toolbar); // get the reference of Toolbar setSupportActionBar(toolbar); // Setting/replace toolbar as the ActionBar4 toolbar.setTitle(getResources().getString(R.string.title)); // setting a title for this Toolbar
- setTitle ( CharSequence title) :
تُستخدم هذه الطريقة أيضًا لتعيين عنوان شريط الأدوات ToolBar .
أدناه قمنا بتعيين عنوان شريط الأدوات.Toolbar toolbar = (Toolbar) findViewById(R.id.toolbar); // get the reference of Toolbar setSupportActionBar(toolbar); // Setting/replace toolbar as the ActionBar4 toolbar.setTitle("AbhiAndroid"); // setting a title for this Toolbar - setSubtitle ( int resId) :
تُستخدم هذه الطريقة لتعيين العنوان الفرعي لشريط الأدوات ToolBar . في هذه الطريقة ، قمنا بتعيين ملف نص نموذج العنوان الفرعي.
أدناه قمنا بتعيين العنوان الفرعي لشريط الأدوات.Toolbar toolbar = (Toolbar) findViewById(R.id.toolbar); // get the reference of Toolbar setSupportActionBar(toolbar); // Setting/replace toolbar as the ActionBar4 toolbar.setSubtitle(getResources().getString(R.string.subTitle)); // setting a sub title for this Toolbar getSupportActionBar().setDisplayShowTitleEnabled(false); // hide the current title from the Toolbar
- setSubtitle ( CharSequence subtitle ) :
تُستخدم هذه الطريقة أيضًا لتعيين العنوان الفرعي لشريط الأدوات ToolBar .
أدناه قمنا بتعيين العنوان الفرعي لشريط الأدوات.Toolbar toolbar = (Toolbar) findViewById(R.id.toolbar); // get the reference of Toolbar setSupportActionBar(toolbar); // Setting/replace toolbar as the ActionBar4 toolbar.setSubtitle("AbhiAndroid"); // setting a sub title for this Toolbar getSupportActionBar().setDisplayShowTitleEnabled(false); // hide the current title from the Toolbar - getTitle (): تُستخدم هذه الطريقة للحصول على عنوان شريط الأدوات ToolBar . تقوم هذه الطريقة بإرجاع كائن CharSequence للعنوان المعروض على شريط الأدوات ، فيما يلي نقوم أولاً بتعيين العنوان ثم نحصل عليه من شريط الأدوات.
Toolbar toolbar = (Toolbar) findViewById(R.id.toolbar); // get the reference of Toolbar setSupportActionBar(toolbar); // Setting/replace toolbar as the ActionBar4 toolbar.setTitle("AbhiAndroid"); // setting a title for this Toolbar CharSequence title=toolbar.getTitle(); // get the displayed title from Toolbar. - getSubtitle (): تُستخدم هذه الطريقة للحصول على العنوان الفرعي لشريط الأدوات ToolBar . تقوم هذه الطريقة بإرجاع كائن CharSequence للعنوان الفرعي المعروض على Toolbar. أدناه ، قمنا أولاً بتعيين العنوان الفرعي ثم نحصل عليه من شريط الأدوات.
Toolbar toolbar = (Toolbar) findViewById(R.id.toolbar); // get the reference of Toolbar
	  setSupportActionBar(toolbar); // Setting/replace toolbar as the ActionBar4
	  toolbar.setSubtitle("AbhiAndroid"); // setting a sub title for this Toolbar
	  CharSequence title=toolbar.getSubtitle(); // get the displayed sub title from Toolbar.
	  getSupportActionBar().setDisplayShowTitleEnabled(false); // hide the current title from the Toolbar
تُستخدم هذه الطريقة لتعيين وصف زر التنقل.
أدناه قمنا بتعيين وصف لزر التنقل.
 Toolbar toolbar = (Toolbar) findViewById(R.id.toolbar); // get the reference of Toolbar
	  setSupportActionBar(toolbar); // Setting/replace toolbar as the ActionBar
	  getSupportActionBar().setDisplayShowTitleEnabled(false); // hide the current title from the Toolbar
	  toolbar.setNavigationIcon(R.drawable.logo); // set icon for navigation button
	  toolbar.setNavigationContentDescription("Navigation"); // setting description for navigation button
Toolbar toolbar = (Toolbar) findViewById(R.id.toolbar); // get the reference of Toolbar
	  setSupportActionBar(toolbar); // Setting/replace toolbar as the ActionBar
	  getSupportActionBar().setDisplayShowTitleEnabled(false); // hide the current title from the Toolbar
	  toolbar.setNavigationIcon(R.drawable.logo); // set icon for navigation button
	  toolbar.setNavigationContentDescription(getResources().getString(R.string.description)); // setting description for navigation button.
 Toolbar toolbar = (Toolbar) findViewById(R.id.toolbar); // get the reference of Toolbar
	  setSupportActionBar(toolbar); // Setting/replace toolbar as the ActionBar
	  getSupportActionBar().setDisplayShowTitleEnabled(false); // hide the current title from the Toolbar
	  toolbar.setNavigationIcon(R.drawable.logo); // set icon for navigation button
	  toolbar.setNavigationContentDescription("Navigation"); // setting description for navigation button
	  CharSequence description=toolbar.getNavigationContentDescription(); // get navigation button description
تُستخدم هذه الطريقة لتعيين لون النص للعنوان المعروض.
أدناه قمنا بتعيين اللون الأحمر لنص العنوان المعروض.
Toolbar toolbar = (Toolbar) findViewById(R.id.toolbar); // get the reference of Toolbar
	  setSupportActionBar(toolbar); // Setting/replace toolbar as the ActionBar
	  toolbar.setTitle("AbhiAndroid"); // setting a title for this Toolbar
	  toolbar.setTitleTextColor(Color.RED); // set title text color for Toolbar.
تُستخدم هذه الطريقة لتعيين لون النص للعنوان الفرعي المعروض.
أدناه قمنا بتعيين اللون الأحمر للنص الفرعي المعروض للعنوان.
Toolbar toolbar = (Toolbar) findViewById(R.id.toolbar); // get the reference of Toolbar
	  setSupportActionBar(toolbar); // Setting/replace toolbar as the ActionBar
	  getSupportActionBar().setDisplayShowTitleEnabled(false); // hide the current title from the Toolbar
	  toolbar.setSubtitle("AbhiAndroid"); // setting a sub title for this Toolbar
	  toolbar.setSubtitleTextColor (Color.RED); // set sub title text color for Toolbar
Toolbar toolbar = (Toolbar) findViewById(R.id.toolbar); // get the reference of Toolbar
	  setSupportActionBar(toolbar); // Setting/replace toolbar as the ActionBar
	  getSupportActionBar().setDisplayShowTitleEnabled(false); // hide the current title from the Toolbar
	  // implement setNavigationOnClickListener event
	  toolbar.setNavigationOnClickListener(new View.OnClickListener() {
	  @Override
	  public void onClick(View view) {
	  // add code here that execute on click of navigation button
	  }
	  });
المثال الأول لشريط الأدوات ToolBar في Android Studio
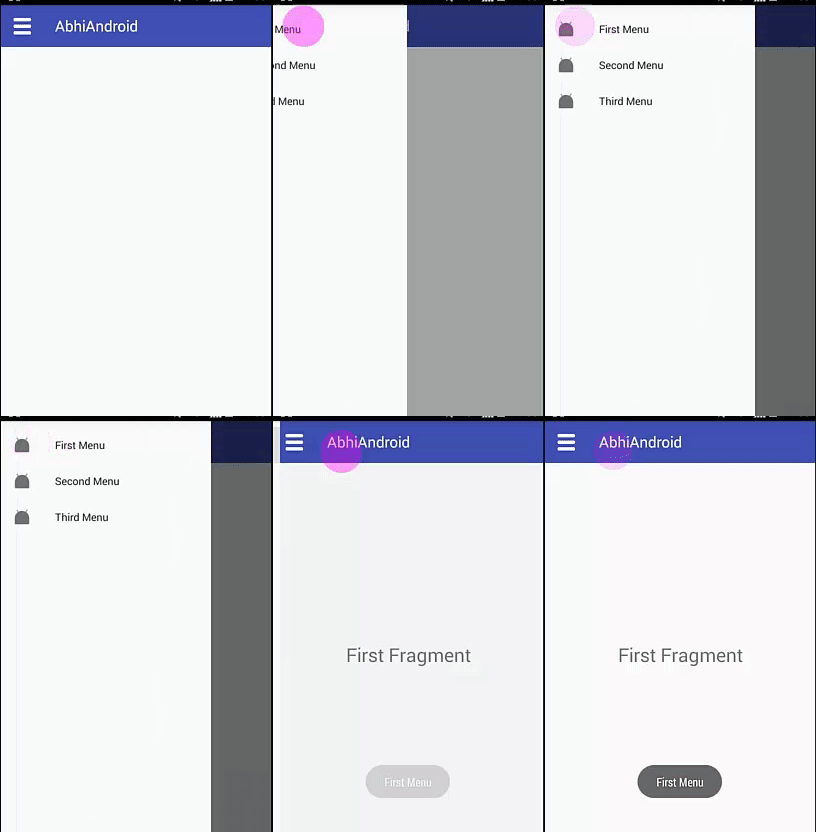
يوجد أدناه أول مثال على شريط الأدوات ToolBar حيث نقوم بإنشاء شريط أدوات واستبداله بـ ActionBar. في هذا الاختبار ، نضيف رموز الإجراءات في Toobar ، وعند النقر فوق زر التنقل في شريط الأدوات ، نفتح درج التنقل . في تخطيطنا الرئيسي ، نستخدم مخطط الدرج وعرض التنقل. تخطيط الدرج هو تخطيط الجذر الذي نقوم فيه بتضمين شريط الأدوات وكذلك تعريف FrameLayout وطريقة عرض التنقل. في طريقة عرض التنقل ، نقوم بتعيين العناصر من ملف القائمة ويتم استخدام FrameLayout لاستبدال الأجزاء عند النقر فوق عناصر القائمة. عندما يقوم المستخدم بالنقر فوق عنصر القائمة ، يتم استبدال الجزء وفقًا لمعرف عنصر القائمة ويتم عرض رسالة نخب بعنوان عنصر القائمة على الشاشة. نقوم أيضًا بإنشاء ثلاثة أجزاء يجب استبدالها عند النقر فوق عناصر القائمة
الخطوة 1: قم بإنشاء مشروع جديد وقم بتسميته ToolbarExample.
الخطوة 2: افتح ملف البناء Gradle> build.gradle وأضف مكتبة دعم التصميم. إذا كنت تستخدم أحدث إصدار من Android Studio ، فلن تحتاج إلى إضافة تبعية مجمعة لمكتبة Appcombat v7 21 إذا لم يكن الأمر كذلك ، فالرجاء التأكد من إضافة السطر أدناه في تبعيات بناء gradel الخاصة بك.
تطبيق البرنامج المساعد: "com.android.application"
android {
  compileSdkVersion 24
  buildToolsVersion "24.0.1"
  defaultConfig {
  applicationId "abhiandroid.toolbarexample"
  minSdkVersion 16
  targetSdkVersion 24
  versionCode 1
  versionName "1.0"
  }
  buildTypes {
  release {
  minifyEnabled false
  proguardFiles getDefaultProguardFile('proguard-android.txt'), 'proguard-rules.pro'
  }
  }
  }
  dependencies {
  compile fileTree(dir: 'libs', include: ['*.jar'])
  testCompile 'junit:junit:4.12'
  compile 'com.android.support:appcompat-v7:24.1.1'
  compile 'com.android.support:design:24.1.1' // design support Library
  }
ToolBar 3: يتم استبدال أشرطة ActionBars بشريط الأدوات حتى لا يزال بإمكاننا استخدام شريط ActionBars ولكن في مثالنا سنقوم بإنشاء شريط أدوات ToolBar ، لذا انتقل إلى ملف style.xml وقم بتغيير السمة إلى "Theme.AppCompat.Light.NoActionBar" هذه السمة تساعد نتخلص من ActionBar حتى نتمكن من إنشاء شريط أدوات.
    <!-- Base application theme. -->
  <style name="AppTheme" parent="Theme.AppCompat.Light.NoActionBar">
  <!-- Customize your theme here. -->
  <item name="colorPrimary">@color/colorPrimary</item>
  <item name="colorPrimaryDark">@color/colorPrimaryDark</item>
  <item name="colorAccent">@color/colorAccent</item>
  </style>
  </resources>
الخطوة 4: الآن دعنا نتحدث عن نظام الألوان لتطبيقنا. افتح ملف color.xml الخاص بك من مجلد القيم. في ملف XML هذا ، يكون colorPrimary هو اللون الأساسي للتطبيق ولون colorPrimaryDark هو لون شريط الحالة. يمكننا بسهولة تغيير ألواننا من هذا الملف.
<?xml version="1.0" encoding="utf-8"?>
  <resources>
  <color name="colorPrimary">#3F51B5</color>
  <color name="colorPrimaryDark">#303F9F</color>
  <color name="colorAccent">#FF4081</color>
  </resources>
الخطوة 5: افتح res -> layout -> activity_main.xml (أو) main.xml وأضف الكود التالي:
في هذه الخطوة نحدد DrawerLayout وهو التخطيط الرئيسي الذي نقوم فيه بتضمين ملف toolbar.xml ونحدد أيضًا FrameLayout وعرض الملاحة. في طريقة عرض التنقل ، قمنا بتعيين العناصر من ملف القائمة المسمى "nav_items" ويتم استخدام FrameLayout لاستبدال الأجزاء عند النقر فوق عناصر القائمة.
<?xml version="1.0" encoding="utf-8"?>
  <android.support.v4.widget.DrawerLayout xmlns:android="http://schemas.android.com/apk/res/android"
  xmlns:app="http://schemas.android.com/apk/res-auto"
  xmlns:tools="http://schemas.android.com/tools"
  android:id="@+id/drawer_layout"
  android:layout_width="match_parent"
  android:layout_height="match_parent"
  android:fitsSystemWindows="true"
  tools:context=".MainActivity">
  <LinearLayout
  android:layout_width="match_parent"
  android:layout_height="match_parent"
  android:orientation="vertical">
  <!-- include your toolbar layout-->
  <include layout="@layout/toolbar" />
  <!-- Let's add fragment -->
  <FrameLayout
  android:id="@+id/frame"
  android:layout_width="match_parent"
  android:layout_height="match_parent" />
  </LinearLayout>
  <!--
  Navigation view to show the menu items
  -->
  <android.support.design.widget.NavigationView
  android:id="@+id/navigation"
  android:layout_width="wrap_content"
  android:layout_height="match_parent"
  android:layout_gravity="start"
  app:menu="@menu/nav_items" />
  </android.support.v4.widget.DrawerLayout>
الخطوة 6: افتح res -> menu -> nav_items.xml وأضف الكود التالي. هنا نحدد عناصر القائمة.
<?xml version="1.0" encoding="utf-8"?>
  <menu xmlns:android="http://schemas.android.com/apk/res/android">
  <group android:checkableBehavior="single">
  <!--
  Add menu items here
  Menu items with icon and Title
  -->
  <item
  android:id="@+id/first"
  android:icon="@mipmap/ic_launcher"
  android:title="First Menu" />
  <item
  android:id="@+id/second"
  android:icon="@mipmap/ic_launcher"
  android:title="Second Menu" />
  <item
  android:id="@+id/third"
  android:icon="@mipmap/ic_launcher"
  android:title="Third Menu" />
  </group>
  </menu>
الخطوة 7: الآن قم بإنشاء تخطيطات xml عن طريق النقر بزر الماوس الأيمن على res / layout -> New -> Layout Resource File وتسميته toolbar.xml
في هذا الملف ، قمنا بتعيين لون الخلفية وزر التنقل والميل لشريط ToolBar .
<?xml version="1.0" encoding="utf-8"?>
  <android.support.v7.widget.Toolbar xmlns:android="http://schemas.android.com/apk/res/android"
  xmlns:app="http://schemas.android.com/apk/res-auto"
  android:id="@+id/toolbar"
  android:layout_width="match_parent"
  android:layout_height="wrap_content"
  android:background="@color/colorPrimary"
  android:theme="@style/ThemeOverlay.AppCompat.Dark"
  app:navigationIcon="@drawable/menu_icon"
  app:title="AbhiAndroid"
  app:titleTextColor="#FFF">
  <!-- navigation button and title for the Toolbar-->
  </android.support.v7.widget.Toolbar>
الخطوة 8: افتح src -> package -> MainActivity.java
في هذه الخطوة ، نفتح MainActivity ونضيف الكود لبدء العروض (DrawerLayout و Toolbar و NavigationView وغيرها من العروض). في هذا ، نستبدل شريط الأدوات الخاص بنا بشريط الأدوات باستخدامطريقة setSupportActionBar () ثم ننفذ حدث setNavigationOnClickListener ونضيف الكود لفتح الدرج عند النقر فوق زر التنقل. بعد ذلك نقوم بتنفيذ حدث setNavigationItemSelectedListener على NavigationView حتى نتمكن من استبدال الأجزاء وفقًا لمعرف عنصر القائمة ويتم عرض رسالة toast بعنوان عنصر القائمة على الشاشة. في هذا ، أضفت تعليقات في الكود لمساعدتك على فهم الكود بسهولة ، لذا اجعلك تقرأ التعليقات.
package abhiandroid.toolbarexample;
  import android.os.Bundle;
  import android.support.design.widget.NavigationView;
  import android.support.v4.app.Fragment;
  import android.support.v4.app.FragmentTransaction;
  import android.support.v4.widget.DrawerLayout;
  import android.support.v7.app.AppCompatActivity;
  import android.support.v7.widget.Toolbar;
  import android.view.Gravity;
  import android.view.MenuItem;
  import android.view.View;
  import android.widget.Toast;
  public class MainActivity extends AppCompatActivity {
  DrawerLayout dLayout;
  @Override
  protected void onCreate(Bundle savedInstanceState) {
  super.onCreate(savedInstanceState);
  setContentView(R.layout.activity_main);
  Toolbar toolbar = (Toolbar) findViewById(R.id.toolbar); // get the reference of Toolbar
  setSupportActionBar(toolbar); // Setting/replace toolbar as the ActionBar

  // implement setNavigationOnClickListener event
  toolbar.setNavigationOnClickListener(new View.OnClickListener() {
  @Override
  public void onClick(View view) {
  dLayout.openDrawer(Gravity.LEFT);
  }
  });
  setNavigationDrawer(); // call method
  }
  private void setNavigationDrawer() {
  dLayout = (DrawerLayout) findViewById(R.id.drawer_layout); // initiate a DrawerLayout
  NavigationView navView = (NavigationView) findViewById(R.id.navigation); // initiate a Navigation View
  // implement setNavigationItemSelectedListener event on NavigationView
  navView.setNavigationItemSelectedListener(new NavigationView.OnNavigationItemSelectedListener() {
  @Override
  public boolean onNavigationItemSelected(MenuItem menuItem) {
  Fragment frag = null; // create a Fragment Object
  int itemId = menuItem.getItemId(); // get selected menu item's id
  // check selected menu item's id and replace a Fragment Accordingly
  if (itemId == R.id.first) {
  frag = new FirstFragment();
  } else if (itemId == R.id.second) {
  frag = new SecondFragment();
  } else if (itemId == R.id.third) {
  frag = new ThirdFragment();
  }
  // display a toast message with menu item's title
  Toast.makeText(getApplicationContext(), menuItem.getTitle(), Toast.LENGTH_SHORT).show();
  if (frag != null) {
  FragmentTransaction transaction = getSupportFragmentManager().beginTransaction();
  transaction.replace(R.id.frame, frag); // replace a Fragment with Frame Layout
  transaction.commit(); // commit the changes
  dLayout.closeDrawers(); // close the all open Drawer Views
  return true;
  }
  return false;
  }
  });
  }
  }
الخطوة 9: نحتاج الآن إلى 3 قطع Fragments و 3 تخطيطات xml. لذا ، قم بإنشاء ثلاثة أجزاء بالنقر بزر الماوس الأيمن على مجلد الحزمة الخاص بك وإنشاء كلاسات وتسميتها باسم FirstFragment و SecondFragment و ThirdFragment وإضافة الكود التالي على التوالي.
FirstFragment.class
package abhiandroid.toolbarexample;
  import android.os.Bundle;
  import android.support.v4.app.Fragment;
  import android.view.LayoutInflater;
  import android.view.View;
  import android.view.ViewGroup;
  public class FirstFragment extends Fragment {
  @Override
  public View onCreateView(LayoutInflater inflater, ViewGroup container,
  Bundle savedInstanceState) {
  // Inflate the layout for this fragment
  return inflater.inflate(R.layout.fragment_first, container, false);
  }
  }
SecondFragment.class
package abhiandroid.toolbarexample;
  import android.os.Bundle;
  import android.support.v4.app.Fragment;
  import android.view.LayoutInflater;
  import android.view.View;
  import android.view.ViewGroup;
  public class SecondFragment extends Fragment {
  @Override
  public View onCreateView(LayoutInflater inflater, ViewGroup container,
  Bundle savedInstanceState) {
  // Inflate the layout for this fragment
  return inflater.inflate(R.layout.fragment_second, container, false);
  }
  }
ThirdFrament.class
package abhiandroid.toolbarexample;
  import android.os.Bundle;
  import android.support.v4.app.Fragment;
  import android.view.LayoutInflater;
  import android.view.View;
  import android.view.ViewGroup;
  public class ThirdFragment extends Fragment {
  @Override
  public View onCreateView(LayoutInflater inflater, ViewGroup container,
  Bundle savedInstanceState) {
  // Inflate the layout for this fragment
  return inflater.inflate(R.layout.fragment_third, container, false);
  }
  }
الخطوة 10: الآن قم بإنشاء 3 تخطيطات xml عن طريق النقر بزر الماوس الأيمن على res / layout -> New -> Layout Resource File وقم بتسميتها باسم fragment_first، fragment_ second and fragment_third وأضف الكود التالي في الملفات المعنية.
سنقوم هنا بتصميم واجهة المستخدم البسيطة الأساسية باستخدام TextView في جميع ملفات xml.
fragment_first.xml
<FrameLayout xmlns:android="http://schemas.android.com/apk/res/android"
  xmlns:tools="http://schemas.android.com/tools"
  android:layout_width="match_parent"
  android:layout_height="match_parent"
  tools:context="abhiandroid.toolbarexample.FirstFragment">
  <TextView
  android:layout_width="match_parent"
  android:layout_height="match_parent"
  android:gravity="center"
  android:text="First Fragment"
  android:textSize="25sp" />
  </FrameLayout>
fragment_second.xml
<FrameLayout xmlns:android="http://schemas.android.com/apk/res/android"
  xmlns:tools="http://schemas.android.com/tools"
  android:layout_width="match_parent"
  android:layout_height="match_parent"
  tools:context="abhiandroid.toolbarexample.SecondFragment">
  <TextView
  android:layout_width="match_parent"
  android:layout_height="match_parent"
  android:gravity="center"
  android:text="Second Fragment"
  android:textSize="25sp" />
  </FrameLayout>
fragment_third.xml
<FrameLayout xmlns:android="http://schemas.android.com/apk/res/android"
  xmlns:tools="http://schemas.android.com/tools"
  android:layout_width="match_parent"
  android:layout_height="match_parent"
  tools:context="abhiandroid.toolbarexample.ThirdFragment">
  <TextView
  android:layout_width="match_parent"
  android:layout_height="match_parent"
  android:gravity="center"
  android:text="Third Fragment"
  android:textSize="25sp" />
  </FrameLayout>
المخرج :
الآن قم بتشغيل التطبيق وسترى رمز القائمة ونص "AbhiAndroid" مكتوب في الجزء العلوي والذي تم إنشاؤه باستخدام شريط الأدوات. انقر الآن على القائمة وسيتم عرض ثلاثة عناصر بداخلها. الآن انقر فوق أي منها وسيتم فتح تخطيط المقابلة لها.
مثال 2 على شريط ToolBar في Android Studio
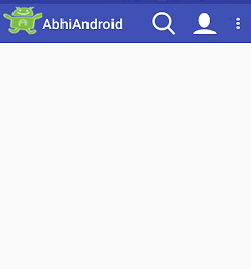
يوجد أدناه مثال بسيط لشريط الأدوات ToolBar حيث نقوم بإنشاء شريط ToolBar واستبداله بـ ActionBar الخاص بنا. في هذا المثال قمنا بتعيين الشعار والعنوان والقائمة لشريط الأدوات. في تخطيطنا الرئيسي ، نقوم بإنشاء شريط أدوات وفي النشاط نحصل على مرجع شريط الأدوات وقم بتعيين العنوان والشعار عليه. في هذا نستخدم طريقة تجاوز النشاط onCreateOptionsMenu لتعيين عناصر القائمة من ملف القائمة و onOptionsItemSelected لتعيين مستمعات النقر على عناصر القائمة. عند النقر فوق عنصر القائمة ، يتم عرض عنوان القائمة على الشاشة بمساعدة Toast.
الخطوة 1: قم بإنشاء مشروع جديد وقم بتسميته SimpleToolbarExample.
الخطوة 2: افتح ملف البناء Gradle> إذا كنت تستخدم أحدث إصدار من Android Studio ، فلن تحتاج إلى إضافة تبعية مجمعة لمكتبة Appcombat v7 21 إذا لم يكن الأمر كذلك ، فالرجاء التأكد من إضافة السطر أدناه في ملف بناء gradel الخاصة بك.
apply plugin: 'com.android.application'
  android {
  compileSdkVersion 24
  buildToolsVersion "24.0.1"
  defaultConfig {
  applicationId "abhiandroid.com.simpletoolbarexample"
  minSdkVersion 16
  targetSdkVersion 24
  versionCode 1
  versionName "1.0"
  }
  buildTypes {
  release {
  minifyEnabled false
  proguardFiles getDefaultProguardFile('proguard-android.txt'), 'proguard-rules.pro'
  }
  }
  }
  dependencies {
  compile fileTree(dir: 'libs', include: ['*.jar'])
  testCompile 'junit:junit:4.12'
  compile 'com.android.support:appcompat-v7:24.1.1'
  }
الخطوة 3: يتم استبدال أشرطة الإجراءات بشريط الأدوات ToolBar حتى لا يزال بإمكاننا استخدام شريط الإجراءات ولكن في مثالنا سنقوم بإنشاء شريط أدوات ToolBar ، لذا انتقل إلى ملف style.xml وقم بتغيير سمه الثيم إلى "Theme.AppCompat.Light.NoActionBar" هذا الثيم يساعدنا نتخلص من ActionBar حتى نتمكن من إنشاء شريط أدوات.
<resources>
  <!-- Base application theme. -->
  <style name="AppTheme" parent="Theme.AppCompat.Light.NoActionBar">
  <!-- Customize your theme here. -->
  <item name="colorPrimary">@color/colorPrimary</item>
  <item name="colorPrimaryDark">@color/colorPrimaryDark</item>
  <item name="colorAccent">@color/colorAccent</item>
  </style>
  </resources>
الخطوة 4: الآن دعنا نتحدث عن نظام الألوان لتطبيقنا. افتح ملف color.xml الخاص بك من مجلد القيم. في ملف XML هذا ، يكون colorPrimary هو اللون الأساسي للتطبيق ولون colorPrimaryDark هو لون شريط الحالة. يمكننا بسهولة تغيير ألواننا من هذا الملف.
<?xml version="1.0" encoding="utf-8"?>
  <resources>
  <color name="colorPrimary">#3F51B5</color>
  <color name="colorPrimaryDark">#303F9F</color>
  <color name="colorAccent">#FF4081</color>
  </resources>
الخطوة 5: افتح res -> layout -> activity_main.xml (أو) main.xml وأضف الكود التالي:
في هذه الخطوة نحدد شريط الأدوات ToolBar في ملف XML الرئيسي لديناونضبطلون الخلفية وموضوعها.
<?xml version="1.0" encoding="utf-8"?>
  <RelativeLayout xmlns:android="http://schemas.android.com/apk/res/android"
  xmlns:tools="http://schemas.android.com/tools"
  android:layout_width="match_parent"
  android:layout_height="match_parent"
  tools:context="abhiandroid.com.simpletoolbarexample.MainActivity">
  <android.support.v7.widget.Toolbar
  android:id="@+id/toolbar"
  android:layout_width="match_parent"
  android:layout_height="wrap_content"
  android:background="@color/colorPrimary"
  android:theme="@style/ThemeOverlay.AppCompat.Dark" />
  </RelativeLayout>
الخطوة 6: افتح res -> menu -> menu_main.xml وأضف الكود التالي:
في هذه الخطوة ، نقوم بإنشاء 3 عناصر قائمة سيتم عرضها على شريط الأدوات ToolBar .
<menu xmlns:android="http://schemas.android.com/apk/res/android"
  xmlns:app="http://schemas.android.com/apk/res-auto"
  xmlns:tools="http://schemas.android.com/tools"
  tools:context=".MainActivity">
  <!--
  Menu item's that displayed on Toolbar.
  -->
  <item
  android:id="@+id/action_settings"
  android:orderInCategory="100"
  android:title="@string/action_settings"
  app:showAsAction="never" />
  <item
  android:id="@+id/action_search"
  android:icon="@drawable/ic_search"
  android:orderInCategory="200"
  android:title="Search"
  app:showAsAction="ifRoom" />
  <item
  android:id="@+id/action_user"
  android:icon="@drawable/user"
  android:orderInCategory="300"
  android:title="User"
  app:showAsAction="ifRoom" />
  </menu>
الخطوة 7: افتح src -> package -> MainActivity.java
في هذه الخطوة ، نفتح MainActivity ونضيف الكود لبدء شريط الأدوات ToolBar .. في هذا نستبدل ActionBar بشريط الأدوات ToolBar الخاص بنا باستخدام طريقة setSupportActionBar () وقم أيضًا بتعيين tiltle وشعار شريط الأدوات. بعد ذلك نقوم بتنفيذ أسلوب تجاوز النشاط onCreateOptionsMenu لتعيين عناصر القائمة من ملف القائمة و onOptionsItemSelected لضبط مستمعي النقرات على عناصر القائمة. عند النقر فوق عنصر القائمة ، يتم عرض ميل القائمة على الشاشة بمساعدة Toast. في هذا ، أضفت تعليقات في الكود لمساعدتك على فهم الكود بسهولة ، لذا تأكد من قراءة التعليقات.
package abhiandroid.com.simpletoolbarexample;
  import android.os.Bundle;
  import android.support.v7.app.AppCompatActivity;
  import android.support.v7.widget.Toolbar;
  import android.view.Menu;
  import android.view.MenuItem;
  import android.widget.Toast;
  public class MainActivity extends AppCompatActivity {
  @Override
  protected void onCreate(Bundle savedInstanceState) {
  super.onCreate(savedInstanceState);
  setContentView(R.layout.activity_main);
  Toolbar toolbar = (Toolbar) findViewById(R.id.toolbar); // get the reference of Toolbar
  toolbar.setTitle("AbhiAndroid"); // set Title for Toolbar
  toolbar.setLogo(R.drawable.android); // set logo for Toolbar
  setSupportActionBar(toolbar); // Setting/replace toolbar as the ActionBar
  }
  // Activity's overrided method used to set the menu file
  @Override
  public boolean onCreateOptionsMenu(Menu menu) {
  // Inflate the menu; this adds items to the action bar if it is present.
  getMenuInflater().inflate(R.menu.menu_main, menu);
  return true;
  }
  // Activity's overrided method used to perform click events on menu items
  @Override
  public boolean onOptionsItemSelected(MenuItem item) {
  // Handle action bar item clicks here. The action bar will
  // automatically handle clicks on the Home/Up button, so long
  // as you specify a parent activity in AndroidManifest.xml.
  int id = item.getItemId();
  //noinspection SimplifiableIfStatement
  // Display menu item's title by using a Toast.
  if (id == R.id.action_settings) {
  Toast.makeText(getApplicationContext(), "Setting Menu", Toast.LENGTH_SHORT).show();
  return true;
  } else if (id == R.id.action_search) {
  Toast.makeText(getApplicationContext(), "Search Menu", Toast.LENGTH_SHORT).show();
  return true;
  } else if (id == R.id.action_user) {
  Toast.makeText(getApplicationContext(), "User Menu", Toast.LENGTH_SHORT).show();
  return true;
  }
  return super.onOptionsItemSelected(item);
  }
  }
المخرجات :
الآن قم بتشغيل التطبيق وسترى شريط الأدوات ToolBar في الأعلى. انقر فوقه وسيتم عرض الرسالة التي تم إنشاؤها باستخدام Toast.