شرح TextInputLayout / Floating Labels In EditText مع مثال في Android Studio
TextInputLayout هو عنصر جديد تم تقديمه في مكتبة Design Support لعرض التسمية العائمة في EditText . لعرض تسمية عائمة في EditText ، يحتاج TextInputLayout إلى التفاف EditText. يمكننا أيضًا عرض رسالة الخطأ على EditText باستخدام أساليب setError () و setErrorEnabled (). يأخذ قيمة التلميح المعينة إلى EditText ويعرضها كتسمية عائمة. قدمت مكتبة Design Support بعض الأدوات الجديدة المهمة التي تساعدنا على إنشاء واجهة مستخدم متسقة.

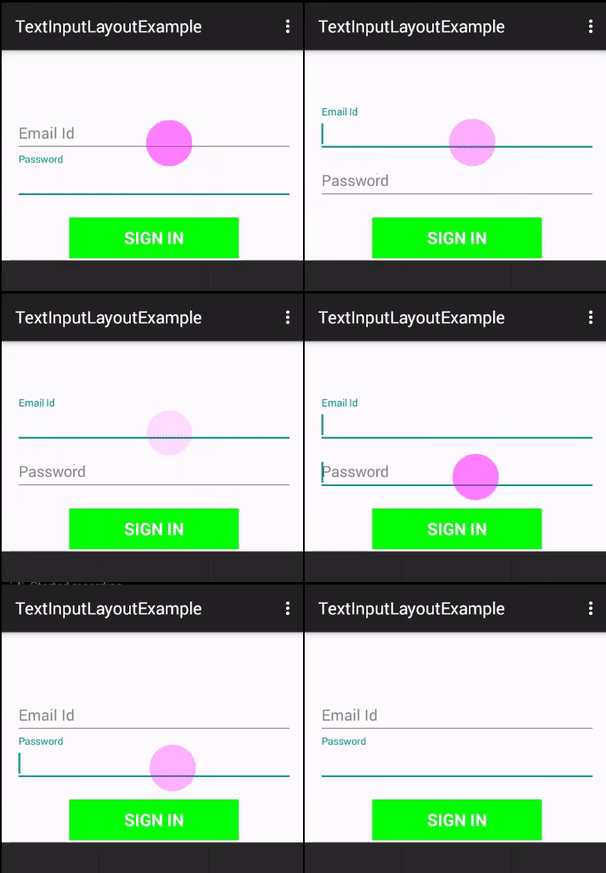
Floating Labels : تم تقديم Floating Labels لأول مرة في مكتبة دعم تصميم Design Support لعرض التسمية العائمة فوقEditText. أولاً ، يعمل كتلميح في EditText عندما يكون الحقل فارغًا. بعد ذلك ، عندما يبدأ المستخدم في إدخال النص ، يبدأ في الحركة بالانتقال إلى موضع التسمية العائم.
ملاحظة خاصة: في نظام Android ، يعد تحرير النص أحد أبسط عناصر واجهة المستخدم أو عناصر واجهة المستخدم. يتم استخدامه بشكل عام لأخذ أي نوع من المدخلات من المستخدم ولكن ما ينقصه هو التسمية المرفقة به. لذلك تم استخدام التلميح في معظم عمليات التنفيذ كتسمية لـ EditText. منذ وقت إصدار تصميم المواد ، تم تقديم مفهوم جديد للملصقات العائمة. في هذا المفهوم ، أظهر التسمية في البداية كتلميح وعندما يقوم المستخدم بإدخال قيمة في EditText ينتقل هذا التلميح إلى أعلى EditText كتسمية عائمة floating label.
جدول المحتويات
كود XML TextInputLayout الأساسي
<android.support.design.widget.TextInputLayout
  android:id="@+id/simpleTextInputLayout"
  android:layout_width="wrap_content"
  android:layout_height="wrap_content">

  <EditText
  android:id="@+id/simpleEditText"
  android:layout_width="wrap_content"
  android:layout_height="wrap_content"
  android:hint="Enter Your Name" />
  </android.support.design.widget.TextInputLayout>
طرق مهمة لتخطيط إدخال النص TextInputLayout :
دعنا نناقش بعض الطرق المهمة لـ TextInputLayout التي قد يتم استدعاؤها من أجل إدارة TextInputLayout.
1. setError ( CharSequenceerror): تُستخدم هذه الطريقة لتعيين رسالة خطأ سيتم عرضها أسفل نص EditText الخاص بنا. في هذه الطريقة ، قمنا بتعيين قيمة CharSequence لرسالة الخطأ.
أدناه قمنا بتعيين رسالة الخطأ التي سيتم عرضها أسفل نص التحرير الخاص بنا.
TextInputLayout simpleTextInputLayout = (TextInputLayout) findViewById(R.id.simpleTextInputLayout); // get the reference of TextInputLayout
  simpleTextInputLayout.setError("Please Check Field"); // set the error message that will be displayed below our EditText
2. getError (): تُستخدم هذه الطريقة للحصول على رسالة الخطأ التي تم تعيينها ليتم عرضها باستخدام setError (CharSequence). يتم إرجاعه فارغًا إذا لم يتم تعيين أي خطأ أو لم يتم تمكين عرض الخطأ. تقوم هذه الطريقة بإرجاع قيمة نوع CharSequence.
أدناه قمنا أولاً بتعيين الخطأ ثم نحصل على رسالة الخطأ التي تم تعيينها للعرض باستخدام طريقة setError (CharSequence).
TextInputLayout simpleTextInputLayout = (TextInputLayout) findViewById(R.id.simpleTextInputLayout); // get the reference of TextInputLayout
  simpleTextInputLayout.setError("Please Check Field"); // set the error message that will be displayed below our EditText
  CharSequence errorMessage=simpleTextInputLayout.getError(); // get the error message that was set to be displayed using setError(CharSequence) method.
3. setErrorEnabled ( boolean enabled): تُستخدم هذه الطريقة لتعيين ما إذا كانت وظيفة الخطأ ممكنة أم لا في هذا التخطيط. قمنا بتعيين صواب لوظيفة الخطأ الممكّنة والخطأ المعطلة.
أدناه قمنا بتعيين القيمة الحقيقية التي مكنت وظيفة الخطأ.
TextInputLayout simpleTextInputLayout = (TextInputLayout) findViewById(R.id.simpleTextInputLayout); // get the reference of TextInputLayout
  simpleTextInputLayout.setErrorEnabled(true); // set the true value that enabled the error functionality
4. isErrorEnabled (): تُستخدم هذه الطريقة للتحقق مما إذا كانت وظيفة الخطأ ممكّنة أم لا في هذا التخطيط. تُرجع هذه الطريقة قيمة النوع المنطقي التي قمنا بتعيينها باستخدام طريقة setErrorEnabled ( boolean enabled).
أدناه قمنا أولاً بتمكين وظيفة الخطأ ثم تحقق مما إذا كانت وظيفة الخطأ ممكّنة أم لا.
TextInputLayout simpleTextInputLayout = (TextInputLayout) findViewById(R.id.simpleTextInputLayout); // get the reference of TextInputLayout
  simpleTextInputLayout.setErrorEnabled(true); // set the true value that enabled the error functionality
  Boolean isEnabled = simpleTextInputLayout.isErrorEnabled(); // check whether the error functionality is enabled or not
5. setHint ( CharSequence hint): تُستخدم هذه الطريقة لتعيين التلميح ليتم عرضه في التسمية العائمة ، إذا تم تمكينه. في هذه الطريقة ، قمنا بتعيين قيمة CharSequence لعرض التلميح.
أدناه قمنا بتعيين التلميح ليتم عرضه في التسمية العائمة.
TextInputLayout simpleTextInputLayout = (TextInputLayout) findViewById(R.id.simpleTextInputLayout); // get the reference of TextInputLayout
  simpleTextInputLayout.setHint("Enter UserName"); // set the hint to be displayed in the floating label.
6. getHint (): تُستخدم هذه الطريقة للحصول على التلميح الذي يتم عرضه في الملصق العائم ، إذا تم تمكينه. تقوم هذه الطريقة بإرجاع قيمة نوع CharSequence.
أدناه قمنا بتعيين التلميح ثم نحصل على التلميح الذي يتم عرضه في التسمية العائمة
TextInputLayout simpleTextInputLayout = (TextInputLayout) findViewById(R.id.simpleTextInputLayout); // get the reference of TextInputLayout
  simpleTextInputLayout.setHint("Enter UserName"); // set the hint to be displayed in the floating label.
  CharSequence hintValue = simpleTextInputLayout.getHint(); // get the hint which is displayed in the floating label
7. setCounterMaxLength (int maxLength): تُستخدم هذه الطريقة لتعيين أقصى قيمة طول لعرضها عند عداد الأحرف. في هذه الطريقة نقوم بتمرير قيمة نوع int لتحديد أقصى قيمة طول.
أدناه قمنا بتعيين الحد الأقصى لقيمة الطول لعرضها في عداد الأحرف.
TextInputLayout simpleTextInputLayout = (TextInputLayout) findViewById(R.id.simpleTextInputLayout); // get the reference of TextInputLayout
  simpleTextInputLayout.setCounterMaxLength(10); // set 10 max length value to display at the character counter
8. getCounterMaxLength (): تستخدم هذه الطريقة للحصول على الحد الأقصى للطول الموضح في عداد الأحرف. ترجع هذه الطريقة قيمة نوع int التي قمنا بتعيينها من خلال طريقة setCounterMaxLength (int maxLength).
أدناه ، قمنا أولاً بتعيين الحد الأقصى لقيمة الطول ثم نحصل على الحد الأقصى لقيمة الطول التي تظهر في عداد الأحرف.
TextInputLayout simpleTextInputLayout = (TextInputLayout) findViewById(R.id.simpleTextInputLayout); // get the reference of TextInputLayout
  simpleTextInputLayout.setCounterMaxLength(10); // set 10 max length value to display at the character counter
  int maxLengthValue= simpleTextInputLayout.getCounterMaxLength(); // get the max length value that shown at the character counter.
9. setCounterEnabled ( boolean enabled): تُستخدم هذه الطريقة لتعيين ما إذا كانت وظيفة عداد الأحرف ممكّنة أم لا في هذا التخطيط. . قمنا بتعيين صواب لـ ممكّن وخطأ لتعطيل وظيفة العداد.
أدناه قمنا بتعيين القيمة الحقيقية التي مكنت وظيفة العداد في هذا التخطيط.
TextInputLayout simpleTextInputLayout = (TextInputLayout) findViewById(R.id.simpleTextInputLayout); // get the reference of TextInputLayout
  simpleTextInputLayout.setCounterEnabled(true); // set the true value that enabled the counter functionality in this layout
10. setTypeface ( Typeface typeface): تُستخدم هذه الطريقة لتعيين المحرف لاستخدامه في كل من التلميح الموسع والعائم.
أدناه قمنا بتعيين محرف Sans - Serif لاستخدامه في التلميح الموسع والعائم.
TextInputLayout simpleTextInputLayout = (TextInputLayout) findViewById(R.id.simpleTextInputLayout); // get the reference of TextInputLayout
  simpleTextInputLayout.setTypeface(Typeface.SANS_SERIF); // set Sans - Serif typeface to use for the expanded and floating hint.
11. getTypeface (): تُستخدم هذه الطريقة للحصول على المحرف المستخدم لكل من التلميح الموسع والعائم. تقوم هذه الطريقة بإرجاع قيمة نوع Typeface التي قمنا بتعيينها باستخدام طريقة setTypeface (محرف محرف).
أدناه قمنا أولاً بتعيين محرف Sans - Serif ثم نحصل على المحرف المستخدم لكل من التلميح الموسع والعائم.
TextInputLayout simpleTextInputLayout = (TextInputLayout) findViewById(R.id.simpleTextInputLayout); // get the reference of TextInputLayout
  simpleTextInputLayout.setTypeface(Typeface.SANS_SERIF); // set Sans - Serif typeface to use for the expanded and floating hint.
  Typeface typeface = simpleTextInputLayout.getTypeface(); // get the typeface used for both the expanded and floating hint.
سمات وخصائص TextInputLayouts
الآن دعنا نناقش بعض السمات الشائعة لـ TextInputLayout التي تساعدنا على تكوينها في تخطيطنا (xml).
1. support.design:counterMaxLength: تُستخدم هذه السمة لتعيين الحد الأقصى للطول لعرضه في عداد الأحرف. في هذه السمة قمنا بتعيين قيمة نوع int لتعيين أقصى قيمة طول. يمكننا أيضًا القيام بذلك برمجيًا باستخدام طريقة setCounterMaxLength (int maxLength).
أدناه قمنا بتعيين الحد الأقصى لقيمة الطول لعرضها في عداد الأحرف.
<android.support.design.widget.TextInputLayout
  android:id="@+id/simpleTextInputLayout"
  android:layout_width="match_parent"
  android:layout_height="wrap_content"
  android.support.design:counterMaxLength="10">

  <EditText
  android:id="@+id/simpleEditText"
  android:layout_width="match_parent"
  android:layout_height="wrap_content"
  android:hint="Enter Your Name" />
  </android.support.design.widget.TextInputLayout>

  <!--   we set the max length value to display at the character counter -->
2. support.design:counterEnabled: تُستخدم هذه السمة لتعيين ما إذا كانت وظيفة عداد الأحرف ممكّنة أم لا في هذا التخطيط. قمنا بتعيين صواب لـ ممكّن وخطأ لتعطيل وظيفة العداد. يمكننا أيضًا القيام بذلك برمجيًا باستخدام طريقة setCounterEnabled (تمكين منطقي).
أدناه قمنا بتعيين القيمة الحقيقية التي مكنت وظيفة العداد في هذا التخطيط.
<android.support.design.widget.TextInputLayout
  android:id="@+id/simpleTextInputLayout"
  android:layout_width="match_parent"
  android:layout_height="wrap_content"
  android.support.design:counterEnabled="true"
  android.support.design:counterMaxLength="10">

  <EditText
  android:id="@+id/simpleEditText"
  android:layout_width="match_parent"
  android:layout_height="wrap_content"
  android:hint="Enter Your Name" />
  </android.support.design.widget.TextInputLayout>
  <!-- set the true value that enabled the counter functionality in this layout-->
3. support.design :errorEnabled: تُستخدم هذه السمة لتعيين ما إذا كانت وظيفة الخطأ ممكنة أم لا في هذا التخطيط. قمنا بتعيين صواب لوظيفة الخطأ الممكّنة والخطأ المعطلة. يمكننا أيضًا القيام بذلك برمجيًا باستخدام طريقة setErrorEnabled (تمكين منطقي).
أدناه قمنا بتعيين القيمة الحقيقية التي مكنت وظيفة الخطأ.
<android.support.design.widget.TextInputLayout
  android:id="@+id/simpleTextInputLayout"
  android:layout_width="match_parent"
  android:layout_height="wrap_content"
  android.support.design:counterEnabled="true"
  android.support.design:errorEnabled="true">

  <EditText
  android:id="@+id/simpleEditText"
  android:layout_width="match_parent"
  android:layout_height="wrap_content"
  android:hint="Enter Your Name" />
  </android.support.design.widget.TextInputLayout>
  <!-- set the true value that enabled the error functionality in this layout-->
4. android:hint : تُستخدم هذه السمة لتعيين التلميح ليتم عرضه في التسمية العائمة. يمكننا أيضًا تعيين تلميح برمجيًا باستخدام طريقة setHint (تلميح CharSequence).
أدناه قمنا بتعيين التلميح ليتم عرضه في التسمية العائمة.
<android.support.design.widget.TextInputLayout
  android:id="@+id/simpleTextInputLayout"
  android:layout_width="match_parent"
  android:layout_height="wrap_content"
  android:hint="User Name">

  <EditText
  android:id="@+id/simpleEditText"
  android:layout_width="match_parent"
  android:layout_height="wrap_content" />
  </android.support.design.widget.TextInputLayout>
  <!-- set the hint to be displayed in the floating label-->
مثال TextInputLayout/ Floating Labels في EditText في Android Studio
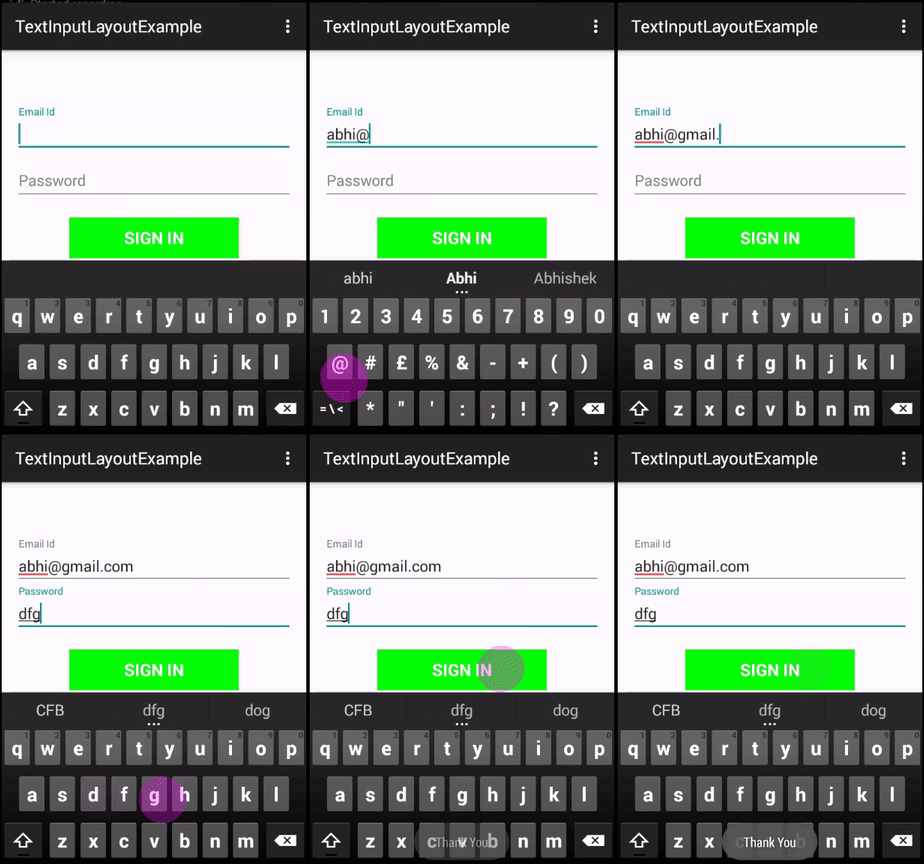
يوجد أدناه مثال لإظهار استخدام TextInputLayout حيث نقوم بإنشاء نموذج تسجيل دخول مع تسميات عائمة floating labels وتمكين عمليات التحقق من صحة الإدخال ورسائل الخطأ. في هذا ، نعرض أيضًا زر تسجيل الدخول وننفذ حدث النقر عليه ، لذلك كلما نقر المستخدم على الزر ، نتحقق من الحقول وإذا كان الحقل فارغًا ، فإننا نعرض رسالة الخطأ وإلا فإننا نعرض رسالة "شكرًا لك" باستخدام Toast.

الخطوة 1: قم بإنشاء مشروع جديد وقم بتسميته TextInputLayoutExample
الخطوة 2: افتح Scripts Gradle> build.gradle وأضف تبعية مكتبة دعم التصميم Design Support
apply plugin: 'com.android.application'

  android {
  compileSdkVersion 23
  buildToolsVersion "23.0.2"

  defaultConfig {
  applicationId "example.abhiandroid.textinputlayoutexample"
  minSdkVersion 15
  targetSdkVersion 23
  versionCode 1
  versionName "1.0"
  }
  buildTypes {
  release {
  minifyEnabled false
  proguardFiles getDefaultProguardFile('proguard-android.txt'), 'proguard-rules.pro'
  }
  }
  }

  dependencies {
  compile fileTree(dir: 'libs', include: ['*.jar'])
  compile 'com.android.support:appcompat-v7:23.1.1'
  compile 'com.android.support:design:23.1.0' // design support library

  }
الخطوة 3: افتح res -> layout -> activity_main.xml (أو) main.xml وأضف الكود التالي:
<LinearLayout xmlns:android="http://schemas.android.com/apk/res/android"
  xmlns:android.support.design="http://schemas.android.com/apk/res-auto"
  xmlns:tools="http://schemas.android.com/tools"
  android:layout_width="match_parent"
  android:layout_height="match_parent"
  android:orientation="vertical"
  android:paddingBottom="@dimen/activity_vertical_margin"
  android:paddingLeft="@dimen/activity_horizontal_margin"
  android:paddingRight="@dimen/activity_horizontal_margin"
  android:paddingTop="@dimen/activity_vertical_margin"
  tools:context=".MainActivity">
  <!-- first TextInputLayout -->
  <android.support.design.widget.TextInputLayout
  android:id="@+id/emailTextInputLayout"
  android:layout_width="match_parent"
  android:layout_height="wrap_content"
  android:layout_marginTop="50dp"
  android.support.design:counterMaxLength="3">

  <EditText
  android:id="@+id/emailEditText"
  android:layout_width="match_parent"
  android:layout_height="wrap_content"
  android:hint="Email Id" />
  </android.support.design.widget.TextInputLayout>
  <!-- first TextInputLayout -->

  <android.support.design.widget.TextInputLayout
  android:id="@+id/passwordTextInputLayout"
  android:layout_width="match_parent"
  android:layout_height="wrap_content"
  android:hint="Password">

  <EditText
  android:id="@+id/passwordEditText"
  android:layout_width="match_parent"
  android:layout_height="wrap_content" />
  </android.support.design.widget.TextInputLayout>
  <!-- sign In Button -->
  <Button
  android:id="@+id/signInButton"
  android:layout_width="200dp"
  android:layout_height="wrap_content"
  android:layout_gravity="center"
  android:layout_marginTop="20dp"
  android:background="#0f0"
  android:text="Sign In"
  android:textColor="#FFF"
  android:textSize="20sp"
  android:textStyle="bold" />
  </LinearLayout>
الخطوة 4: افتح src -> package -> MainActivity.java
في هذه الخطوة نفتح MainActivity ونضيف الكود لبدء العروض (TextInputLayout وطرق أخرى). بعد ذلك نقوم بتنفيذ حدث النقر فوق الزر ، لذلك عندما يقوم المستخدم بالنقر فوق الزر ، نتحقق من الحقول وإذا كان الحقل فارغًا ، فإننا نعرض رسالة الخطأ وإلا فإننا نعرض رسالة "شكرًا لك" باستخدام Toast.
package example.abhiandroid.textinputlayoutexample;

  import android.graphics.Typeface;
  import android.support.design.widget.TextInputLayout;
  import android.support.v7.app.AppCompatActivity;
  import android.os.Bundle;
  import android.view.View;
  import android.widget.EditText;
  import android.widget.Button;
  import android.widget.Toast;

  public class MainActivity extends AppCompatActivity {

  TextInputLayout emailTextInputLayout, passwordTextInputLayout;
  EditText email, password;
  Button signIn;

  @Override
  protected void onCreate(Bundle savedInstanceState) {
  super.onCreate(savedInstanceState);
  setContentView(R.layout.activity_main);
  // get the reference of View's
  emailTextInputLayout = (TextInputLayout) findViewById(R.id.emailTextInputLayout);
  passwordTextInputLayout = (TextInputLayout) findViewById(R.id.passwordTextInputLayout);
  email = (EditText) findViewById(R.id.emailEditText);
  password = (EditText) findViewById(R.id.passwordEditText);
  signIn = (Button) findViewById(R.id.signInButton);
  // perform click event on sign In Button
  signIn.setOnClickListener(new View.OnClickListener() {
  @Override
  public void onClick(View v) {
  if (validate(email, emailTextInputLayout) && validate(password, passwordTextInputLayout)) {
  //  display a Thank You message
  Toast.makeText(getApplicationContext(), "Thank You", Toast.LENGTH_LONG).show();

  }
  }
  });
  }

  // validate fields
  private boolean validate(EditText editText, TextInputLayout textInputLayout) {
  if (editText.getText().toString().trim().length() > 0) {
  return true;
  }
  editText.requestFocus(); // set focus on fields
  textInputLayout.setError("Please Fill This.!!!"); // set error message
  return false;
  }
  }
المخرجات :
الآن قم بتشغيل التطبيق وسترى نموذج تسجيل الدخول على الشاشة. انقر فوق البريد الإلكتروني وكلمة المرور وسترى نص التسمية عائمًا ويبدو جميلًا.
