برنامج PercentRelativeLayout التعليمي مع مثال في Android Studio
تُعد PercentRelativeLayout في Android فئة فرعية من RelativeLayout التي تدعم الهامش المستند إلى النسبة المئوية وأبعاد طرق العرض (الزر أو عرض النص أو أي طريقة عرض أخرى).

مكتبة دعم النسبة المئوية: توفر مكتبة الدعم المئوية ميزة لتعيين الأبعاد والهوامش في مصطلح النسبة المئوية. يحتوي على اثنين من التخطيطات المبنية مسبقًا - PercentRelativeLayout و PercentFrameLayout . ركزنا في هذه المقالة على PercentRelativeLayout. هذه المكتبة سهلة الاستخدام لأنها تحتوي على نفس النسق النسبي وتخطيط الإطار الذي نعرفه ، فقط مع بعض الوظائف الإضافية الجديدة.
ملاحظة مهمة - لاستخدام النسبة المئوية ، تحتاج إلى إضافة تبعية مكتبة الدعم في المئة في ملف build.gradle.
نصوص Gradle> build.gradle (الوحدة: التطبيق) -> التبعيات الداخلية
compile 'com.android.support:percent:23.3.0' // Percent Support Library
جدول المحتويات
PercentRelativeLayout مقابل التخطيط النسبي في Android:
تمتد فئة PercentRelativeLayout من فئة النسق النسبي لذا فهي تدعم جميع الميزات والسمات الخاصة بـ RelativeLayout ولها أبعاد نسبية لذا فهي تدعم أيضًا بعض ميزات LinearLayout. بكلمات بسيطة يمكننا القول أن PercentRelativeLayout يحتوي على ميزات لكلا التخطيطين مع تقليل تعقيد العرض.
الحاجة إلى PercentRelativeLayout في Android
يوجد في Android الكثير من التخطيطات التي يمكن استخدامها في وقت التطوير ولكن أخيرًا ننتهي دائمًا بتخطيطاتنا الرئيسية الثلاثة: Linear Layout و Relative Layout و FrameLayout. في حالة ما إذا كنا بحاجة إلى إنشاء عرض معقد ، فإننا نستخدم خاصية الوزن في LinearLayout لتوزيع العرض عبر الشاشات. ولكن أثناء استخدام خاصية الوزن ، يجب أن نكون قد لاحظنا أنه يتعين علينا إضافة عرض حاوية افتراضي لتغليف عرض الطفل الخاص بنا. يمكننا اتباع هذا النهج ولكنه يضيف عرضًا هرميًا إضافيًا في التخطيط الخاص بنا والذي لا فائدة منه باستثناء الاحتفاظ بقيمة مجموع الوزن والعرض الفرعي. بعد تقديم PercentRelativeLayout يمكننا وضع أبعاد وهوامش النسبة المئوية في وجهة نظرنا التي تساعدنا على إزالة مشكلة RelativeLayout الحالية.
وصف قصير حول RelativeLayout:
النسق النسبي هو تخطيط مرن للغاية يستخدم في نظام أندرويد لتصميم التخطيط المخصص. إنه يمنحنا المرونة في وضع مكوناتنا بناءً على موضع المكون النسبي أو الشقيق. فقط لأنه يسمح لنا بوضع المكون في أي مكان نريد لذلك يعتبر التخطيط الأكثر مرونة. للسبب نفسه ، يعد التخطيط النسبي هو التخطيط الأكثر استخدامًا بعد التخطيط الخطي في Android. يسمح بعرضها الفرعي لوضعها بالنسبة لبعضها البعض أو بالنسبة للحاوية أو حاوية أخرى. يمكنك قراءة البرنامج التعليمي الكامل حول التخطيط النسبي .
ملاحظة مهمة: في PercentRelativeLayout ، ليس من الضروري تحديد سمات layout_width و layout_height إذا حددنا سمة layout_widthPercent. إذا كنا نريد أن يكون العرض قادرًا على شغل مساحة أكبر مما تسمح به النسبة المئوية ، فيمكننا إضافة سمات layout_width و layout_height مع قيمة wrap_content. في هذه الحالة ، إذا كان حجم المحتوى أكبر من حجم النسبة المئوية ، فسيتم تغيير حجمه تلقائيًا باستخدام قاعدة wrap_content. إذا لم نستخدم سمة layout_height و layout_width ، فسيظهر لنا android studio علامة خطأ على عنصر في المحرر ولكن سيتم تجاهله تلقائيًا في وقت التشغيل.
رمز XML PercentRelativeLayout الأساسي:
<?xml version="1.0" encoding="utf-8"?>
  <android.support.percent.PercentRelativeLayout xmlns:android="http://schemas.android.com/apk/res/android"
  android:layout_width="match_parent"
  android:layout_height="match_parent">
  <!-- Add Child View's Here... -->
  </android.support.percent.PercentRelativeLayout>
سمات وخصائص PercentRelativeLayout
الآن دعونا نناقش بعض السمات المشتركة لـ PercentRelativeLayout التي تساعدنا على تكوينها في تخطيطنا (xml). إنه يدعم جميع سمات RelativeLayout ولكننا هنا نناقش فقط بعض السمات الإضافية.
ملاحظة مهمة جدًا: قبل استخدام الكود أدناه ، تأكد من إضافة تبعية مكتبة الدعم في المئة في ملف build.gradle في التبعيات.
نصوص Gradle> build.gradle (الوحدة: التطبيق) -> التبعيات الداخلية
compile 'com.android.support:percent:23.3.0' // Percent Support Library
- layout_widthPercent: تُستخدم هذه السمة لضبط عرض العرض بالنسبة المئوية. أدناه قمنا بتعيين قيمة 50٪ لقيمة widthPercent و wrap_content لارتفاع TextView.
<?xml version="1.0" encoding="utf-8"?>
	  <android.support.percent.PercentRelativeLayout
	  xmlns:android="http://schemas.android.com/apk/res/android"
	  xmlns:app="http://schemas.android.com/apk/res-auto"
	  android:layout_width="match_parent"
	  android:layout_height="match_parent">
	  <TextView
	  app:layout_widthPercent="50%"
	  android:layout_height="wrap_content"
	  android:textColor="#000"
	  android:textSize="20sp"
	  android:text="AbhiAndroid" />
	  </android.support.percent.PercentRelativeLayout>

- layout_heightPercent: تستخدم هذه السمة لضبط ارتفاع العرض بالنسبة المئوية. أدناه قمنا بتعيين قيمة 30٪ لقيمة heightPercent و wrap_content لعرض TextView.
<?xml version="1.0" encoding="utf-8"?>
	  <android.support.percent.PercentRelativeLayout xmlns:android="http://schemas.android.com/apk/res/android"
	  xmlns:app="http://schemas.android.com/apk/res-auto"
	  android:layout_width="match_parent"
	  android:layout_height="match_parent">
	  <TextView
	  android:layout_width="wrap_content"
	  android:text="AbhiAndroid"
	  android:textColor="#000"
	  android:textSize="20sp"
	  app:layout_heightPercent="30%" />
	  </android.support.percent.PercentRelativeLayout>

- layout_marginPercent: تُستخدم هذه السمة لتعيين هامش العرض من حيث النسبة المئوية. تحدد هذه السمة نفس الهامش من جميع الجوانب. أدناه قمنا بتعيين التفاف_كونتينت vlaue للارتفاع والعرض وهامش 10٪ من جميع جوانب TextView.
<?xml version="1.0" encoding="utf-8"?>
	  <android.support.percent.PercentRelativeLayout xmlns:android="http://schemas.android.com/apk/res/android"
	  xmlns:app="http://schemas.android.com/apk/res-auto"
	  android:layout_width="match_parent"
	  android:layout_height="match_parent">
	  <TextView
	  android:layout_width="wrap_content"
	  android:layout_height="wrap_content"
	  android:text="AbhiAndroid"
	  android:textColor="#000"
	  android:textSize="20sp"
	  app:layout_marginPercent="10%" />
	  </android.support.percent.PercentRelativeLayout>

- layout_marginLeftPercent: تُستخدم هذه السمة لتعيين هامش النسبة المئوية على الجانب الأيسر من العرض. أدناه قمنا بتعيين قيمة wrap_content للارتفاع والعرض وهامش 10٪ على الجانب الأيسر من TextView.
<?xml version="1.0" encoding="utf-8"?>
	  <android.support.percent.PercentRelativeLayout xmlns:android="http://schemas.android.com/apk/res/android"
	  xmlns:app="http://schemas.android.com/apk/res-auto"
	  android:layout_width="match_parent"
	  android:layout_height="match_parent">
	  <TextView
	  android:layout_width="wrap_content"
	  android:layout_height="wrap_content"
	  android:text="AbhiAndroid"
	  android:textColor="#000"
	  android:textSize="20sp"
	  app:layout_marginLeftPercent="10%" />
	  </android.support.percent.PercentRelativeLayout>

- layout_marginTopPercent: تُستخدم هذه السمة لتعيين هامش النسبة المئوية إلى الجانب العلوي من العرض. أدناه قمنا بتعيين قيمة التفاف_كونتينت للارتفاع والعرض وهامش 10٪ على الجانب العلوي من TextView.
<?xml version="1.0" encoding="utf-8"?>
	  <android.support.percent.PercentRelativeLayout xmlns:android="http://schemas.android.com/apk/res/android"
	  xmlns:app="http://schemas.android.com/apk/res-auto"
	  android:layout_width="match_parent"
	  android:layout_height="match_parent">
	  <TextView
	  android:layout_width="wrap_content"
	  android:layout_height="wrap_content"
	  android:text="AbhiAndroid"
	  android:textColor="#000"
	  android:textSize="20sp"
	  app:layout_marginTopPercent="10%" />
	  </android.support.percent.PercentRelativeLayout>

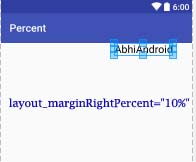
- layout_marginRightPercent: تُستخدم هذه السمة لتعيين هامش النسبة المئوية على الجانب الأيمن من العرض. أدناه قمنا بتعيين قيمة wrap_content للارتفاع والعرض وهامش 10٪ على الجانب الأيمن من TextView. في هذا المثال ، قمنا بتعيين المحاذاة الصحيحة لـ TextView حتى نتمكن من التحقق بسهولة من استخدام هذه السمة.
<?xml version="1.0" encoding="utf-8"?>
	  <android.support.percent.PercentRelativeLayout xmlns:android="http://schemas.android.com/apk/res/android"
	  xmlns:app="http://schemas.android.com/apk/res-auto"
	  android:layout_width="match_parent"
	  android:layout_height="match_parent">
	  <TextView
	  android:layout_width="wrap_content"
	  android:layout_height="wrap_content"
	  android:text="AbhiAndroid"
	  android:textColor="#000"
	  android:textSize="20sp"
	  android:layout_alignParentRight="true"
	  app:layout_marginRightPercent="10%" />
	  </android.support.percent.PercentRelativeLayout>
- layout_marginBottomPercent: تُستخدم هذه السمة لتعيين النسبة المئوية للهامش من الجانب السفلي للعرض. أدناه قمنا بتعيين قيمة wrap_content للارتفاع والعرض وهامش 10٪ من الجانب السفلي من TextView. في هذا المثال ، قمنا بتعيين المحاذاة السفلية لـ TextView حتى نتمكن من التحقق بسهولة من استخدام هذه السمة.
<?xml version="1.0" encoding="utf-8"?>
	  <android.support.percent.PercentRelativeLayout xmlns:android="http://schemas.android.com/apk/res/android"
	  xmlns:app="http://schemas.android.com/apk/res-auto"
	  android:layout_width="match_parent"
	  android:layout_height="match_parent">
	  <TextView
	  android:layout_width="wrap_content"
	  android:layout_height="wrap_content"
	  android:layout_alignParentBottom="true"
	  android:text="AbhiAndroid"
	  android:textColor="#000"
	  android:textSize="20sp"
	  app:layout_marginBottomPercent="10%" />
	  </android.support.percent.PercentRelativeLayout>

مثال النسبة المئوية للتخطيط في Android Studio:
فيما يلي مثال على PercentRelativeLayout حيث نقوم بإنشاء نموذج تسجيل الدخول مع حقلين لاسم المستخدم وكلمة المرور. في هذا المثال نأخذ 2 EditText و 2 TextView و 1 Login Button. لهذه الآراء قمنا بتعيين الأبعاد والهامش في شكل نسبة مئوية. إذا نقر المستخدم على زر تسجيل الدخول ، فسيتم عرض رسالة "شكرًا لك" مع اسم المستخدم على الشاشة بمساعدة Toast.

الخطوة 1: إنشاء مشروع جديد وتسميته PercentRelativeLayoutExample.
الخطوة 2: افتح نصوص Gradle> build.gradle وأضف تبعية مكتبة الدعم في المئة.
apply plugin: 'com.android.application'
  android {
  compileSdkVersion 24
  buildToolsVersion "24.0.1"
  defaultConfig {
  applicationId "abhiandroid.percentrelativelayoutexample"
  minSdkVersion 16
  targetSdkVersion 24
  versionCode 1
  versionName "1.0"
  }
  buildTypes {
  release {
  minifyEnabled false
  proguardFiles getDefaultProguardFile('proguard-android.txt'), 'proguard-rules.pro'
  }
  }
  }
  dependencies {
  compile fileTree(dir: 'libs', include: ['*.jar'])
  testCompile 'junit:junit:4.12'
  compile 'com.android.support:appcompat-v7:24.1.1'
  compile 'com.android.support:percent:23.3.0' // Percent Support Library
  }
الخطوة 3: افتح res -> layout -> activity_main.xml (أو) main.xml وأضف الكود التالي:
في هذه الخطوة ، نأخذ 2 EditText's و 2 TextView's و 1 زر تسجيل الدخول ولهذه العروض قمنا بتعيين الأبعاد والهامش في النموذج من النسبة المئوية. لاحظ أنه في جميع طرق العرض لم آخذ سمة layout_widht ولا تزال تعمل بشكل جيد. يعرض Android Studio سطر خطأ في العنصر ولكن سيتم تجاهله تلقائيًا في وقت التشغيل.
<?xml version="1.0" encoding="utf-8"?>
  <android.support.percent.PercentRelativeLayout xmlns:android="http://schemas.android.com/apk/res/android"
  xmlns:app="http://schemas.android.com/apk/res-auto"
  android:layout_width="match_parent"
  android:layout_height="match_parent">
  <!--
  TextView's for labels and EditText for getting value from user
  -->
  <TextView
  android:id="@+id/txtUserName"
  android:layout_height="wrap_content"
  android:text="UserName :"
  android:textColor="#000"
  android:textSize="20sp"
  app:layout_marginLeftPercent="10%"
  app:layout_marginTopPercent="10%"
  app:layout_widthPercent="30%" />
  <TextView
  android:id="@+id/txtPassword"
  android:layout_height="wrap_content"
  android:layout_below="@+id/txtUserName"
  android:text="Password :"
  android:textColor="#000"
  android:textSize="20sp"
  app:layout_marginLeftPercent="10%"
  app:layout_marginTopPercent="4%"
  app:layout_widthPercent="30%" />
  <EditText
  android:id="@+id/userName"
  android:layout_height="wrap_content"
  android:layout_toRightOf="@+id/txtUserName"
  android:hint="User Name"
  android:textColor="#000"
  android:textSize="20sp"
  app:layout_marginLeftPercent="3%"
  app:layout_marginTopPercent="8%"
  app:layout_widthPercent="50%" />
  <EditText
  android:id="@+id/password"
  android:layout_height="wrap_content"
  android:layout_toRightOf="@+id/txtPassword"
  android:hint="Password"
  android:inputType="textPassword"
  android:textColor="#000"
  android:textSize="20sp"
  app:layout_marginLeftPercent="3%"
  app:layout_marginTopPercent="16%"
  app:layout_widthPercent="50%" />
  <!-- Login Button -->
  <Button
  android:id="@+id/login"
  android:layout_height="wrap_content"
  android:layout_below="@+id/password"
  android:layout_centerHorizontal="true"
  android:background="#F0F"
  android:text="Login"
  android:textColor="#fff"
  android:textSize="20sp"
  app:layout_marginPercent="5%"
  app:layout_widthPercent="60%" />
  </android.support.percent.PercentRelativeLayout>
الخطوة 4: افتح src -> package -> MainActivity.java
في هذه الخطوة ، نفتح MainActivity ونضيف الكود لبدء طرق العرض (EditText and Button). بعد ذلك قمنا بتنفيذ حدث setOnClickListener على زر تسجيل الدخول بحيث كلما نقر المستخدم على زر ، تظهر رسالة شكر إذا قام المستخدم بالفعل بملء الحقلين أو يتم عرض رسالة خطأ تدخل اسم المستخدم وكلمة المرور على الشاشة بمساعدة Toast.
package abhiandroid.percentrelativelayoutexample;
  import android.os.Bundle;
  import android.support.v7.app.AppCompatActivity;
  import android.view.View;
  import android.widget.Button;
  import android.widget.EditText;
  import android.widget.Toast;
  public class MainActivity extends AppCompatActivity {
  Button login;
  EditText userName, password;
  @Override
  protected void onCreate(Bundle savedInstanceState) {
  super.onCreate(savedInstanceState);
  setContentView(R.layout.activity_main);
  // init the View's
  userName = (EditText) findViewById(R.id.userName);
  password = (EditText) findViewById(R.id.password);
  login = (Button) findViewById(R.id.login);
  // perform setOnClickListener Event on Login Button
  login.setOnClickListener(new View.OnClickListener() {
  @Override
  public void onClick(View view) {
  // validate user name and password
  if (userName.getText().toString().trim().length() > 0 && password.getText().toString().trim().length() > 0) {
  // display a thanks you message with user name
  Toast.makeText(getApplicationContext(), "Thank You " + userName.getText().toString(), Toast.LENGTH_SHORT).show();
  } else {
  // display an error message that fill user name and password
  Toast.makeText(getApplicationContext(), "Please Enter Your User Name And Password.!!", Toast.LENGTH_SHORT).show();
  }
  }
  });
  }
  }
المخرجات :
الآن قم بتشغيل التطبيق وسوف تقوم بتسجيل الدخول إلى النموذج المصمم باستخدام PercentRelativeLayout.