دروس الرسوم المتحركة Animation مع مثال في Android Studio
تم تقديم واجهة برمجة تطبيقات Property Animation بواسطة Google في Android 3.0 مما يمنحنا المرونة لتغيير خصائص الكائن خلال فترة زمنية معينة. يتيح لنا إطار عمل الرسوم المتحركة Animations إنشاء رسوم متحركة وانتقالات جذابة بصريًا في تطبيقاتنا. باستخدام الرسوم المتحركة ، يمكن للمرء أن يحول تطبيقه الجيد المظهر إلى تطبيق ممتاز وقابل للاستخدام بشكل كبير.
 تكون الرسوم المتحركة Animations مفيدة عندما تتغير حالة الشاشة ، أي عندما يتم تحميل المحتوى أو تصبح الإجراءات الجديدة متاحة.
الرسوم المتحركة Animations هي عملية إنشاء الحركة وتغيير الشكل. سنعرض في هذا البرنامج التعليمي كيف تشجعك الرسوم المتحركة البسيطة على استخدامها بحرية وثقة أكبر.
تقوم الرسوم المتحركة Animations بإعلام المستخدمين بما يحدث في تطبيقك وتحسين النموذج العقلي لواجهة تطبيقك.
جدول المحتويات
يحدد Android ثلاثة أنواع من الرسوم المتحركة Animations
عرض الرسوم المتحركة View Animation :
هذا هو أبسط الرسوم المتحركة المستخدمة في Android. تحدد خصائص طرق العرض الخاصة بنا التي يجب تحريكها باستخدام تقنية تسمى Tween Animation ، وهي تأخذ المعلمات التالية مثل الحجم ، ومدة الوقت ، وزاوية الدوران ، وقيمة البداية ، وقيمة النهاية ، وتنفيذ الرسوم المتحركة المطلوبة على هذا الكائن. الرسوم المتحركة عن طريق تحديد التحويلات على طريقة العرض الخاصة بك. يمكن القيام بذلك في ملفات موارد XML أو برمجيًا.
يمكن أن تجعل الرسوم المتحركة لـ Android View رسومًا متحركة على أي كائنات عرض ، مثل ImageView أو TextView أو Button. عرض الرسوم المتحركة يمكنه فقط تحريك الخصائص البسيطة مثل الموضع والحجم والدوران وخاصية ألفا التي تسمح لك بتحريك شفافية العرض.
عيب هذه الآلية هو أنه لا يمكن تطبيقها إلا على طرق العرض.
تحريك الخاصية Property Animation :
تم تقديم هذه الرسوم المتحركة في Android 3.0 (مستوى API 11). يسمح للمستخدم بتحريك أي شيء.
الرسوم المتحركة للخاصية قابلة للتخصيص بدرجة كبيرة ، يمكنك تحديد المدة وعدد التكرارات ونوع الاستيفاء ومعدل الإطارات للرسوم المتحركة. يُفضل دائمًا نظام الرسوم المتحركة للخاصية للرسوم المتحركة الأكثر تعقيدًا.
تسمح لنا الرسوم المتحركة للخاصية بتحريك أي خاصية لأي كائن من قيمة إلى أخرى خلال مدة محددة. لنأخذ مثالاً ، تخيل أنك تريد تحريك الدوران ثلاثي الأبعاد باستخدام خصائص rotationX أو rotationY التي تم تقديمها في API 11. أو ربما تريد تحريك تغيير اللون أو تحريك تغيير قابل للرسم. هذا غير ممكن باستخدام "عرض الرسوم المتحركة". لهذا الغرض يتم استخدام خاصية الرسوم المتحركة.
أنت غير مقيد بأنواع الرسوم المتحركة المحددة مسبقًا أو نوع الكائن الذي تريد تحريكه. في البداية ، قد يبدو استخدام نظام الرسوم المتحركة للممتلكات معقدًا بعض الشيء. ومع ذلك ، في معظم الحالات ، يمكنك استخدام ObjectAnimator متعدد الاستخدامات الذي يستخدم الانعكاس. يجعل ObjectAnimator إنشاء الرسوم المتحركة للخاصية بنفس سهولة إنشاء عرض الرسوم المتحركة.
تشمل الخصائص الشائعة التي يتم تحريكها بشكل شائع في طرق العرض ما يلي:
| ملكية | وصف |
|---|---|
| ألفا | تتلاشى أو تتلاشى |
| التناوب ، التناوب س ، التناوب ص | تدور أو تقلب |
| scaleX ، scaleY | تنمو أو تتقلص |
| س ، ص ، ض | موضع |
| translationX ، translationY ، translationZ (API 21+) | الإزاحة من المركز |
الرسوم المتحركة القابلة للرسم Drawable Animation :
تتيح هذه الرسوم المتحركة Animations للمستخدم تحميل الموارد القابلة للرسم وعرضها إطارًا تلو الآخر. تكون طريقة الرسوم المتحركة هذه مفيدة عندما يريد المستخدم تحريك الأشياء التي يسهل تمثيلها باستخدام موارد Drawable.
لاستخدام الرسوم المتحركة في Android ، قدم لنا Android فئة تسمى الرسوم المتحركة Animations .
لأداء الرسوم المتحركة Animations في android ، سنقوم باستدعاء دالة ثابتة loadAnimation () (تُستخدم هذه الطريقة لتحميل الرسوم المتحركة) لفئة AnimationUtils. سوف نتلقى النتيجة في مثيل كائن الرسوم المتحركة. تركيبها كما يلي -
Animation animation =AnimationUtils.loadAnimation(getApplicationContext(), R.anim.myanimation);
تشير المعلمة الثانية إلى ملف animation.xml الخاص بنا ، ويتم إنشاؤه ضمن دليل res (res-> anim-> myanimation.xml)
تحتوي فئة الرسوم المتحركة Animations على العديد من الطرق والدوال الموضحة أدناه:
1. start (): ستبدأ هذه الطريقة في الرسم المتحرك.
2. setDuration (مدة طويلة): تحدد هذه الطريقة مدة الرسوم المتحركة.
3. getDuration () : تحصل هذه الطريقة على المدة.
4. end (): تنهي هذه الطريقة الرسوم المتحركة.
5.cancel(): This method cancels the animation.
ضبط مستمعي الرسوم المتحركة Animations (اختياري)
يمكن ضبط مستمعي الرسوم المتحركة من خلال تطبيق AnimationListener في نشاطنا. إذا كنت ستستخدم AnimationListener ، فسيتعين عليك تجاوز الطرق التالية.
onAnimationStart -
@Override
  public void onAnimationStart(Animation animation) {
  }
onAnimationEnd -
@Override
  public void onAnimationEnd(Animation animation) {
  }
onAnimationRepeat -
@Override
  public void onAnimationRepeat(Animation animation) {
  }
مقياس الرسوم المتحركة Scale Animation
يتم استخدام Scale Animation لإنشاء عرض أصغر أو أكبر إما على المحور س أو المحور ص. يمكن أيضًا تحديد النقطة المحورية التي نريد أن تحدث الرسوم المتحركة حولها.
تدوير الرسوم المتحركة Rotate Animation
يتم استخدام Rotate Animation لتدوير عرض حول نقطة محورية بعدد معين من الدرجات.
Translate Animation
تُستخدم حركة الترجمة لتحريك عرض على طول المحور س أو ص.
ألفا أنيميشن Alpha Animation
يمكن تغيير شفافية طريقة العرض بواسطة Alpha Animation
المحرف Interpolator
معنى القاموس من Interpolate هو التغيير أو الاعتراض أو الإدراج بين شيئين أو حدثين.
يتم استخدامه لإدراج أو تطبيق تأثيرات حركة إضافية بين قيمة البداية والنهاية لخاصية الكائن ، كما يتم استخدامه أيضًا لتحديد معدل تغيير الرسوم المتحركة.
أنواع المحرف Types of Interpolator:
1 - المحرف الخطي Linear Interpolator : هو المحرف الافتراضي لجميع الرسوم المتحركة. يحدد أن معدل تغيير الرسوم المتحركة ثابت.
2. تسريع Interpolator: يعمل على تسريع تحريك العرض ، ويبدأ ببطء ثم يتسارع حتى يصل إلى الموضع النهائي.
3. يبطئ من Interpolator: هل يعمل عكس محرف التسريع. يبدأ بسرعة ويبطئ.
4. تسريع التباطؤ المبطئ: يجعل الحركة تسير ببطء في البداية والنهاية ، ولكن بسرعة في المنتصف.
5. توقع المحرف: تحريك الرسم المتحرك للخلف قبل أن يبدأ
6. تجاوز المحرف: هل هو عكس المحرف المتوقع. يجعل الرسوم المتحركة تذهب أبعد من الوجهة المحددة ، ثم تعود إلى الوجهة المحددة.
7. توقع تجاوز الهدف : يجمع بين المتداخل المتوقع والمتجاوز. يبدأ التغيير للخلف ثم يتقلب للأمام ويتخطى القيمة المستهدفة ويعود أخيرًا إلى القيمة النهائية.
8. Bounce Interpolator: يقوم بعمل رسم متحرك للارتداد قبل انتهاء الحركة المرغوبة.
9. Cycle Interpolator: يكرر الرسم المتحرك لعدد محدد من الدورات.
سمات وخصائص Animation المهمة في Android
1. android:duration : المدة: يُشار إلى المدة التي يتم فيها إكمال الرسوم المتحركة باسم سمة المدة. يشير إلى المدة المثالية لإظهار الانتقال على الشاشة.
android:duration="1500"
2. android: fillAfter: تحدد هذه السمة ما إذا كان يجب أن يكون العرض مرئيًا أم لا في نهاية الرسوم المتحركة. لقد حددنا قيمتها في الرسوم المتحركة لدينا. إذا تم تعيينه على "خطأ" ، فستعود تغييرات العنصر إلى حالته السابقة بعد الرسم المتحرك.
android:fillAfter="true"
3. android: interpolator: تشير هذه الخاصية إلى معدل التغيير في الرسوم المتحركة. يمكنك تحديد أدوات الاستيفاء الخاصة بك باستخدام الوقت كقيود. في هذه الرسوم المتحركة ، استخدمنا محرفًا داخليًا ، أي محرف خطي.
android:interpolator="@android:anim/linear_interpolator"
4. android: startOffset: يشير إلى وقت الانتظار قبل أن تبدأ الرسوم المتحركة.
android:startOffset="2000"
5. android:repeatMode : وضع التكرار: عندما يريد المستخدم تكرار الرسوم المتحركة ، يتم استخدام هذه السمة
android:repeatMode="restart"
6. android:repeatCount : تكرار الكونت: تحدد هذه السمة عدد التكرارات في الرسوم المتحركة.
android:repeatCount="infinite"
مثال للرسوم المتحركة Animations في Android Studio يعرض 14 نوعًا من الرسوم المتحركة:
أدناه سننشئ مثالًا كاملًا للرسوم المتحركة Animations في Android Studio والذي سيعرض 14 نوعًا مختلفًا من الرسوم المتحركة. سنضع 14 نوعًا من أسماء الرسوم المتحركة في قائمة NavigationDrawer ونقرة واحدة على الأسماء في القائمة التي ستعمل الرسوم المتحركة المعينة.
يمكنك أدناه تنزيل الكود ، والاطلاع على الإخراج النهائي والشرح خطوة بخطوة للمثال.
الخطوة 1 : قم بإنشاء مشروع جديد فارغ وقم بتسميته AnimationExample
الخطوة 2 : حدد نشاط درج التنقل Navigation Drawer من مربع الحوار "إنشاء مشروع جديد" ، انقر فوق "التالي" ثم "إنهاء".
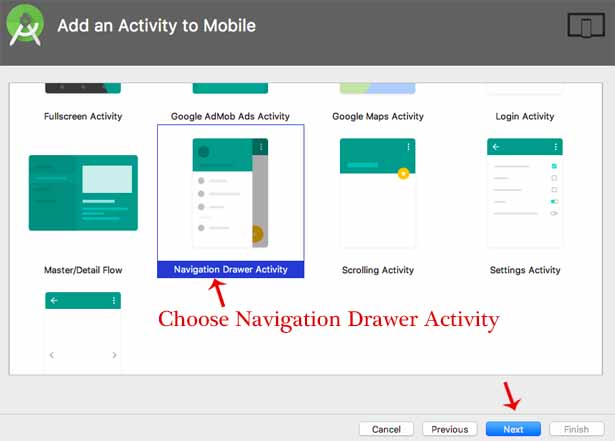
ملاحظة مهمة: عند تحديد نشاط درج التنقل Navigation Drawerلمشروعك ، سيتم إنشاء أربعة ملفات xml في res => مجلد التخطيط layout وملف content_main.xml من بين أربعة ملفات مهمة سنستخدمها في مشروعنا.
الخطوة 3: إعداد NavigationDrawer لمثالنا لإظهار أنواع مختلفة من قائمة الرسوم المتحركة في قائمة التنقل.
كود activity_main.xml:
<?xml version="1.0" encoding="utf-8"?>
  <android.support.v4.widget.DrawerLayout xmlns:android="http://schemas.android.com/apk/res/android"
  xmlns:app="http://schemas.android.com/apk/res-auto"
  xmlns:tools="http://schemas.android.com/tools"
  android:id="@+id/drawer_layout"
  android:layout_width="match_parent"
  android:layout_height="match_parent"
  android:fitsSystemWindows="true"
  tools:openDrawer="start">

  <include
  layout="@layout/app_bar_main"
  android:layout_width="match_parent"
  android:layout_height="match_parent" />

  <android.support.design.widget.NavigationView
  android:id="@+id/nav_view"
  android:layout_width="wrap_content"
  android:layout_height="match_parent"
  android:layout_gravity="start"
  android:fitsSystemWindows="true"
  app:headerLayout="@layout/nav_header_main"
  app:menu="@menu/activity_main_drawer" />

  </android.support.v4.widget.DrawerLayout>
app_bar_main.xml code
<?xml version="1.0" encoding="utf-8"?>
  <android.support.design.widget.CoordinatorLayout xmlns:android="http://schemas.android.com/apk/res/android"
  xmlns:app="http://schemas.android.com/apk/res-auto"
  xmlns:tools="http://schemas.android.com/tools"
  android:layout_width="match_parent"
  android:layout_height="match_parent"
  tools:context="com.example.abhishek.animationexample.MainActivity">

  <android.support.design.widget.AppBarLayout
  android:layout_width="match_parent"
  android:layout_height="wrap_content"
  android:theme="@style/AppTheme.AppBarOverlay">

  <android.support.v7.widget.Toolbar
  android:id="@+id/toolbar"
  android:layout_width="match_parent"
  android:layout_height="?attr/actionBarSize"
  android:background="?attr/colorAccent"
  app:popupTheme="@style/AppTheme.PopupOverlay" />

  </android.support.design.widget.AppBarLayout>

  <include layout="@layout/content_main" />
  </android.support.design.widget.CoordinatorLayout>
content_main.xml كود
<?xml version="1.0" encoding="utf-8"?>
  <RelativeLayout xmlns:android="http://schemas.android.com/apk/res/android"
  xmlns:app="http://schemas.android.com/apk/res-auto"
  xmlns:tools="http://schemas.android.com/tools"
  android:layout_width="match_parent"
  android:layout_height="match_parent"
  android:paddingBottom="@dimen/activity_vertical_margin"
  android:paddingLeft="@dimen/activity_horizontal_margin"
  android:paddingRight="@dimen/activity_horizontal_margin"
  android:paddingTop="@dimen/activity_vertical_margin"
  app:layout_behavior="@string/appbar_scrolling_view_behavior"
  tools:context=".MainActivity"
  tools:showIn="@layout/app_bar_main">
  <FrameLayout
  android:id="@+id/content_frame"
  android:layout_width="match_parent"
  android:layout_height="match_parent" />

  </RelativeLayout>
nav_header_main.xml or nav_header.xml code:
<?xml version="1.0" encoding="utf-8"?>
  <RelativeLayout xmlns:android="http://schemas.android.com/apk/res/android"
  xmlns:app="http://schemas.android.com/apk/res-auto"
  android:layout_width="match_parent"
  android:layout_height="@dimen/nav_header_height"
  android:background="@drawable/side_nav_bar"
  android:gravity="bottom"
  android:orientation="vertical"
  android:paddingBottom="@dimen/activity_vertical_margin"
  android:paddingLeft="@dimen/activity_horizontal_margin"
  android:paddingRight="@dimen/activity_horizontal_margin"
  android:paddingTop="@dimen/activity_vertical_margin"
  android:theme="@style/ThemeOverlay.AppCompat.Dark"
  android:weightSum="1">

  <ImageView
  android:id="@+id/imageView"
  android:layout_width="wrap_content"
  android:layout_height="wrap_content"
  android:src="@drawable/animation"
  android:layout_alignParentTop="true"
  android:layout_alignRight="@+id/textView"
  android:layout_alignEnd="@+id/textView"
  android:layout_marginRight="172dp"
  android:layout_marginEnd="172dp" />

  <TextView
  android:id="@+id/textView"
  android:layout_width="140dp"
  android:layout_height="55dp"
  android:text="ANIMATION EXAMPLE"
  android:textColor="#0606ea"
  android:textSize="11dp"
  android:textStyle="bold"
  android:layout_alignParentBottom="true"
  android:layout_alignParentRight="true"
  android:layout_alignParentEnd="true"
  android:layout_marginBottom="17dp" />


  </RelativeLayout>
الخطوة 4: افتح ملف activity_main_drawer.xml المتاح في res => مجلد القائمة :
ضع الكود أدناه فيه. في هذا التخطيط ، سنحدد العناصر المختلفة التي سننشئها في NavigationDrawer.
<?xml version="1.0" encoding="utf-8"?>
  <menu xmlns:app="http://schemas.android.com/apk/res-auto"
  xmlns:android="http://schemas.android.com/apk/res/android">

  <group android:checkableBehavior="single">
  <item
  android:id="@+id/nav_zoomin"
  android:title="Zoom In" />
  <item
  android:id="@+id/nav_zoomout"
  android:title="Zoom Out" />
  <item
  android:id="@+id/nav_rotate"
  android:title="Rotate" />
  <item
  android:id="@+id/nav_move"
  android:title="Move" />
  <item
  android:id="@+id/nav_bounce"
  android:title="Bounce" />
  <item
  android:id="@+id/nav_Blink"
  android:title="Blink" />
  <item
  android:id="@+id/nav_slideup"
  android:title="Slide Up" />
  <item
  android:id="@+id/nav_slidedown"
  android:title="Slide Down" />
  <item
  android:id="@+id/nav_fade"
  android:title="Fade Animation" />
  <item
  android:id="@+id/nav_sequentialanimation"
  android:title="Sequential Animation" />
  <item
  android:id="@+id/nav_togetheranimation"
  android:title="Together Animation" />
  <item
  android:id="@+id/nav_flip"
  android:title="Flip Animation" />
  <item
  android:id="@+id/nav_drawable"
  android:title="Drawable Animation" />
  <item
  android:id="@+id/nav_swap"
  android:title="Swap Animation"/>
  </group>
  </menu>
الخطوة 5: الآن افتح ملف MainActivity.java وأدخل الكود أدناه.
لجعل قوائم الأدراج عملية ، استخدمنا طريقة OnNavigationItemSelected () . ثم يتم استخدام displaySelectedScreen () حيث يتم إنشاء كائن جزء وتهيئة كائن الجزء الذي تم تحديده.
package com.example.abhishek.animationexample;

  import android.support.v4.app.Fragment;
  import android.os.Bundle;
  import android.support.v4.app.FragmentTransaction;
  import android.support.design.widget.NavigationView;
  import android.support.v4.view.GravityCompat;
  import android.support.v4.widget.DrawerLayout;
  import android.support.v7.app.ActionBarDrawerToggle;
  import android.support.v7.app.AppCompatActivity;
  import android.support.v7.widget.Toolbar;
  import android.view.Menu;
  import android.view.MenuItem;

  import com.example.abhishek.animationexample.fragment.blinkfragment;
  import com.example.abhishek.animationexample.fragment.bouncefragment;
  import com.example.abhishek.animationexample.fragment.drawableanimationfragment;
  import com.example.abhishek.animationexample.fragment.fadefragment;
  import com.example.abhishek.animationexample.fragment.flipfragment;
  import com.example.abhishek.animationexample.fragment.movefragment;
  import com.example.abhishek.animationexample.fragment.rotatefragment;
  import com.example.abhishek.animationexample.fragment.sequentialanimationfragment;
  import com.example.abhishek.animationexample.fragment.slidedownfragment;
  import com.example.abhishek.animationexample.fragment.slideupfragment;
  import com.example.abhishek.animationexample.fragment.swapanimationfragment;
  import com.example.abhishek.animationexample.fragment.togetheranimationfragment;
  import com.example.abhishek.animationexample.fragment.zoominfragment;
  import com.example.abhishek.animationexample.fragment.zoomoutfragment;

  public class MainActivity extends AppCompatActivity
  implements NavigationView.OnNavigationItemSelectedListener {

  @Override
  protected void onCreate(Bundle savedInstanceState) {
  super.onCreate(savedInstanceState);
  setContentView(R.layout.activity_main);
  Toolbar toolbar = (Toolbar) findViewById(R.id.toolbar);

  DrawerLayout drawer = (DrawerLayout) findViewById(R.id.drawer_layout);
  ActionBarDrawerToggle toggle = new ActionBarDrawerToggle(
  this, drawer, toolbar, R.string.navigation_drawer_open, R.string.navigation_drawer_close);
  drawer.setDrawerListener(toggle);
  toggle.syncState();
  NavigationView navigationView = (NavigationView) findViewById(R.id.nav_view);
  navigationView.setNavigationItemSelectedListener(this);
  }

  @Override
  public void onBackPressed() {
  DrawerLayout drawer = (DrawerLayout) findViewById(R.id.drawer_layout);
  if (drawer.isDrawerOpen(GravityCompat.START)) {
  drawer.closeDrawer(GravityCompat.START);
  } else {
  super.onBackPressed();
  }
  }

  private void displaySelectedScreen(int itemId) {
  Fragment fragment = null;
  switch (itemId) {
  case R.id.nav_bounce:
  fragment = new bouncefragment();
  break;
  case R.id.nav_Blink:
  fragment = new blinkfragment();
  break;
  case R.id.nav_zoomin:
  fragment = new zoominfragment();
  break;
  case R.id.nav_zoomout:
  fragment = new zoomoutfragment();
  break;
  case R.id.nav_rotate:
  fragment = new rotatefragment();
  break;
  case R.id.nav_move:
  fragment = new movefragment();
  break;
  case R.id.nav_slideup:
  fragment = new slideupfragment();
  break;
  case R.id.nav_slidedown:
  fragment = new slidedownfragment();
  break;
  case R.id.nav_sequentialanimation:
  fragment = new sequentialanimationfragment();
  break;
  case R.id.nav_togetheranimation:
  fragment = new togetheranimationfragment();
  break;
  case R.id.nav_flip:
  fragment = new flipfragment();
  break;
  case R.id.nav_fade:
  fragment= new fadefragment();
  break;
  case  R.id.nav_drawable:
  fragment = new drawableanimationfragment();
  break;
  case R.id.nav_swap:
  fragment = new swapanimationfragment();
  break;
  }
  if (fragment != null) {
  FragmentTransaction ft = getSupportFragmentManager().beginTransaction();
  ft.replace(R.id.content_frame, fragment);
  ft.commit();
  }
  DrawerLayout drawer = (DrawerLayout) findViewById(R.id.drawer_layout);
  drawer.closeDrawer(GravityCompat.START);
  }
  @Override
  public boolean onNavigationItemSelected(MenuItem item) {
  displaySelectedScreen(item.getItemId());
  return true;
  }
  }
الخطوة السادسة: إنشاء شاشات لقوائم التنقل باستخدام التجزئة
كلما نقرنا على عنصر تنقل من الدرج ، يجب أن تفتح الشاشة المعنية. سوف نستخدم شظايا لهذا الغرض. يوجد أدناه الكود الخاص بكل جزء xml وملف جافا المرتبط به. سننشئ دليلًا بداخله جزء الاسم وسننشئ ملفات fragment.java.
الخطوة 6.1. إعداد الرسوم المتحركة Animations الوامضة:
 الرسوم المتحركة Animations التي يتم إجراؤها بشكل لا نهائي في الوضع العكسي تتلاشى وتتلاشى في كل مرة يشار إليها باسم الرسوم المتحركة الوامضة.
android:repeatMode=”reverse” - مفيد عندما تريد تكرار الرسوم المتحركة
android: repetCount = "infinite" - يحدد عدد مرات التكرار على الرسوم المتحركة Animations . لقد قمنا بتعيين هذه القيمة إلى لانهائي الآن ستتكرر الرسوم المتحركة مرات لا نهائية
fragment_blink.xml في التخطيط:
<?xml version="1.0" encoding="utf-8"?>
  <RelativeLayout xmlns:android="http://schemas.android.com/apk/res/android"
  android:layout_width="match_parent"
  android:layout_height="match_parent"
  android:orientation="vertical">
  <ImageView
  android:id="@+id/imageblink"
  android:src="@drawable/blink"
  android:layout_width="wrap_content"
  android:layout_height="wrap_content"
  android:visibility="gone"
  android:layout_marginBottom="38dp"
  android:layout_above="@+id/btnStart"
  android:layout_alignParentLeft="true"
  android:layout_alignParentStart="true"
  android:layout_marginLeft="10dp"
  android:layout_marginStart="10dp" />

  <Button android:id="@+id/btnStart"
  android:layout_width="wrap_content"
  android:layout_height="wrap_content"
  android:text="Start Blinking"
  android:layout_marginBottom="17dp"
  android:layout_alignParentBottom="true"
  android:layout_alignParentRight="true"
  android:layout_alignParentEnd="true"
  android:layout_marginRight="34dp"
  android:layout_marginEnd="34dp" />

  </RelativeLayout>
blinkfragment.java في مجلد fragment :
package com.example.abhishek.animationexample.fragment;

  import android.app.Activity;
  import android.support.v4.app.Fragment;
  import android.os.Bundle;
  import android.support.annotation.Nullable;
  import android.view.LayoutInflater;
  import android.view.View;
  import android.view.ViewGroup;
  import android.view.animation.Animation;
  import android.view.animation.AnimationUtils;
  import android.widget.Button;
  import android.widget.ImageView;
  import android.widget.TextView;
  import android.widget.Toast;
  import com.example.abhishek.animationexample.R;
  import static com.example.abhishek.animationexample.R.drawable.animation;

  /**
  * Created by abhiandroid
  */

  public class blinkfragment extends Fragment implements Animation.AnimationListener {
  ImageView imageView;
  Button btnStart;
  View view;
  Animation animBlink;
  @Override
  public View onCreateView(LayoutInflater inflater, @Nullable ViewGroup container, Bundle savedInstanceState) {
  view = inflater.inflate(R.layout.fragment_blink, container, false);
  imageView = (ImageView) view.findViewById(R.id.imageblink);
  btnStart = (Button)view.findViewById(R.id.btnStart);
  animBlink = AnimationUtils.loadAnimation(getContext(),
  R.anim.blink);
  animBlink.setAnimationListener(this);

  btnStart.setOnClickListener(new View.OnClickListener() {
  @Override
  public void onClick(View v) {
  imageView.setVisibility(View.VISIBLE);
  imageView.startAnimation(animBlink);
  }
  });
  return view;
  }
  @Override
  public void onAnimationStart(Animation animation) {
  }

  @Override
  public void onAnimationEnd(Animation animation) {
  }

  @Override
  public void onAnimationRepeat(Animation animation) {
  }
  }
الخطوة 6.1.1: سنقوم الآن بإنشاء مجلد الرسوم المتحركة anim وملف موارد الرسوم المتحركة blink.xml في Android Studio .
blink.xml (إنشاء ملف موارد الرسوم المتحركة في مجلد الرسوم المتحركة)
<?xml version="1.0" encoding="utf-8"?>
  <set xmlns:android="http://schemas.android.com/apk/res/android">
  <alpha android:fromAlpha="0.0"
  android:toAlpha="1.0"
  android:interpolator="@android:anim/accelerate_interpolator"
  android:duration="600"
  android:repeatMode="repeat"
  android:repeatCount="infinite"/>
  </set>
الخطوة 6.2. إعداد الرسوم المتحركة المرتدة Bounce Animation :
 تُعرف الرسوم المتحركة التي تنتهي بطريقة الارتداد باسم الرسوم المتحركة المرتدة لهذه المجموعة android:interpolator : قيمة interpolator إلى android: anim / bounce_interpolator .
fragment_bounce.xml (إنشاء في مجلد Layout):
<?xml version="1.0" encoding="utf-8"?>
  <RelativeLayout xmlns:android="http://schemas.android.com/apk/res/android"
  android:layout_width="fill_parent"
  android:layout_height="fill_parent" >
  <ImageView
  android:id="@+id/imgbounce"
  android:layout_width="wrap_content"
  android:layout_height="wrap_content"
  android:layout_centerInParent="true"
  android:src="@drawable/bounce"
  android:visibility="gone" />
  <Button
  android:id="@+id/btn_bounce"
  android:layout_width="wrap_content"
  android:layout_height="wrap_content"
  android:layout_marginBottom="26dp"
  android:text="Start Bouncing"
  android:layout_alignParentBottom="true"
  android:layout_alignParentRight="true"
  android:layout_alignParentEnd="true"
  android:layout_marginRight="13dp"
  android:layout_marginEnd="13dp" />

  </RelativeLayout>
bouncefragment.java (إنشاء في مجلد Fragment )
package com.example.abhishek.animationexample.fragment;
  import android.support.v4.app.Fragment;

  import android.os.Bundle;
  import android.support.annotation.Nullable;
  import android.view.LayoutInflater;
  import android.view.View;
  import android.view.ViewGroup;
  import android.view.animation.Animation;
  import android.view.animation.AnimationUtils;
  import android.widget.Button;
  import android.widget.ImageView;

  import com.example.abhishek.animationexample.R;

  /**
  * Created by abhiandroid
  */
  public class bouncefragment extends Fragment implements Animation.AnimationListener {
  ImageView imageView;
  Button btnStart;
  View view;
  Animation animBounce;

  @Override
  public View onCreateView(LayoutInflater inflater, @Nullable ViewGroup container, Bundle savedInstanceState) {

  view = inflater.inflate(R.layout.fragment_bounce, container, false);
  imageView = (ImageView) view.findViewById(R.id.imgbounce);
  btnStart = (Button)view.findViewById(R.id.btn_bounce);
  animBounce = AnimationUtils.loadAnimation(getContext(),
  R.anim.bounce );
  animBounce.setAnimationListener(this);

  btnStart.setOnClickListener(new View.OnClickListener() {
  @Override
  public void onClick(View v) {
  imageView.setVisibility(View.VISIBLE);

  imageView.startAnimation(animBounce);
  }
  });
  return view;
  }
  @Override
  public void onAnimationStart(Animation animation) {
  }
  @Override
  public void onAnimationEnd(Animation animation) {
  }
  @Override
  public void onAnimationRepeat(Animation animation) {
  }
  }
bounce.xml (ملف الرسوم المتحركة في مجلد الرسوم المتحركة anim )
<?xml version="1.0" encoding="utf-8"?>
  <set xmlns:android="http://schemas.android.com/apk/res/android"
  android:fillAfter="true"
  android:interpolator="@android:anim/bounce_interpolator">
  <scale
  android:duration="800"
  android:fromXScale="2.0"
  android:fromYScale="0.0"
  android:toXScale="1.0"
  android:toYScale="1.0" />
  </set>
الخطوة 6.3 - إعداد الرسوم المتحركة القابلة للرسم Drawable Animation :
 تقوم الرسوم المتحركة القابلة للرسم بتحميل موارد Drawable واحدًا تلو الآخر لإنشاء رسوم متحركة. فئة AnimationDrawable هي الأساس للرسوم المتحركة Drawable.
في المجلد drawable ، أضف الصور images1.png ، و images2.png ، و images3.png ، و images4.png.
fragment_drawable.xml (إنشاء في مجلد Layout ):
<RelativeLayout xmlns:android="http://schemas.android.com/apk/res/android"
  android:layout_width="match_parent"
  android:layout_height="match_parent">

  <TextView
  android:id="@+id/textView2"
  android:textColor="#c008ce"
  android:textStyle="italic"
  android:layout_width="wrap_content"
  android:layout_height="wrap_content"
  android:text="@string/touch_start_animation"
  android:layout_above="@+id/ball"
  android:layout_centerHorizontal="true"
  android:layout_marginBottom="45dp" />

  <ImageView
  android:id="@+id/ball"
  android:layout_width="241dp"
  android:layout_height="182dp"
  android:src="@drawable/ball"
  android:layout_marginBottom="151dp"
  android:layout_alignParentBottom="true"
  android:layout_centerHorizontal="true" />

  </RelativeLayout>
drawableanimationfragment.java (إنشاء في مجلد Fragment):
package com.example.abhishek.animationexample.fragment;

  import android.graphics.drawable.AnimationDrawable;
  import android.os.Bundle;
  import android.support.annotation.Nullable;
  import android.support.v4.app.Fragment;
  import android.support.v7.app.ActionBarActivity;
  import android.view.LayoutInflater;
  import android.view.MotionEvent;
  import android.view.View;
  import android.view.ViewGroup;
  import android.widget.ImageView;

  import com.example.abhishek.animationexample.R;

  /**
  * Created by abhishek on 31/10/17.
  */

  public class drawableanimationfragment extends Fragment {
  View view;
  @Nullable
  @Override
  public View onCreateView(LayoutInflater inflater, @Nullable ViewGroup container, @Nullable Bundle savedInstanceState) {
  view = inflater.inflate(R.layout.fragment_drawable, container, false);

  final ImageView ball = (ImageView) view.findViewById(R.id.ball);
  ball.setOnTouchListener(new View.OnTouchListener() {
  @Override
  public boolean onTouch(View v, MotionEvent event) {
  if (event.getAction() == MotionEvent.ACTION_DOWN) {
  AnimationDrawable animation = (AnimationDrawable) ball.getDrawable();
  animation.stop();
  animation.selectDrawable(0);
  animation.start();
  return true;
  }
  return false;
  }
  });
  return view;
  }
  }
قم بإنشاء ball.xml تحت drawable ( res-> drawable-> ball.xml )
يتكون ملف XML من عنصر <animation-list>. هذه الرسوم المتحركة تعمل لأربعة إطارات. لقد قمنا بتعيين android: سمة ونشوت من القائمة ، وهذا سوف يتحول مرة واحدة فقط ، ثم يتوقف مع الاستمرار في الإطار الأخير.
<?xml version="1.0" encoding="utf-8"?>
  <animation-list xmlns:android="http://schemas.android.com/apk/res/android"
  android:oneshot="true">
  <item android:drawable="@drawable/images4" android:duration="400" />
  <item android:drawable="@drawable/images3" android:duration="400" />
  <item android:drawable="@drawable/images2" android:duration="400" />
  <item android:drawable="@drawable/images1" android:duration="400" />
  </animation-list>
الخطوة 6.4 - إعداد الرسوم المتحركة المتلاشية:
 يتم استخدام علامة <alpha> التي تحدد قيمة ألفا للرسوم المتحركة المتلاشية
يشير ألفا إلى عتامة الكائن. يكون الكائن الذي يحتوي على قيم ألفا منخفضة أكثر شفافية ، بينما يكون الكائن الذي يحتوي على قيم ألفا أعلى أقل شفافية وأكثر تعتيمًا.
التلاشي في الرسوم المتحركة ليس سوى زيادة قيمة ألفا من 0 إلى 1.
تشير حركة التلاشي إلى تقليل قيمة ألفا من 1 إلى 0.
تتلاشى الرسوم المتحركة تمامًا مقابل التلاشي في الرسوم المتحركة.
fragment_fade.xml (إنشاء في مجلد Layout ):
<?xml version="1.0" encoding="utf-8"?>
  <RelativeLayout xmlns:android="http://schemas.android.com/apk/res/android"
  android:layout_width="match_parent"
  android:layout_height="match_parent"
  android:gravity="center">

  <ImageView android:id="@+id/imgfade"
  android:layout_width="222dp"
  android:layout_height="200dp"
  android:src="@drawable/fade"
  android:layout_marginTop="92dp"
  android:layout_alignParentTop="true"
  android:layout_alignParentRight="true"
  android:layout_alignParentEnd="true"
  android:layout_marginRight="65dp"
  android:layout_marginEnd="65dp" />

  <Button android:id="@+id/btnfade"
  android:layout_width="wrap_content"
  android:layout_height="wrap_content"
  android:text="Start"
  android:layout_marginBottom="40dp"
  android:layout_marginRight="42dp"
  android:layout_marginEnd="42dp"
  android:layout_alignParentBottom="true"
  android:layout_alignParentRight="true"
  android:layout_alignParentEnd="true" />

  </RelativeLayout>
fadefragment.java في مجلد Fragment
package com.example.abhishek.animationexample.fragment;

  import android.support.v4.app.Fragment;
  import android.os.Bundle;
  import android.support.annotation.Nullable;
  import android.view.LayoutInflater;
  import android.view.View;
  import android.view.ViewGroup;
  import android.view.animation.Animation;
  import android.view.animation.AnimationUtils;
  import android.widget.Button;
  import android.widget.ImageView;

  import com.example.abhishek.animationexample.R;
  /**
  * Created by abhiandroid
  */

  public class fadefragment extends Fragment implements Animation.AnimationListener{ @Nullable
  ImageView imageView;
  Button btnstart;
  View view;
  Animation animFade;

  @Override
  public View onCreateView(LayoutInflater inflater, @Nullable ViewGroup container, Bundle savedInstanceState) {

  view = inflater.inflate(R.layout.fragment_fade, container, false);
  imageView = (ImageView) view.findViewById(R.id.imgfade);
  btnstart = (Button)view.findViewById(R.id.btnfade);
  animFade = AnimationUtils.loadAnimation(getContext(),
  R.anim.fade );
  animFade.setAnimationListener(this);

  btnstart.setOnClickListener(new View.OnClickListener() {
  @Override
  public void onClick(View v) {

  imageView.startAnimation(animFade);
  }
  });
  return view;
  }

  @Override
  public void onAnimationStart(Animation animation) {
  }

  @Override
  public void onAnimationEnd(Animation animation) {
  }

  @Override
  public void onAnimationRepeat(Animation animation) {
  }
  }
fade.xml (ملف موارد الرسوم المتحركة في مجلد الرسوم المتحركة)
<?xml version="1.0" encoding="utf-8"?>
  <set xmlns:android="http://schemas.android.com/apk/res/android"
  android:interpolator="@android:anim/accelerate_interpolator" >

  <alpha
  android:fromAlpha="0"
  android:toAlpha="1"
  android:duration="2000" >
  </alpha>

  <alpha
  android:startOffset="2000"
  android:fromAlpha="1"
  android:toAlpha="0"
  android:duration="2000" >
  </alpha>
  </set>
الخطوة 6.5 - إعداد Flip Animation:
 يجعل Flipping Animation تأثيرًا رائعًا على اللعبة أو التطبيق. سنستخدم صورتين مختلفتين - واحدة للأمام والأخرى للخلف لإنشاء تأثير قلب البطاقة. سنحتاج إلى مصدرين للرسوم المتحركة سنحددهما في XML باستخدام objectAnimator.
ObjectAnimator هو فئة فرعية من ValueAniamtor التي توفر دعمًا لتحريك الخصائص على الكائنات المستهدفة.
صفات:
android: propertyName: الحصول على اسم الخاصية التي سيتم تحريكها. على سبيل المثال: يمكنك تحديد "ألفا" أو عرض كائن.
android: valueTo: القيمة التي تنتهي عندها الخاصية المتحركة.
android: valueFrom: القيمة حيث تبدأ الخاصية المتحركة
android: المدة: يُشار إلى المدة التي تكتمل فيها الرسوم المتحركة باسم سمة المدة. يشير إلى المدة المثالية لإظهار الانتقال على الشاشة.
android: تكرار الوضع: "عكس" (مفيد عندما تريد أن تتكرر الرسوم المتحركة)
android: تكرار الكونت: "لانهائي" (يحدد عدد التكرارات على الرسوم المتحركة. لقد قمنا بتعيين هذه القيمة على عدد لا نهائي من الرسوم المتحركة الآن ستتكرر مرات لا نهائية)
android: startOffset: يحدد وقت الانتظار قبل أن تبدأ الرسوم المتحركة.
<objectAnimator xmlns:android="http://schemas.android.com/apk/res/android"
      android:duration="1000"
      android:valueTo="200"
      android:valueType="floatType"
      android:propertyName="y"
      android:repeatCount="1"
      android:repeatMode="reverse"/>
fragment_flip.xml (إنشاء في مجلد layout ):
<?xml version="1.0" encoding="utf-8"?>
  <FrameLayout xmlns:android="http://schemas.android.com/apk/res/android"
  xmlns:tools="http://schemas.android.com/tools"
  android:layout_width="match_parent"
  android:layout_height="match_parent"
  tools:context=".MainActivity"
  >

  <FrameLayout
  android:id="@+id/card_back"
  android:layout_width="match_parent"
  android:layout_height="match_parent">
  <include layout="@layout/card_back" />
  </FrameLayout>

  <FrameLayout
  android:id="@+id/card_front"
  android:layout_width="match_parent"
  android:layout_height="match_parent"
  android:gravity="center">
  <include layout="@layout/card_front" />
  </FrameLayout>
  </FrameLayout>
card_back.xml (إنشاء في res-> layout-> card_back.xml)
<?xml version="1.0" encoding="utf-8"?>
  <FrameLayout xmlns:android="http://schemas.android.com/apk/res/android"
  android:layout_width="match_parent"
  android:layout_height="match_parent"
  android:orientation="vertical">
  <ImageView
  android:layout_width="match_parent"
  android:layout_height="match_parent"
  android:tint="@color/cardBack"
  android:padding="16dp"
  android:src="@drawable/oval"/>
  <TextView
  android:layout_width="match_parent"
  android:layout_height="match_parent"
  android:text="@string/back"
  android:textColor="#0606ea"
  style="@style/Base.TextAppearance.AppCompat.Display1"
  android:gravity="center"/>
  </FrameLayout>
card_front.xml (إنشاء في res-> layout-> card_front.xml):
<?xml version="1.0" encoding="utf-8"?>
  <FrameLayout xmlns:android="http://schemas.android.com/apk/res/android"
  android:layout_width="match_parent"
  android:layout_height="match_parent"
  android:orientation="vertical">
  <ImageView
  android:layout_width="match_parent"
  android:layout_height="match_parent"
  android:tint="@color/cardFront"
  android:padding="16dp"
  android:src="@drawable/oval"/>
  <TextView
  android:layout_width="match_parent"
  android:layout_height="match_parent"
  android:text="@string/front"
  android:textColor="#b815d9"
  style="@style/Base.TextAppearance.AppCompat.Display1"
  android:gravity="center"/>
  </FrameLayout>
flipfragment.java (إنشاء في مجلد Fragment)
package com.example.abhishek.animationexample.fragment;

  import android.animation.AnimatorInflater;
  import android.animation.AnimatorSet;
  import android.support.v4.app.Fragment;
  import android.os.Bundle;
  import android.support.annotation.Nullable;
  import android.support.v4.app.Fragment;
  import android.support.v7.app.AppCompatActivity;
  import android.view.LayoutInflater;
  import android.view.View;
  import android.view.ViewGroup;
  import android.view.animation.Animation;
  import android.view.animation.AnimationUtils;
  import android.widget.Button;
  import android.widget.ImageView;

  import com.example.abhishek.animationexample.R;

  /**
  * Created by abhiandroid
  */

  public class flipfragment extends Fragment {
  private AnimatorSet mSetRightOut;
  private AnimatorSet mSetLeftIn;
  private boolean mIsBackVisible = false;
  private View mCardFrontLayout;
  private View mCardBackLayout;
  ImageView imageView;
  View view;

  @Override
  public View onCreateView(LayoutInflater inflater, @Nullable ViewGroup container, Bundle savedInstanceState) {

  view = inflater.inflate(R.layout.fragment_flip, container, false);
  findViews();
  loadAnimations();
  flipCard(view);
  changeCameraDistance();
  return view;
  }
  private void changeCameraDistance() {
  int distance = 8000;
  float scale = getResources().getDisplayMetrics().density * distance;
  mCardFrontLayout.setCameraDistance(scale);
  mCardBackLayout.setCameraDistance(scale);
  }

  private void loadAnimations() {
  mSetRightOut = (AnimatorSet) AnimatorInflater.loadAnimator(getContext(), R.anim.out_animation);
  mSetLeftIn = (AnimatorSet) AnimatorInflater.loadAnimator(getContext(), R.anim.in_animation);
  }

  private void findViews() {
  mCardBackLayout = view.findViewById(R.id.card_back);
  mCardFrontLayout = view.findViewById(R.id.card_front);
  }

  public void flipCard(View view) {
  if (!mIsBackVisible) {
  mSetRightOut.setTarget(mCardFrontLayout);
  mSetLeftIn.setTarget(mCardBackLayout);
  mSetRightOut.start();
  mSetLeftIn.start();
  mIsBackVisible = true;
  } else {
  mSetRightOut.setTarget(mCardBackLayout);
  mSetLeftIn.setTarget(mCardFrontLayout);
  mSetRightOut.start();
  mSetLeftIn.start();
  mIsBackVisible = false;
  }
  }
  }
in_animation.xml (إنشاء res-> anim-> in_animation.xml)
<?xml version="1.0" encoding="utf-8"?>
  <set xmlns:android="http://schemas.android.com/apk/res/android">

  <objectAnimator
  android:valueFrom="1.0"
  android:valueTo="0.0"
  android:propertyName="alpha"
  android:duration="0" />

  <objectAnimator
  android:valueFrom="-180"
  android:valueTo="0"
  android:propertyName="rotationY"
  android:repeatMode="reverse"
  android:duration="@integer/anim_length" />

  <objectAnimator
  android:valueFrom="0.0"
  android:valueTo="1.0"
  android:propertyName="alpha"
  android:startOffset="@integer/anim_length_half"
  android:duration="0" />
  </set>
out_animation.xml (إنشاء res-> anim-> out_animation.xml)
<?xml version="1.0" encoding="utf-8"?>
  <set xmlns:android="http://schemas.android.com/apk/res/android">
  <objectAnimator
  android:valueFrom="0"
  android:valueTo="180"
  android:propertyName="rotationY"
  android:duration="@integer/anim_length" />

  <objectAnimator
  android:valueFrom="1.0"
  android:valueTo="0.0"
  android:propertyName="alpha"
  android:startOffset="@integer/anim_length_half"
  android:duration="0" />
  </set>
oval.xml (إنشاء في res-> drawable-> oval.xml)
<?xml version="1.0" encoding="utf-8"?>
  <shape xmlns:android="http://schemas.android.com/apk/res/android"
  android:shape="oval">
  <corners android:radius="16dp"/>
  <solid android:color="#fff"/>
  <stroke android:width="2dp" android:color="#000"></stroke>
  </shape>
الخطوة 6.6 - إعداد تحريك الرسوم المتحركة:
 تُستخدم علامة <translate> في هذه الرسوم المتحركة للتحكم في موضع الكائن. يحتوي على المعلمات التالية:
fromXDelta: يشير إلى التغيير في إحداثي X لتطبيقه في بداية الرسم المتحرك
fromYDelta: يشير إلى التغيير في إحداثيات Y ليتم تطبيقها في بداية الرسم المتحرك
toXDelta: يشير إلى التغيير في إحداثيات X ليتم تطبيقها في نهاية الرسم المتحرك
toYDelta: يشير إلى التغيير في إحداثيات Y ليتم تطبيقه في نهاية الرسم المتحرك
fragment_move.xml (إنشاء في مجلد layout ):
<?xml version="1.0" encoding="utf-8"?>
  <RelativeLayout xmlns:android="http://schemas.android.com/apk/res/android"
  android:layout_width="match_parent"
  android:layout_height="match_parent"
  android:gravity="center">

  <ImageView android:id="@+id/imgmove"
  android:layout_width="150dp"
  android:layout_height="100dp"
  android:src="@drawable/move"
  android:layout_alignParentTop="true" />

  <Button android:id="@+id/btnmove"
  android:layout_width="wrap_content"
  android:layout_height="wrap_content"
  android:text="Start Moving"
  android:layout_marginRight="21dp"
  android:layout_marginEnd="21dp"
  android:layout_marginBottom="39dp"
  android:layout_alignParentBottom="true"
  android:layout_alignParentRight="true"
  android:layout_alignParentEnd="true" />

  </RelativeLayout>
movefragment.java (إنشاء في مجلد Fragment ):
package com.example.abhishek.animationexample.fragment;

  import android.support.v4.app.Fragment;
  import android.os.Bundle;
  import android.support.annotation.Nullable;
  import android.view.LayoutInflater;
  import android.view.View;
  import android.view.ViewGroup;
  import android.view.animation.Animation;
  import android.view.animation.AnimationUtils;
  import android.widget.Button;
  import android.widget.ImageView;

  import com.example.abhishek.animationexample.R;

  /**
  * Created by abhiandroid
  */
  public class movefragment extends Fragment implements Animation.AnimationListener{ @Nullable
  ImageView imageView;
  Button btnmove;
  View view;
  Animation animMove;

  @Override
  public View onCreateView(LayoutInflater inflater, @Nullable ViewGroup container, Bundle savedInstanceState) {

  view = inflater.inflate(R.layout.fragment_move, container, false);
  imageView = (ImageView) view.findViewById(R.id.imgmove);
  btnmove = (Button)view.findViewById(R.id.btnmove);
  animMove = AnimationUtils.loadAnimation(getContext(),
  R.anim.move );
  animMove.setAnimationListener(this);

  btnmove.setOnClickListener(new View.OnClickListener() {
  @Override
  public void onClick(View v) {

  imageView.startAnimation(animMove);
  }
  });
  return view;
  }

  @Override
  public void onAnimationStart(Animation animation) {
  }

  @Override
  public void onAnimationEnd(Animation animation) {
  }

  @Override
  public void onAnimationRepeat(Animation animation) {
  }
  }
move.xml (إنشاء دليل موارد الرسوم المتحركة في مجلد الرسوم المتحركة anim):
<?xml version="1.0" encoding="utf-8"?>
  <set
  xmlns:android="http://schemas.android.com/apk/res/android"
  android:interpolator="@android:anim/linear_interpolator"
  android:fillAfter="true">
  <translate
  android:fromXDelta="0%p"
  android:toXDelta="60%p"
  android:duration="1500" />
  </set>
الخطوة 6.7 - إعداد تدوير الرسوم المتحركة
 تُستخدم علامة <rotate> للتحكم في تدوير كائن في حركة التدوير. يحدث الدوران في المستوى XY. (0،0) هي نقطة الدوران الافتراضية.
السمات التي تحدد زوايا الدوران:
android: fromDegrees: يحدد تعويض التدوير لتطبيقه في بداية الرسوم المتحركة.
android: toDegrees: يحدد تعويض التدوير لتطبيقه في نهاية الرسوم المتحركة.
على مدار الساعة - استخدم قيمة toDegrees موجبة
ضد عقارب الساعة - استخدم قيمة إلى درجات سلبية
حدود:
pivotX: يشير إلى إحداثي X للنقطة التي يدور حولها الكائن
المحور ص: يشير إلى إحداثي ص للنقطة التي يدور حولها الكائن
android: تكرار الوضع: "عكس" ( مفيد عندما تريد تكرار الرسوم المتحركة)
android: تكرار الكونت: "لانهائي" ( يحدد عدد التكرارات على الرسوم المتحركة. لقد قمنا بتعيين هذه القيمة على عدد لا نهائي من الرسوم المتحركة الآن ستتكرر مرات لا نهائية)
android: interpolator: تشير هذه الخاصية إلى معدل التغيير في الرسوم المتحركة. يمكنك تحديد أدوات الاستيفاء الخاصة بك باستخدام الوقت كقيود. في هذه الرسوم المتحركة ، استخدمنا محرفًا داخليًا iecycle interpolator
fragment_rotate.xml (إنشاء في مجلد التخطيط):
<?xml version="1.0" encoding="utf-8"?>
  <RelativeLayout xmlns:android="http://schemas.android.com/apk/res/android"
  android:layout_width="match_parent"
  android:layout_height="match_parent"
  android:gravity="center">
  <ImageView android:id="@+id/imgrotate"
  android:layout_width="222dp"
  android:layout_height="200dp"
  android:src="@drawable/rotate"
  android:layout_marginTop="92dp"
  android:layout_alignParentTop="true"
  android:layout_alignParentRight="true"
  android:layout_alignParentEnd="true"
  android:layout_marginRight="65dp"
  android:layout_marginEnd="65dp" />
  <Button android:id="@+id/btnrotate"
  android:layout_width="wrap_content"
  android:layout_height="wrap_content"
  android:text="Start Rotating"
  android:layout_marginBottom="40dp"
  android:layout_marginRight="42dp"
  android:layout_marginEnd="42dp"
  android:layout_alignParentBottom="true"
  android:layout_alignParentRight="true"
  android:layout_alignParentEnd="true" />
  </RelativeLayout>
rotatefragment.java: (إنشاء في مجلد جزء)
package com.example.abhishek.animationexample.fragment;

  import android.support.v4.app.Fragment;
  import android.os.Bundle;
  import android.support.annotation.Nullable;
  import android.view.LayoutInflater;
  import android.view.View;
  import android.view.ViewGroup;
  import android.view.animation.Animation;
  import android.view.animation.AnimationUtils;
  import android.widget.Button;
  import android.widget.ImageView;

  import com.example.abhishek.animationexample.R;
  /**
  * Created by abhiandroid
  */

  public class rotatefragment extends Fragment implements Animation.AnimationListener{ @Nullable
  ImageView imageView;
  Button btnrotate;
  View view;
  Animation animRotate;
  @Override
  public View onCreateView(LayoutInflater inflater, @Nullable ViewGroup container, Bundle savedInstanceState) {

  view = inflater.inflate(R.layout.fragment_rotate, container, false);
  imageView = (ImageView) view.findViewById(R.id.imgrotate);
  btnrotate = (Button)view.findViewById(R.id.btnrotate);
  animRotate = AnimationUtils.loadAnimation(getContext(),
  R.anim.rotate );
  animRotate.setAnimationListener(this);

  btnrotate.setOnClickListener(new View.OnClickListener() {
  @Override
  public void onClick(View v) {

  imageView.startAnimation(animRotate);
  }
  });
  return view;
  }
  @Override
  public void onAnimationStart(Animation animation) {
  }
  @Override
  public void onAnimationEnd(Animation animation) {
  }
  @Override
  public void onAnimationRepeat(Animation animation) {
  }
  }
rotate.xml (إنشاء في مجلد الرسوم المتحركة):
<?xml version="1.0" encoding="utf-8"?>
  <set xmlns:android="http://schemas.android.com/apk/res/android">
  <rotate android:fromDegrees="0"
  android:toDegrees="360"
  android:pivotX="70%"
  android:pivotY="70%"
  android:duration="1000"
  android:repeatMode="restart"
  android:repeatCount="infinite"
  android:interpolator="@android:anim/cycle_interpolator"/>
  </set>
الخطوة 6.8 - إعداد الرسوم المتحركة المتتابعة:
 في هذه الرسوم المتحركة ، استخدمنا startOffset لإعطاء تأخير بين الرسوم المتحركة.
android: startOffset: يشير إلى وقت الانتظار قبل أن تبدأ الرسوم المتحركة. تُستخدم هذه الخاصية بشكل أساسي لأداء حركات متعددة بطريقة متسلسلة
fragment_sequentialanimation.xml (إنشاء في مجلد التخطيط):
<?xml version="1.0" encoding="utf-8"?>
  <RelativeLayout xmlns:android="http://schemas.android.com/apk/res/android"
  android:layout_width="fill_parent"
  android:layout_height="fill_parent">

  <ImageView android:id="@+id/imgsequence"
  android:layout_width="wrap_content"
  android:layout_height="wrap_content"
  android:src="@drawable/sequential"
  android:layout_marginBottom="309dp"
  android:layout_above="@+id/btnSequence"
  android:layout_toStartOf="@+id/btnSequence" />

  <Button android:id="@+id/btnSequence"
  android:layout_width="wrap_content"
  android:layout_height="wrap_content"
  android:text="Start Animation"
  android:layout_marginBottom="18dp"
  android:layout_alignParentBottom="true"
  android:layout_centerHorizontal="true" />

  </RelativeLayout>
Sequentialanimationfragment.java (إنشاء في مجلد الأجزاء):
package com.example.abhishek.animationexample.fragment;

  import android.support.v4.app.Fragment;
  import android.os.Bundle;
  import android.support.annotation.Nullable;
  import android.view.LayoutInflater;
  import android.view.View;
  import android.view.ViewGroup;
  import android.view.animation.Animation;
  import android.view.animation.AnimationUtils;
  import android.widget.Button;
  import android.widget.ImageView;

  import com.example.abhishek.animationexample.R;

  /**
  * Created by abhishek on 27/10/17.
  */

  public class sequentialanimationfragment extends Fragment implements     Animation.AnimationListener{ @Nullable
  ImageView imageView;
  Button btnStart;
  View view;
  Animation animSequence;

  @Override
  public View onCreateView(LayoutInflater inflater, @Nullable ViewGroup container, Bundle savedInstanceState) {

  view = inflater.inflate(R.layout.fragment_sequentialanimation, container, false);
  imageView = (ImageView) view.findViewById(R.id.imgsequence);
  btnStart = (Button)view.findViewById(R.id.btnSequence);
  animSequence = AnimationUtils.loadAnimation(getContext(),
  R.anim.sequential );
  animSequence.setAnimationListener(this);

  btnStart.setOnClickListener(new View.OnClickListener() {
  @Override
  public void onClick(View v) {

  imageView.startAnimation(animSequence);
  }
  });
  return view;
  }
  @Override
  public void onAnimationStart(Animation animation) {
  }
  @Override
  public void onAnimationEnd(Animation animation) {
  }
  @Override
  public void onAnimationRepeat(Animation animation) {
  }
  }
Sequential.xml (إنشاء في مجلد الرسوم المتحركة):
<?xml version="1.0" encoding="utf-8"?>
  <set xmlns:android="http://schemas.android.com/apk/res/android"
  android:fillAfter="true"
  android:interpolator="@android:anim/linear_interpolator" >
  <!-- Use startOffset to give delay between animations -->
  <!-- Move -->
  <translate
  android:duration="800"
  android:fillAfter="true"
  android:fromXDelta="0%p"
  android:startOffset="300"
  android:toXDelta="75%p" />
  <translate
  android:duration="800"
  android:fillAfter="true"
  android:fromYDelta="0%p"
  android:startOffset="1100"
  android:toYDelta="70%p" />
  <translate
  android:duration="800"
  android:fillAfter="true"
  android:fromXDelta="0%p"
  android:startOffset="1900"
  android:toXDelta="-75%p" />
  <translate
  android:duration="800"
  android:fillAfter="true"
  android:fromYDelta="0%p"
  android:startOffset="2700"
  android:toYDelta="-70%p" />

  <!-- Rotate 360 degrees -->
  <rotate
  android:duration="1000"
  android:fromDegrees="0"
  android:interpolator="@android:anim/cycle_interpolator"
  android:pivotX="50%"
  android:pivotY="50%"
  android:startOffset="3800"
  android:repeatCount="infinite"
  android:repeatMode="restart"
  android:toDegrees="360" />
  </set>
الخطوة 6.9 - إعداد الرسوم المتحركة من SlideUp:
 تُستخدم علامة <translate> في هذه الرسوم المتحركة لتحريك ImageView لأعلى. لقد استخدمنا السمات التالية:
المدة: يُشار إلى المدة التي يتم فيها إكمال الرسوم المتحركة على أنها سمة المدة. يشير إلى المدة المثالية لإظهار الانتقال على الشاشة.
fromYDelta: يشير إلى التغيير في إحداثيات Y ليتم تطبيقها في بداية الرسم المتحرك
toYDelta: يشير إلى التغيير في إحداثيات Y ليتم تطبيقه في نهاية الرسم المتحرك
fragment_slideup.xml (إنشاء في مجلد التخطيط):
<?xml version="1.0" encoding="utf-8"?>
  <RelativeLayout xmlns:android="http://schemas.android.com/apk/res/android"
  android:layout_width="fill_parent"
  android:layout_height="fill_parent" >

  <ImageView
  android:id="@+id/imgslideup"
  android:layout_width="wrap_content"
  android:layout_height="wrap_content"
  android:layout_centerInParent="true"
  android:src="@drawable/slide" />

  <Button
  android:id="@+id/btnSlideup"
  android:layout_width="wrap_content"
  android:layout_height="wrap_content"
  android:layout_marginBottom="22dp"
  android:text="Start Animation"
  android:layout_alignParentBottom="true"
  android:layout_alignRight="@+id/imgslideup"
  android:layout_alignEnd="@+id/imgslideup" />

  </RelativeLayout>
slideupfragment.java (إنشاء في مجلد جزء):
package com.example.abhishek.animationexample.fragment;

  import android.support.v4.app.Fragment;
  import android.os.Bundle;
  import android.support.annotation.Nullable;
  import android.view.LayoutInflater;
  import android.view.View;
  import android.view.ViewGroup;
  import android.view.animation.Animation;
  import android.view.animation.AnimationUtils;
  import android.widget.Button;
  import android.widget.ImageView;

  import com.example.abhishek.animationexample.R;

  /**
  * Created by abhishek on 27/10/17.
  */

  public class slideupfragment extends Fragment implements Animation.AnimationListener{ @Nullable
  ImageView imageView;
  Button btnStart;
  View view;
  Animation animSlideup;

  @Override
  public View onCreateView(LayoutInflater inflater, @Nullable ViewGroup container, Bundle savedInstanceState) {

  view = inflater.inflate(R.layout.fragment_slideup, container, false);
  imageView = (ImageView) view.findViewById(R.id.imgslideup);
  btnStart = (Button)view.findViewById(R.id.btnSlideup);
  animSlideup = AnimationUtils.loadAnimation(getContext(),
  R.anim.slide_up);
  animSlideup.setAnimationListener(this);

  btnStart.setOnClickListener(new View.OnClickListener() {
  @Override
  public void onClick(View v) {

  imageView.startAnimation(animSlideup);
  }
  });
  return view;
  }

  @Override
  public void onAnimationStart(Animation animation) {
  }

  @Override
  public void onAnimationEnd(Animation animation) {
  }

  @Override
  public void onAnimationRepeat(Animation animation) {
  }
  }
slide_up.xml (أنشئ في مجلد الرسوم المتحركة):
<?xml version="1.0" encoding="utf-8"?>
  <set xmlns:android="http://schemas.android.com/apk/res/android" >

  <translate
  android:duration="1000"
  android:fromYDelta="100%"
  android:toYDelta="0" />
  </set>
الخطوة 6.10 - إعداد رسم متحرك لأسفل:
 حركة التمرير لأسفل هي عكس الرسوم المتحركة تمامًا. يجب عليك تبادل قيم android: fromYScale و android: toYScale .
fragment_slidedown.xml (إنشاء في مجلد التخطيط):
<?xml version="1.0" encoding="utf-8"?>
  <RelativeLayout xmlns:android="http://schemas.android.com/apk/res/android"
  android:layout_width="fill_parent"
  android:layout_height="fill_parent" >

  <ImageView
  android:id="@+id/imgSlidedown"
  android:layout_width="wrap_content"
  android:layout_height="wrap_content"
  android:layout_centerInParent="true"
  android:src="@drawable/slide"
  android:visibility="gone" />

  <Button
  android:id="@+id/btnSlidedown"
  android:layout_width="wrap_content"
  android:layout_height="wrap_content"
  android:text="Start Animation"
  android:layout_marginRight="44dp"
  android:layout_marginEnd="44dp"
  android:layout_marginBottom="38dp"
  android:layout_alignParentBottom="true"
  android:layout_alignParentRight="true"
  android:layout_alignParentEnd="true" />

  </RelativeLayout>
slidedownfragment.java (إنشاء في مجلد الأجزاء) :
package com.example.abhishek.animationexample.fragment;

  import android.support.v4.app.Fragment;
  import android.os.Bundle;
  import android.support.annotation.Nullable;
  import android.view.LayoutInflater;
  import android.view.View;
  import android.view.ViewGroup;
  import android.view.animation.Animation;
  import android.view.animation.AnimationUtils;
  import android.widget.Button;
  import android.widget.ImageView;

  import com.example.abhishek.animationexample.R;
  /**
  * Created by abhiandroid
  */
  public class slidedownfragment extends Fragment implements Animation.AnimationListener {
  @Nullable
  ImageView imageView;
  Button btnStart;
  View view;
  Animation animSlidedown;

  @Override
  public View onCreateView(final LayoutInflater inflater, @Nullable ViewGroup container, Bundle savedInstanceState) {

  view = inflater.inflate(R.layout.fragment_slidedown, container, false);
  imageView = (ImageView) view.findViewById(R.id.imgSlidedown);
  btnStart = (Button) view.findViewById(R.id.btnSlidedown);
  animSlidedown = AnimationUtils.loadAnimation(getContext(),
  R.anim.slide_down);
  animSlidedown.setAnimationListener(this);

  btnStart.setOnClickListener(new View.OnClickListener() {
  @Override
  public void onClick(View v) {
  imageView.setVisibility(View.VISIBLE);
  imageView.startAnimation(animSlidedown);
  }
  });
  return view;
  }

  @Override
  public void onAnimationStart(Animation animation) {
  }

  @Override
  public void onAnimationEnd(Animation animation) {
  }

  @Override
  public void onAnimationRepeat(Animation animation) {
  }
  }
slide_down.xml (أنشئ دليل موارد الرسوم المتحركة في مجلد الرسوم المتحركة):
<?xml version="1.0" encoding="utf-8"?>
  <set xmlns:android="http://schemas.android.com/apk/res/android" >
  <translate
  android:duration="1000"
  android:fromYDelta="0"
  android:toYDelta="100%" />
  </set>
الخطوة 6.11 - إعداد Swap Animation:
 ستنشئ هذه الرسوم المتحركة دورانًا ثلاثي الأبعاد على المحور ص. يتم تحديد الدوران بزاوية البداية وزاوية النهاية. كلا الزاويتين بالدرجات. يتم إجراء الدوران حول نقطة مركزية على الفضاء ثنائي الأبعاد ، محددًا بواسطة زوج من إحداثيات X و Y ، يُطلق عليهما centerX و centerY. عندما يبدأ الرسم المتحرك ، يتم إجراء ترجمة على المحور Z (العمق).
fromDegrees: يمثل زاوية البداية للدوران ثلاثي الأبعاد إلى
درجات: يمثل زاوية نهاية مركز الدوران ثلاثي الأبعاد
X: يمثل المركز X لمركز الدوران ثلاثي الأبعاد
Y: يمثل المركز Y للدوران ثلاثي الأبعاد
fragment_swapanimation.xml (إنشاء في مجلد التخطيط):
<?xml version="1.0" encoding="utf-8"?>
  <FrameLayout xmlns:android="http://schemas.android.com/apk/res/android"
  android:id="@+id/container"
  android:layout_width="fill_parent"
  android:layout_height="fill_parent">
  <ListView
  android:id="@android:id/list"
  android:persistentDrawingCache="animation|scrolling"
  android:layout_width="fill_parent"
  android:layout_height="fill_parent"
  android:layoutAnimation="@anim/layout_bottom_to_top_slide" />

  <ImageView
  android:id="@+id/picture"
  android:scaleType="fitCenter"
  android:layout_width="fill_parent"
  android:layout_height="fill_parent"
  android:visibility="gone" />
  </FrameLayout>
الآن قم بإنشاء فئة java ضمن الحزمة الرئيسية الخاصة بك وقم بتسميتها -
Rotation.java (إنشاء في مجلد جزء):
package com.example.abhishek.animationexample;

  import android.graphics.Camera;
  import android.graphics.Matrix;
  import android.view.animation.Animation;
  import android.view.animation.Transformation;

  public class Rotation extends Animation {
  private final float mFromDegrees;
  private final float mToDegrees;
  private final float mCenterX;
  private final float mCenterY;
  private final float mDepthZ;
  private final boolean mReverse;
  private Camera mCamera;


  public Rotation(float fromDegrees, float toDegrees,
  float centerX, float centerY, float depthZ, boolean reverse) {
  mFromDegrees = fromDegrees;
  mToDegrees = toDegrees;
  mCenterX = centerX;
  mCenterY = centerY;
  mDepthZ = depthZ;
  mReverse = reverse;
  }

  @Override
  public void initialize(int width, int height, int parentWidth, int parentHeight) {
  super.initialize(width, height, parentWidth, parentHeight);
  mCamera = new Camera();
  }

  @Override
  protected void applyTransformation(float interpolatedTime, Transformation t) {
  final float fromDegrees = mFromDegrees;
  float degrees = fromDegrees + ((mToDegrees - fromDegrees) * interpolatedTime);

  final float centerX = mCenterX;
  final float centerY = mCenterY;
  final Camera camera = mCamera;

  final Matrix matrix = t.getMatrix();

  camera.save();
  if (mReverse) {
  camera.translate(0.0f, 0.0f, mDepthZ * interpolatedTime);
  } else {
  camera.translate(0.0f, 0.0f, mDepthZ * (1.0f - interpolatedTime));
  }
  camera.rotateY(degrees);
  camera.getMatrix(matrix);
  camera.restore();

  matrix.preTranslate(-centerX, -centerY);
  matrix.postTranslate(centerX, centerY);
  }
  }
swapanimationfragment.java (إنشاء في مجلد الأجزاء):
الموضع: يمثل العنصر الذي تم النقر عليه لإظهار صورة ، أو -1 لإظهار
بداية القائمة : زاوية البداية التي يجب أن يبدأ عندها التدوير
نهاية: زاوية نهاية التدوير.
يتم استخدام مستمع الرسوم المتحركة لتشغيل الحركة التالية
package com.example.abhishek.animationexample.fragment;

  import android.app.Activity;
  import android.os.Bundle;
  import android.support.annotation.Nullable;
  import android.support.v4.app.Fragment;
  import android.view.LayoutInflater;
  import android.view.View;
  import android.view.ViewGroup;
  import android.view.animation.AccelerateInterpolator;
  import android.view.animation.Animation;
  import android.view.animation.DecelerateInterpolator;
  import android.widget.AdapterView;
  import android.widget.ArrayAdapter;
  import android.widget.ImageView;
  import android.widget.ListView;

  import com.example.abhishek.animationexample.R;
  import com.example.abhishek.animationexample.Rotation;

  /**
  * Created by abhiandroid
  */

  public class swapanimationfragment extends Fragment implements
  AdapterView.OnItemClickListener, View.OnClickListener {
  private ListView mPhotosList;
  private ViewGroup mContainer;
  private ImageView mImageView;
  // Names of the photos we show in the list
  private static final String[] PHOTOS_NAMES = new String[]{
  "India",
  "BanglaDesh",
  "Germany",
  "Canada"
  };

  // Resource identifiers for the photos we want to display
  private static final int[] PHOTOS_RESOURCES = new int[]{
  R.drawable.india,
  R.drawable.bangladesh,
  R.drawable.germany,
  R.drawable.canada
  };
  View view;

  @Nullable
  @Override
  public View onCreateView(LayoutInflater inflater, @Nullable ViewGroup container, @Nullable Bundle savedInstanceState) {
  view = inflater.inflate(R.layout.fragment_swapanimation, container, false);

  mPhotosList = (ListView) view.findViewById(android.R.id.list);
  mImageView = (ImageView) view.findViewById(R.id.picture);
  mContainer = (ViewGroup) view.findViewById(R.id.container);

  // Prepare the ListView
  final ArrayAdapter<String> adapter = new ArrayAdapter<String>(getContext(),
  android.R.layout.simple_list_item_1, PHOTOS_NAMES);

  mPhotosList.setAdapter(adapter);
  mPhotosList.setOnItemClickListener(this);

  // Prepare the ImageView
  mImageView.setClickable(true);
  mImageView.setFocusable(true);
  mImageView.setOnClickListener(this);

  mContainer.setPersistentDrawingCache(ViewGroup.PERSISTENT_ANIMATION_CACHE);
  return view;
  }

  private void applyRotation(int position, float start, float end) {
  // Find the center of the container
  final float centerX = mContainer.getWidth() / 2.0f;
  final float centerY = mContainer.getHeight() / 2.0f;

  final Rotation rotation =
  new Rotation(start, end, centerX, centerY, 310.0f, true);
  rotation.setDuration(500);
  rotation.setFillAfter(true);
  rotation.setInterpolator(new AccelerateInterpolator());
  rotation.setAnimationListener(new DisplayNextView(position));

  mContainer.startAnimation(rotation);
  }

  public void onItemClick(AdapterView parent, View v, int position, long id) {
  // Pre-load the image then start the animation
  mImageView.setImageResource(PHOTOS_RESOURCES[position]);
  applyRotation(position, 0, 90);
  }

  public void onClick(View v) {
  applyRotation(-1, 180, 90);
  }

  /**
  * This class listens for the end of the first half of the animation.
  * It then posts a new action that effectively swaps the views when  the container is rotated 90 degrees and thus invisible.
  */
  private final class DisplayNextView implements Animation.AnimationListener {
  private final int mPosition;

  private DisplayNextView(int position) {
  mPosition = position;
  }

  public void onAnimationStart(Animation animation) {
  }

  public void onAnimationEnd(Animation animation) {
  mContainer.post(new SwapViews(mPosition));
  }

  public void onAnimationRepeat(Animation animation) {
  }
  }

  /**
  * This class is responsible for swapping the views and start the    second half of the animation.
  */
  private final class SwapViews implements Runnable {
  private final int mPosition;

  public SwapViews(int position) {
  mPosition = position;
  }

  public void run() {
  final float centerX = mContainer.getWidth() / 2.0f;
  final float centerY = mContainer.getHeight() / 2.0f;
  Rotation rotation;

  if (mPosition > -1) {
  mPhotosList.setVisibility(View.GONE);
  mImageView.setVisibility(View.VISIBLE);
  mImageView.requestFocus();

  rotation = new Rotation(90, 180, centerX, centerY, 310.0f, false);
  } else {
  mImageView.setVisibility(View.GONE);
  mPhotosList.setVisibility(View.VISIBLE);
  mPhotosList.requestFocus();

  rotation = new Rotation(90, 0, centerX, centerY, 310.0f, false);
  }
  rotation.setDuration(5000);
  rotation.setFillAfter(true);
  rotation.setInterpolator(new DecelerateInterpolator());
  mContainer.startAnimation(rotation);
  }
  }
  }
الدقة-> anim-> layout_bottom_to_top_slide.xml:
<?xml version="1.0" encoding="utf-8"?>

  <layoutAnimation
  xmlns:android="http://schemas.android.com/apk/res/android"
  android:delay="30%"
  android:animationOrder="reverse"
  android:animation="@anim/slide_right" />
الدقة-> anim-> slide_right.xml:
<?xml version="1.0" encoding="utf-8"?>

  <set xmlns:android="http://schemas.android.com/apk/res/android"
  android:interpolator="@android:anim/accelerate_interpolator">
  <translate
  android:fromXDelta="-100%p"
  android:toXDelta="0"
  android:duration="@android:integer/config_shortAnimTime" />
  </set>
وفي مجلد قابل للرسم ، قم بتنزيل أعلام أربع دول: الهند وبنغلاديش وألمانيا وكندا على التوالي as india.png، Bangladesh.png، germany.png، canada.png.
الخطوة 6.12 - إعداد الرسوم المتحركة معًا:
 تشير الرسوم المتحركة معًا إلى كتابة جميع الرسوم المتحركة واحدة تلو الأخرى دون استخدام android: startOffset ( تشير إلى وقت الانتظار قبل بدء الرسوم المتحركة. تُستخدم هذه الخاصية بشكل أساسي لأداء رسوم متحركة متعددة بطريقة متسلسلة )
android: fillAfter: تحدد هذه السمة ما إذا كان يجب أن يكون العرض مرئيًا أم لا في نهاية الرسوم المتحركة ، وقد حددنا قيمتها في الرسوم المتحركة الخاصة بنا ، وإذا تم تعيينها على false ، فستعود تغييرات العنصر إلى حالتها السابقة بعد الرسوم المتحركة
android: interpolator: تشير هذه الخاصية إلى معدل التغيير في الرسوم المتحركة. يمكنك تحديد أدوات الاستيفاء الخاصة بك باستخدام الوقت كقيود. في هذه الرسوم المتحركة ، استخدمنا محرفًا داخليًا ، أي محرف خطي
fragment_togetheranimation.xml (إنشاء في مجلد التخطيط):
<?xml version="1.0" encoding="utf-8"?>
  <RelativeLayout xmlns:android="http://schemas.android.com/apk/res/android"
  android:layout_width="fill_parent"
  android:layout_height="fill_parent">

  <ImageView android:id="@+id/imgtogether"
  android:layout_width="200dp"
  android:layout_height="122dp"
  android:src="@drawable/together"
  android:layout_marginTop="156dp"
  android:layout_alignParentTop="true"
  android:layout_centerHorizontal="true" />

  <Button android:id="@+id/btntogether"
  android:layout_width="wrap_content"
  android:layout_height="wrap_content"
  android:text="Start"
  android:layout_marginRight="56dp"
  android:layout_marginEnd="56dp"
  android:layout_alignParentBottom="true"
  android:layout_alignParentRight="true"
  android:layout_alignParentEnd="true"
  android:layout_marginBottom="24dp" />

  </RelativeLayout>
togetheranimationfragment.java (إنشاء في مجلد تجزيئي):
package com.example.abhishek.animationexample.fragment;

  import android.support.v4.app.Fragment;
  import android.os.Bundle;
  import android.support.annotation.Nullable;
  import android.view.LayoutInflater;
  import android.view.View;
  import android.view.ViewGroup;
  import android.view.animation.Animation;
  import android.view.animation.AnimationUtils;
  import android.widget.Button;
  import android.widget.ImageView;

  import com.example.abhishek.animationexample.R;

  /**
  * Created by abhiandroid
  */

  public class togetheranimationfragment extends Fragment implements Animation.AnimationListener{ @Nullable
  ImageView imageView;
  Button btnStart;
  View view;
  Animation animTogether;

  @Override
  public View onCreateView(LayoutInflater inflater, @Nullable ViewGroup container, Bundle savedInstanceState) {

  view = inflater.inflate(R.layout.fragment_togetheranimation, container, false);
  imageView = (ImageView) view.findViewById(R.id.imgtogether);
  btnStart = (Button)view.findViewById(R.id.btntogether);
  animTogether = AnimationUtils.loadAnimation(getContext(),
  R.anim.together );
  animTogether.setAnimationListener(this);

  btnStart.setOnClickListener(new View.OnClickListener() {
  @Override
  public void onClick(View v) {

  imageView.startAnimation(animTogether);
  }
  });
  return view;

  }

  @Override
  public void onAnimationStart(Animation animation) {

  }

  @Override
  public void onAnimationEnd(Animation animation) {

  }

  @Override
  public void onAnimationRepeat(Animation animation) {

  }
  }
together.xml (إنشاء دليل موارد الرسوم المتحركة في مجلد الرسوم المتحركة):
<?xml version="1.0" encoding="utf-8"?>
  <set xmlns:android="http://schemas.android.com/apk/res/android"
  android:fillAfter="true"
  android:interpolator="@android:anim/linear_interpolator" >
  <!-- Move -->
  <scale
  xmlns:android="http://schemas.android.com/apk/res/android"
  android:duration="4000"
  android:fromXScale="1"
  android:fromYScale="1"
  android:pivotX="50%"
  android:pivotY="50%"
  android:toXScale="4"
  android:toYScale="4" >
  </scale>

  <!-- Rotate 180 degrees -->
  <rotate
  android:duration="500"
  android:fromDegrees="0"
  android:pivotX="50%"
  android:pivotY="50%"
  android:repeatCount="infinite"
  android:repeatMode="restart"
  android:toDegrees="360" />
  </set>
الخطوة 6.13 - إعداد ZoomIn Animation:
 ل تكبير استخدام <نطاق> العلامة. يحدد مقياس الكائن ، ويحتوي على المعلمات التالية:
android: المدة: يُشار إلى المدة التي تكتمل فيها الرسوم المتحركة باسم سمة المدة. يشير إلى المدة المثالية لإظهار الانتقال على الشاشة.
android: fromXScale : عامل قياس أفقي ليتم تطبيقه في بداية الرسم المتحرك.
android: fromYScale: عامل التحجيم الرأسي للتطبيق في بداية الرسوم المتحركة.
android: toXScale: عامل قياس أفقي ليتم تطبيقه في نهاية الرسم المتحرك.
android: toYScale: عامل التحجيم العمودي ليتم تطبيقه في نهاية الرسوم المتحركة.
pivotX و pivotY: هي النقطة المركزية للرسوم المتحركة ؛
android: pivotX = "50٪" و android: pivotY = "50٪" يعني أن التكبير سيبدأ من المركز.
للتكبير: fromXScale ، يجب أن تكون قيم سمات fromYScale أقل من toXScale ، toYScale
fragment_zoomin.xml (إنشاء في مجلد التخطيط):
<?xml version="1.0" encoding="utf-8"?>
  <RelativeLayout xmlns:android="http://schemas.android.com/apk/res/android"
  android:layout_width="match_parent"
  android:layout_height="match_parent"

  android:gravity="center">

  <ImageView android:id="@+id/imgzoomin"
  android:layout_width="188dp"
  android:layout_height="150dp"
  android:src="@drawable/zoom"
  android:layout_marginLeft="68dp"
  android:layout_marginStart="68dp"
  android:layout_marginTop="91dp"
  android:layout_alignParentTop="true"
  android:layout_alignParentLeft="true"
  android:layout_alignParentStart="true" />

  <Button android:id="@+id/btnzoomin"
  android:layout_width="wrap_content"
  android:layout_height="wrap_content"
  android:text="Start ZOOM IN"
  android:layout_marginBottom="19dp"
  android:layout_alignParentBottom="true"
  android:layout_alignParentRight="true"
  android:layout_alignParentEnd="true"
  android:layout_marginRight="36dp"
  android:layout_marginEnd="36dp" />

  </RelativeLayout>
zoominfragment.java (إنشاء في مجلد الأجزاء):
package com.example.abhishek.animationexample.fragment;

  import android.support.v4.app.Fragment;
  import android.os.Bundle;
  import android.support.annotation.Nullable;
  import android.view.LayoutInflater;
  import android.view.View;
  import android.view.ViewGroup;
  import android.view.animation.Animation;
  import android.view.animation.AnimationUtils;
  import android.widget.Button;
  import android.widget.ImageView;

  import com.example.abhishek.animationexample.R;

  /**
  * Created by abhiandroid
  */

  public class zoominfragment extends Fragment implements Animation.AnimationListener{ @Nullable
  ImageView imageView;
  Button btnStart;
  View view;
  Animation animZoomin;

  @Override
  public View onCreateView(LayoutInflater inflater, @Nullable ViewGroup container, Bundle savedInstanceState) {

  view = inflater.inflate(R.layout.fragment_zoomin, container, false);
  imageView = (ImageView) view.findViewById(R.id.imgzoomin);
  btnStart = (Button)view.findViewById(R.id.btnzoomin);
  animZoomin = AnimationUtils.loadAnimation(getContext(),
  R.anim.zoom_in );
  animZoomin.setAnimationListener(this);

  btnStart.setOnClickListener(new View.OnClickListener() {
  @Override
  public void onClick(View v) {

  imageView.startAnimation(animZoomin);
  }
  });
  return view;
  }

  @Override
  public void onAnimationStart(Animation animation) {
  }

  @Override
  public void onAnimationEnd(Animation animation) {
  }

  @Override
  public void onAnimationRepeat(Animation animation) {
  }
  }
zoom_in.xml (إنشاء في مجلد الرسوم المتحركة):
<?xml version="1.0" encoding="utf-8"?>
  <set xmlns:android="http://schemas.android.com/apk/res/android"
  android:fillAfter="true" >
  <scale
  xmlns:android="http://schemas.android.com/apk/res/android"
  android:duration="3500"
  android:fromXScale="1.0"
  android:fromYScale="1.0"
  android:pivotX="80%"
  android:pivotY="80%"
  android:toXScale="2.0"
  android:toYScale="2.0" >
  </scale>
  </set>
الخطوة 6.14 - إعداد ZoomOut Animation:
 تصغير الرسوم المتحركة هو نفسه التكبير ولكن قيم سمات toXScale و toYScale أقل من fromXScale ، fromYScale
fragment_zoomout.xml (إنشاء في مجلد التخطيط):
<?xml version="1.0" encoding="utf-8"?>
  <RelativeLayout xmlns:android="http://schemas.android.com/apk/res/android"
  android:layout_width="match_parent"
  android:layout_height="match_parent"
  android:gravity="center">
  <ImageView android:id="@+id/imgzoomout"
  android:layout_width="188dp"
  android:layout_height="150dp"
  android:src="@drawable/zoom"
  android:layout_marginLeft="68dp"
  android:layout_marginStart="68dp"
  android:layout_marginTop="91dp"
  android:layout_alignParentTop="true"
  android:layout_alignParentLeft="true"
  android:layout_alignParentStart="true" />

  <Button android:id="@+id/btnzoomout"
  android:layout_width="wrap_content"
  android:layout_height="wrap_content"
  android:text="Start ZOOM OUT"
  android:layout_marginBottom="19dp"
  android:layout_alignParentBottom="true"
  android:layout_alignParentRight="true"
  android:layout_alignParentEnd="true"
  android:layout_marginRight="36dp"
  android:layout_marginEnd="36dp" />
  </RelativeLayout>
zoomoutfragment.java (إنشاء في مجلد الأجزاء):
package com.example.abhishek.animationexample.fragment;

  import android.support.v4.app.Fragment;
  import android.os.Bundle;
  import android.support.annotation.Nullable;
  import android.view.LayoutInflater;
  import android.view.View;
  import android.view.ViewGroup;
  import android.view.animation.Animation;
  import android.view.animation.AnimationUtils;
  import android.widget.Button;
  import android.widget.ImageView;

  import com.example.abhishek.animationexample.R;
  /**
  * Created by abhiandroid
  */
  public class zoomoutfragment extends Fragment implements Animation.AnimationListener{ @Nullable
  ImageView imageView;
  Button btnStart;
  View view;
  Animation animZoomout;

  @Override
  public View onCreateView(LayoutInflater inflater, @Nullable ViewGroup container, Bundle savedInstanceState) {

  view = inflater.inflate(R.layout.fragment_zoomout, container, false);
  imageView = (ImageView) view.findViewById(R.id.imgzoomout);
  btnStart = (Button)view.findViewById(R.id.btnzoomout);
  animZoomout = AnimationUtils.loadAnimation(getContext(),
  R.anim.zoom_out );
  animZoomout.setAnimationListener(this);

  btnStart.setOnClickListener(new View.OnClickListener() {
  @Override
  public void onClick(View v) {

  imageView.startAnimation(animZoomout);
  }
  });
  return view;
  }

  @Override
  public void onAnimationStart(Animation animation) {
  }

  @Override
  public void onAnimationEnd(Animation animation) {
  }

  @Override
  public void onAnimationRepeat(Animation animation) {
  }
  }
zoom_out.xml (إنشاء في مجلد الرسوم المتحركة):
<?xml version="1.0" encoding="utf-8"?>
  <set xmlns:android="http://schemas.android.com/apk/res/android"
  android:fillAfter="true" >

  <scale
  xmlns:android="http://schemas.android.com/apk/res/android"
  android:duration="3500"
  android:fromXScale="1.0"
  android:fromYScale="1.0"
  android:pivotX="50%"
  android:pivotY="80%"
  android:toXScale="0.2"
  android:toYScale="0.2" >
  </scale>
  </set>
المخرجات :
الآن قم بتشغيل التطبيق وافتح قائمة التنقل. انقر فوق اسم الرسوم المتحركة Animations الذي تريد رؤيته لاختباره.