ScrollView و Horizontal ScrollView TutorView مع مثال في Android
في Android ، يمكن لـ ScrollView الاحتفاظ بطفل مباشر واحد فقط. وهذا يعني أنه إذا كان لديك تخطيط معقد مع المزيد من وجهات النظر (أزرار، TextViews أو أي رأي آخر) ثم عليك وضع عليها داخل تخطيط قياسي آخر مثل جدول تخطيط ، تخطيط النسبي أو الخطي تخطيط . يمكنك تحديد layout_width و layout_height لضبط عرض الشاشة وارتفاعها. يمكنك تحديد الارتفاع والعرض في dp (كثافة بكسل) أو بكسل (بكسل). ثم بعد تضمينها في تخطيط قياسي ، أرفق التخطيط بالكامل في ScrollView لجعل كل العناصر أو طرق العرض قابلة للتمرير .
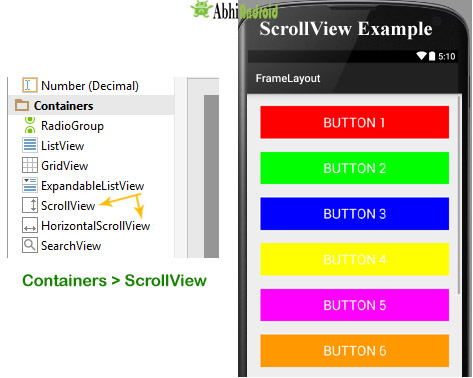
ScrollView في Android Studio Design: إنه موجود داخل الحاويات >> ScrollView أو HorizontalScrollView
ملاحظة مهمة 2: في نظام Android الافتراضي ، يتم استخدام ScrollView لتمرير العناصر في الاتجاه الرأسي وإذا كنت تريد تمرير العناصر أفقيًا ، فأنت بحاجة إلى تنفيذ ScrollView الأفقي .
تركيب ScrollView :
	<ScrollView
	android:id="@+id/scrollView"
	android:layout_width="fill_parent"
	android:layout_height="fill_parent">


	<!-- add child view’s here -->


	</ScrollView>
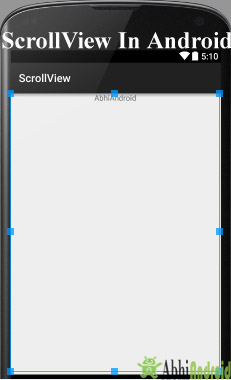
إليك كيفية ظهور Scroll View في Android:
عرض التمرير الأفقي Horizontal ScrollView :
في Android ، يمكنك تمرير العناصر أو العروض في كلا الاتجاهين الرأسي والأفقي. للتمرير في الوضع الرأسي ، نستخدم ScrollView كما هو موضح في الكود السابق لهذه المقالة وللتمرير في الاتجاه الأفقي نحتاج إلى استخدام HorizontalScrollview.

	<HorizontalScrollView
	android:id="@+id/horizontalscrollView"
	android:layout_width="fill_parent"
	android:layout_height="fill_parent">

	<-- add child view’s here -->

	</HorizontalScrollView >
خصائص طريقة عرض التمرير Attributes Of Scroll View :
ScrollView و HorizontalScrollView لهما نفس السمات ، والفرق الوحيد هو التمرير التمرير للعناصر التابعة في الاتجاه الرأسي بينما يتم تمرير عرض التمرير الأفقي للعناصر التابعة في الاتجاه الأفقي.
الآن دعنا نناقش السمات التي تساعدنا في تكوين ScrollView وعناصر التحكم التابعة له. تتضمن بعض أهم السمات التي ستستخدمها مع ScrollView ما يلي :
1. المعرّف: في android ، تُستخدم سمة المعرّف لتعريف ScrollView بشكل فريد.
فيما يلي مثال على رمز سمة المعرف مع الشرح المضمّن.
	<ScrollView
	android:id="@+id/scrollView"
	android:layout_width="fill_parent"
	android:layout_height="fill_parent"
	/>
2. أشرطة التمرير scrollbars : في نظام Android ، تُستخدم سمة أشرطة التمرير لإظهار أشرطة التمرير في الاتجاه الأفقي أو الرأسي. القيمة المحتملة لأشرطة التمرير رأسية أو أفقية أو لا شيء. بشكل افتراضي ، يتم عرض أشرطة التمرير في الاتجاه الرأسي في scrollView وفي الاتجاه الأفقي في HorizontalScrollView.
يوجد أدناه رمز مثال لسمة أشرطة التمرير حيث قمنا بتعيين أشرطة التمرير في الاتجاه الرأسي.
	< HorizontalScrollView
	android:layout_width="fill_parent"
	android:layout_height="fill_parent"
	android:scrollbars="vertical"/><!--scrollbars in vertical direction-->
مثال على ScrollView في Android Studio :
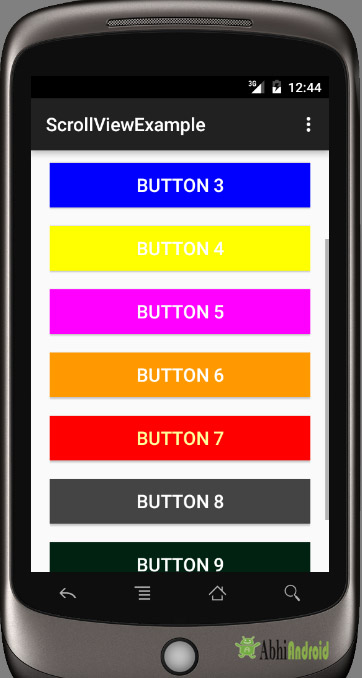
مثال 1: في هذا المثال ، سنستخدم 10 ازرار ونقوم بتمريرها باستخدام ScrollView في الاتجاه الرأسي. فيما يلي الكود والمخرج النهائي الذي سننشئه:
حدد ملف -> جديد -> مشروع جديد -> مشروع تطبيق Android (أو) مشروع Android. املأ الاستمارات وانقر فوق الزر "إنهاء" .
الخطوة 2: افتح res -> layout -> activity_main. xml (أو) main. xml وإضافة الكود أدناه. نحن هنا نقوم بإنشاء نسق نسبي به 10 أزرار متداخلة في تخطيط خطي ثم في ScrollView.
ملاحظة مهمة: تذكر أن ScrollView يمكنه الاحتفاظ بعنصر مباشر واحد فقط. لذلك علينا وضع 10 أزرار بشكل مشترك داخل Linear Layout لجعله طفلًا واحدًا. ثم نضعه داخل ScrollView.
	<RelativeLayout xmlns:android="http://schemas.android.com/apk/res/android"
	xmlns:tools="http://schemas.android.com/tools"
	android:layout_width="match_parent"
	android:layout_height="match_parent"
	tools:context=".MainActivity">

	<ScrollView
	android:layout_width="fill_parent"
	android:layout_height="fill_parent"
	android:scrollbars="vertical">

	<LinearLayout
	android:layout_width="fill_parent"
	android:layout_height="fill_parent"
	android:layout_margin="20dp"
	android:orientation="vertical">

	<Button
	android:layout_width="fill_parent"
	android:layout_height="wrap_content"
	android:layout_gravity="center"
	android:background="#f00"
	android:text="Button 1"
	android:textColor="#fff"
	android:textSize="20sp" />

	<Button
	android:layout_width="fill_parent"
	android:layout_height="wrap_content"
	android:layout_gravity="center"
	android:layout_marginTop="20dp"
	android:background="#0f0"
	android:text="Button 2"
	android:textColor="#fff"
	android:textSize="20sp" />

	<Button
	android:layout_width="fill_parent"
	android:layout_height="wrap_content"
	android:layout_gravity="center"
	android:layout_marginTop="20dp"
	android:background="#00f"
	android:text="Button 3"
	android:textColor="#fff"
	android:textSize="20sp" />

	<Button
	android:layout_width="fill_parent"
	android:layout_height="wrap_content"
	android:layout_gravity="center"
	android:layout_marginTop="20dp"
	android:background="#ff0"
	android:text="Button 4"
	android:textColor="#fff"
	android:textSize="20sp" />

	<Button
	android:layout_width="fill_parent"
	android:layout_height="wrap_content"
	android:layout_gravity="center"
	android:layout_marginTop="20dp"
	android:background="#f0f"
	android:text="Button 5"
	android:textColor="#fff"
	android:textSize="20sp" />

	<Button
	android:layout_width="fill_parent"
	android:layout_height="wrap_content"
	android:layout_gravity="center"
	android:layout_marginTop="20dp"
	android:background="#f90"
	android:text="Button 6"
	android:textColor="#fff"
	android:textSize="20sp" />

	<Button
	android:layout_width="fill_parent"
	android:layout_height="wrap_content"
	android:layout_gravity="center"
	android:layout_marginTop="20dp"
	android:background="#f00"
	android:text="Button 7"
	android:textColor="#ff9"
	android:textSize="20sp" />

	<Button
	android:layout_width="fill_parent"
	android:layout_height="wrap_content"
	android:layout_gravity="center"
	android:layout_marginTop="20dp"
	android:background="#444"
	android:text="Button 8"
	android:textColor="#fff"
	android:textSize="20sp" />

	<Button
	android:layout_width="fill_parent"
	android:layout_height="wrap_content"
	android:layout_gravity="center"
	android:layout_marginTop="20dp"
	android:background="#ff002211"
	android:text="Button 9"
	android:textColor="#fff"
	android:textSize="20sp" />

	<Button
	android:layout_width="fill_parent"
	android:layout_height="wrap_content"
	android:layout_gravity="center"
	android:layout_marginTop="20dp"
	android:background="#0f0"
	android:text="Button 10"
	android:textColor="#fff"
	android:textSize="20sp" />

	</LinearLayout>

	</ScrollView>

	</RelativeLayout>
الخطوة 3: الآن افتح src -> package -> MainActivity. Java ولصق الكود أدناه
	package com.example.gourav.scrollviewExample;

	import android.support.v7.app.AppCompatActivity;
	import android.os.Bundle;

	public class MainActivity extends AppCompatActivity {

	@Override
	protected void onCreate(Bundle savedInstanceState) {
	super.onCreate(savedInstanceState);
	setContentView(R.layout.activity_main);
	}
	}
الخطوة 4: الآن افتح AndroidManifest . xml والصق الكود أدناه
	<?xml version="1.0" encoding="utf-8"?>
	<manifest xmlns:android="http://schemas.android.com/apk/res/android"
	package="com.example.gourav.scrollviewExample" >

	<application
	android:allowBackup="true"
	android:icon="@mipmap/ic_launcher"
	android:label="@string/app_name"
	android:theme="@style/AppTheme" >
	<activity
	android:name=".MainActivity"
	android:label="@string/app_name" >
	<intent-filter>
	<action android:name="android.intent.action.MAIN" />
	<category android:name="android.intent.category.LAUNCHER" />
	</intent-filter>
	</activity>
	</application>

	</manifest>
الخطوة 5: أخيرًا افتح res -> values -> strings.xml والصق الكود أدناه
	<resources>
	<string name="app_name">ScrollViewExample</string>
	<string name="hello_world">Hello world!</string>
	<string name="action_settings">Settings</string>
	</resources>
مخرج :
الآن قم بتشغيل التطبيق في Emulator / AVD أو في جهاز حقيقي. سترى الأزرار العشرة التي يمكن تمريرها في الاتجاه العمودي.
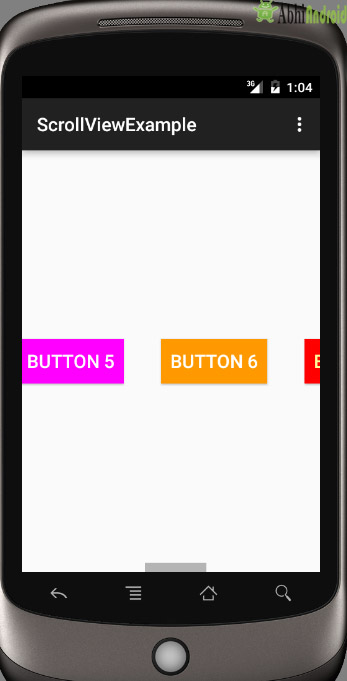
مثال 2: في هذا المثال سنقوم بتمرير الأزرار في اتجاه أفقي. فيما يلي الكود الكامل والمخرج النهائي:
حدد ملف -> جديد -> مشروع جديد واملأ النماذج وانقر فوق الزر "إنهاء" .
الخطوة 2: الآن افتح res -> layout -> activity_mail.xml (أو) main.xml وأضف الكود أدناه. نحن هنا نقوم بإنشاء نفس الأزرار في HorizontalScrollView.
	<RelativeLayout xmlns:android="http://schemas.android.com/apk/res/android"
    xmlns:tools="http://schemas.android.com/tools"
    android:layout_width="match_parent"
    android:layout_height="match_parent"
    tools:context=".MainActivity">

    <HorizontalScrollView
	android:layout_width="fill_parent"
	android:layout_height="fill_parent"
	android:scrollbars="horizontal">

	<LinearLayout
	android:layout_width="fill_parent"
	android:layout_height="fill_parent"
	android:orientation="horizontal">

	<Button
	android:layout_width="wrap_content"
	android:layout_height="wrap_content"
	android:layout_gravity="center"
	android:layout_margin="20dp"
	android:background="#f00"
	android:padding="10dp"
	android:text="Button 1"
	android:textColor="#fff"
	android:textSize="20sp" />

	<Button
	android:layout_width="wrap_content"
	android:layout_height="wrap_content"
	android:layout_gravity="center"
	android:layout_margin="20dp"
	android:background="#0f0"
	android:padding="10dp"
	android:text="Button 2"
	android:textColor="#fff"
	android:textSize="20sp" />

	<Button
	android:layout_width="wrap_content"
	android:layout_height="wrap_content"
	android:layout_gravity="center"
	android:layout_margin="20dp"
	android:background="#00f"
	android:padding="10dp"
	android:text="Button 3"
	android:textColor="#fff"
	android:textSize="20sp" />

	<Button
	android:layout_width="wrap_content"
	android:layout_height="wrap_content"
	android:layout_gravity="center"
	android:layout_margin="20dp"
	android:background="#ff0"
	android:padding="10dp"
	android:text="Button 4"
	android:textColor="#fff"
	android:textSize="20sp" />

	<Button
	android:layout_width="wrap_content"
	android:layout_height="wrap_content"
	android:layout_gravity="center"
	android:layout_margin="20dp"
	android:background="#f0f"
	android:padding="10dp"
	android:text="Button 5"
	android:textColor="#fff"
	android:textSize="20sp" />

	<Button
	android:layout_width="wrap_content"
	android:layout_height="wrap_content"
	android:layout_gravity="center"
	android:layout_margin="20dp"
	android:background="#f90"
	android:padding="10dp"
	android:text="Button 6"
	android:textColor="#fff"
	android:textSize="20sp" />

	<Button
	android:layout_width="wrap_content"
	android:layout_height="wrap_content"
	android:layout_gravity="center"
	android:layout_margin="20dp"
	android:background="#f00"
	android:padding="10dp"
	android:text="Button 7"
	android:textColor="#ff9"
	android:textSize="20sp" />

	<Button
	android:layout_width="wrap_content"
	android:layout_height="wrap_content"
	android:layout_gravity="center"
	android:layout_margin="20dp"
	android:background="#444"
	android:padding="10dp"
	android:text="Button 8"
	android:textColor="#fff"
	android:textSize="20sp" />

	<Button
	android:layout_width="wrap_content"
	android:layout_height="wrap_content"
	android:layout_gravity="center"
	android:layout_margin="20dp"
	android:background="#ff002211"
	android:padding="10dp"
	android:text="Button 9"
	android:textColor="#fff"
	android:textSize="20sp" />

	<Button
	android:layout_width="wrap_content"
	android:layout_height="wrap_content"
	android:layout_gravity="center"
	android:layout_margin="20dp"
	android:background="#0f0"
	android:padding="10dp"
	android:text="Button 10"
	android:textColor="#fff"
	android:textSize="20sp" />

	</LinearLayout>

    </HorizontalScrollView>

	</RelativeLayout>
الخطوة 3: الآن افتح التطبيق -> java -> MainActivity. java في العبوة والصق الكود أدناه:
	package com.example.gourav.horizontalscrollviewExample;

	import android.support.v7.app.AppCompatActivity;
	import android.os.Bundle;

	public class MainActivity extends AppCompatActivity {

    @Override
    protected void onCreate(Bundle savedInstanceState) {
	super.onCreate(savedInstanceState);
	setContentView(R.layout.activity_main);
    }
	}
الخطوة 5: الآن افتح AndroidManifest.xml داخل البيانات والصق الكود أدناه:
	<?xml version="1.0" encoding="utf-8"?>
	<manifest xmlns:android="http://schemas.android.com/apk/res/android"
    package="com.example.gourav.horizontalscrollviewExample" >

    <application
	android:allowBackup="true"
	android:icon="@mipmap/ic_launcher"
	android:label="@string/app_name"
	android:theme="@style/AppTheme" >
	<activity
	android:name="com.example.gourav.horizontalscrollviewExample.MainActivity"
	android:label="@string/app_name" >
	<intent-filter>
	<action android:name="android.intent.action.MAIN" />

	<category android:name="android.intent.category.LAUNCHER" />
	</intent-filter>
	</activity>
    </application>

	</manifest>
الخطوة 6: افتح res -> values -> strings.xml والصق الكود أدناه:
	<resources>
    <string name="app_name">ScrollViewExample</string>
    <string name="hello_world">Hello world!</string>
    <string name="action_settings">Settings</string>
	</resources>
مخرجات :
الآن قم بتشغيل التطبيق في Emulator / AVD أو جهاز حقيقي وسترى 10 أزرار يمكن الآن التمرير في الاتجاه الأفقي.