RadioButton & RadioGroup تعليمي مع مثال في Android Studio
في Android ، يتم استخدام RadioButton بشكل أساسي معًا في RadioGroup . في RadioGroup ، سيؤدي التحقق من زر اختيار واحد من عدة أزرار اختيار تمت إضافتها فيه إلى إلغاء تحديد جميع الأزرار الأخرى تلقائيًا. هذا يعني أنه يمكننا في وقت واحد التحقق من زر اختيار واحد فقط من مجموعة من أزرار الاختيار التي تنتمي إلى نفس مجموعة الراديو . الاستخدام الأكثر شيوعًا لزر الاختيار هو رمز تطبيق Quiz Android .
ملاحظة مهمة: RadioGroup هو عنصر واجهة مستخدم في Android لتجميع أزرار الاختيار وتوفير ميزة تحديد زر اختيار واحد فقطمن المجموعة. عندما يحاول المستخدم تحديد أي زر اختيار آخر ضمن مجموعة الاختيارنفسها ، سيتمإلغاء تحديد زر الاختيار المحدد مسبقًا تلقائيًا.
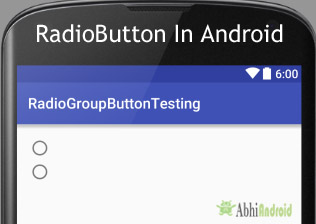
كود RadioGroup و RadioButton في XML:
<RadioGroup
    android:layout_width="wrap_content"
    android:layout_height="wrap_content">
    <RadioButton
    android:id="@+id/simpleRadioButton"
    android:layout_width="wrap_content"
    android:layout_height="wrap_content"/>
    <RadioButton
    android:id="@+id/simpleRadioButton1"
    android:layout_width="wrap_content"
    android:layout_height="wrap_content"/>
    </RadioGroup>
يمكنك التحقق من الحالة الحالية لزر الاختيار برمجيًا باستخدام طريقة isChecked (). ترجع هذه الطريقة قيمة منطقية إما صواب أو خطأ. إذا تم تحديده ، فسيتم إرجاعه صحيحًا وإلا يتم إرجاع خطأ يوجد أدناه مثال على رمز مع شرح تحققنا فيه من الحالة الحالية لزر الاختيار.
/*Add in Oncreate() funtion after setContentView()*/
    RadioButton simpleRadioButton = (RadioButton) findViewById(R.id.simpleRadioButton); // initiate a radio button

    Boolean RadioButtonState = simpleRadioButton.isChecked(); // check current state of a radio button (true or false).
سمات RadioButton في Android:
الآن دعنا نناقش السمات المهمة التي تساعدنا على إنشاء زر اختيار جميل في ملف xml (التخطيط).
1. id: id هي سمة تُستخدم لتعريف زر الاختيار بشكل فريد.
<RadioButton
    android:id="@+id/simpleRadioButton"
    android:layout_width="wrap_content"
    android:layout_height="wrap_content"/>
2. فحص: يتم استخدام السمة المحددة في زر الاختيار لتعيين الحالة الحالية لزر الاختيار. يمكننا تعيينها إما على صواب أو خطأ حيث يُظهر true الحالة المحددة والعروض الخاطئة التي لم يتم التحقق منها لزر الاختيار. كالعادة القيمة الافتراضية للسمة المحددة خاطئة. يمكننا أيضًا ضبط الوضع الحالي في JAVA .
أدناه قمنا بتعيين القيمة الحقيقية للسمة المحددة التي تحدد الحالة الحالية لفحص الزر
<RadioButton
    android:id="@+id/simpleRadioButton"
    android:layout_width="wrap_content"
    android:layout_height="wrap_content"
    android:checked="true"/> <!-- set the current state of the radio button-->

أدناه رمز تعيين الحالة الحالية لـ RadioButton لفحصها برمجيًا.
/*Add in Oncreate() funtion after setContentView()*/
    // initiate a radio button
    RadioButton simpleRadioButton = (RadioButton) findViewById(R.id.simpleRadioButton);

    // set the current state of a radio button
    simpleRadioButton.setChecked(true);
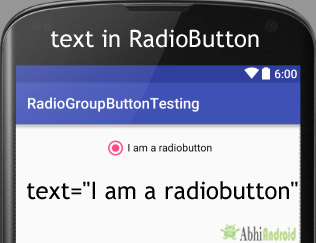
3. Text : يتم استخدام سمة النص لتعيين النص في زر الاختيار. يمكننا ضبط النص في كلا الاتجاهين إما في XML أو في فئة JAVA .
يوجد أدناه مثال للكود مع شرح مضمن حيث قمنا بتعيين النص "أنا زر راديو" لزر اختيار.
<RadioButton
    android:id="@+id/simpleRadioButton"
    android:layout_width="wrap_content"
    android:layout_height="wrap_content"
    android:checked="true"
    android:layout_centerHorizontal="true"
    android:text="I am a radiobutton" /> <!-- displayed text of radio button-->
إعداد نص RadioButton في فئة Java:
أدناه نقوم بتعيين نص زر الاختيار برمجيًا:
/*Add in Oncreate() funtion after setContentView()*/
    RadioButton simpleRadioButton=(RadioButton) findViewById(R.id.simpleRadioButton);
    simpleRadioButton.setText("I am a radiobutton"); // displayed text of radio button
يوجد أدناه مثال للكود مع شرح مضمن قمنا فيه بتعيين مركز الجاذبية لنص زر الاختيار.
<RadioButton
    android:id="@+id/simpleRadioButton"
    android:layout_width="fill_parent"
    android:layout_height="wrap_content"
    android:checked="true"
    android:text="I am a Button"
    android:gravity="center"/> <!-- center gravity of the text-->

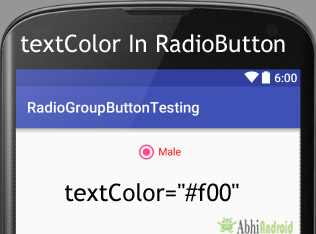
أدناه قمنا بتعيين اللون الأحمر للنص المعروض لزر الاختيار.
<RadioButton
    android:id="@+id/simpleRadioButton"
    android:layout_width="wrap_content"
    android:layout_height="wrap_content"
    android:checked="true"
    android:layout_centerHorizontal="true"
    android:text="Male"
    android:textColor="#f00" /><!--red color for displayed text-->
أدناه نقوم بتعيين لون النص لزر الاختيار برمجيًا.
/*Add in Oncreate() funtion after setContentView()*/
    RadioButton simpleRadioButton = (RadioButton) findViewById(R.id.simpleRadioButton);// initiate radio button

    simpleRadioButton.setTextColor(Color.RED); //red color for displayed text of radio button
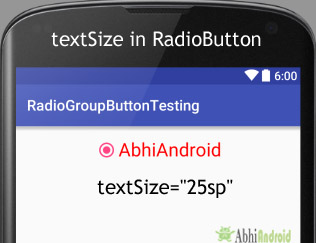
6. textSize: يتم استخدام سمة textSize لتعيين حجم نص زر الاختيار. يمكننا ضبط حجم النص في sp (مقياس بكسل مستقل) أو dp (كثافة بكسل).
أدناه قمنا بتعيين حجم 25sp لنص زر الاختيار.
<RadioButton
    android:id="@+id/simpleRadioButton"
    android:layout_width="wrap_content"
    android:layout_height="wrap_content"
    android:checked="true"
    android:layout_centerHorizontal="true"
    android:text="AbhiAndroid"
    android:textColor="#f00"
    android:textSize="25sp"/> <!--setting  text size-->
أدناه قمنا بتعيين حجم نص زر الاختيار برمجيًا:
/*Add in Oncreate() funtion after setContentView()*/
    RadioButton simpleRadioButton = (RadioButton) findViewById(R.id.simpleRadioButton); // initiate radio button

    simpleRadioButton.setTextSize(25); // set 25sp displayed text size of radio button
7. textStyle: يتم استخدام سمة textStyle لتعيين نمط النص لنص زر الاختيار. أنماط النص الممكنة هي غامقة ومائلة وعادية. إذا احتجنا إلى استخدام نمطين أو أكثر لعرض النص ، فحينئذٍ "|" عامل يستخدم لذلك.
يوجد أدناه مثال للكود مع شرح مضمن حيث قمنا بتعيين أنماط النص الغامق والمائل لنص زر الاختيار.
<RadioButton
    android:id="@+id/simpleRadioButton"
    android:layout_width="wrap_content"
    android:layout_height="wrap_content"
    android:checked="true"
    android:textSize="25sp"
    android:layout_centerHorizontal="true"
    android:text="Male"
    android:textColor="#f00"
    android:textStyle="bold|italic"/> <!-- bold and italic text style-->

أدناه قمنا بتعيين اللون الأسود للخلفية واللون الأحمر للنص المعروض لزر الاختيار.
<RadioButton
    android:id="@+id/simpleRadioButton"
    android:layout_width="wrap_content"
    android:layout_height="wrap_content"
    android:checked="true"
    android:textSize="25sp"
    android:textStyle="bold|italic"
    android:padding="20dp"
    android:layout_centerHorizontal="true"
    android:text="Male"
    android:textColor="#f00"
    android:background="#000"/> <!-- black background for radio button-->

أدناه قمنا بتعيين لون الخلفية لزر الاختيار برمجيًا.
/*Add in Oncreate() funtion after setContentView()*/
    RadioButton simpleRadioButton = (RadioButton) findViewById(R.id.simpleRadioButton);

    simpleRadioButton.setBackgroundColor(Color.BLACK);
9. padding: يتم استخدام خاصية padding لتعيين المساحة المتروكة من اليسار أو اليمين أو أعلى أو أسفل.
- padding إلى اليمين : اضبط المساحة المتروكة من الجانب الأيمن لزر الاختيار .
- paddingLeft: اضبط المساحة المتروكة من الجانب الأيسر لزر الاختيار .
- paddingTop: اضبط المساحة المتروكة من الجانب العلوي لزر الاختيار .
- paddingBottom: اضبط المساحة المتروكة من الجانب السفلي لزر الاختيار .
- المساحة المتروكة : اضبط المساحة المتروكة من جميع جوانب زر الاختيار .
أدناه ، قمنا بتعيين خاصية المساحة المتروكة لـ 20dp padding من جميع جوانب زر الاختيار.
<RadioButton
    android:id="@+id/simpleRadioButton"
    android:layout_width="wrap_content"
    android:layout_height="wrap_content"
    android:checked="true"
    android:textSize="25sp"
    android:textStyle="bold|italic"
    android:layout_centerHorizontal="true"
    android:text="AbhiAndroid"
    android:textColor="#f00"
    android:padding="40dp"/> <!--40dp padding from all the sides of radio button-->

أدناه قمنا بتعيين الرمز على يمين نص RadioButton.
<RadioButton
    android:id="@+id/simpleRadioButton"
    android:layout_width="wrap_content"
    android:layout_height="wrap_content"
    android:checked="true"
    android:textSize="25sp"
    android:padding="20dp"
    android:layout_centerHorizontal="true"
    android:text="AbhiAndroid"
    android:textColor="#f00"
    android:drawableRight="@drawable/ic_launcher" /> <!-- drawable icon at the right of radio button-->

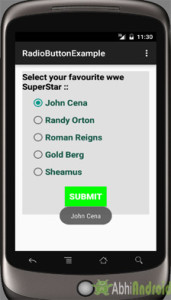
مثال على RadioButton و RadioGroup في Android Studio:
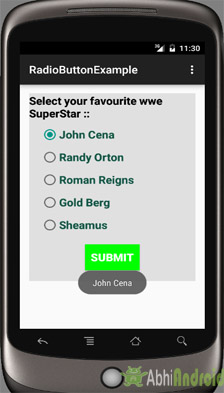
يوجد أدناه مثال Radiobutton في Android حيث نعرض خمسة أزرار اختيار بخلفية وسمات أخرى. تُستخدم أزرار الاختيار لاختيار نجم WWE المفضل لديك بزر "إرسال" واحد. فيما يلي الإخراج النهائي ، تنزيل التعليمات البرمجية والشرح خطوة بخطوة للبرنامج التعليمي:
حدد ملف -> جديد -> مشروع جديد واملأ النماذج وانقر فوق الزر "إنهاء".
الخطوة 2: افتح res -> layout -> activity_main. xml (أو) main.xml وأضف الكود التالي:
في هذه الخطوة ، نفتح ملف xml ونضيف الكود لعرض 5 RadioButton وزر عادي واحد.
<LinearLayout xmlns:android="http://schemas.android.com/apk/res/android"
    xmlns:tools="http://schemas.android.com/tools"
    android:layout_width="match_parent"
    android:layout_height="match_parent"
    android:orientation="vertical"
    android:paddingBottom="@dimen/activity_vertical_margin"
    android:paddingLeft="@dimen/activity_horizontal_margin"
    android:paddingRight="@dimen/activity_horizontal_margin"
    android:paddingTop="@dimen/activity_vertical_margin"
    tools:context=".MainActivity">

    <LinearLayout
    android:layout_width="fill_parent"
    android:layout_height="wrap_content"
    android:background="#e0e0e0"
    android:orientation="vertical">

    <TextView
    android:layout_width="wrap_content"
    android:layout_height="wrap_content"
    android:text="Select your favourite wwe SuperStar :: "
    android:textColor="#000"
    android:textSize="20sp"
    android:textStyle="bold" />

    <RadioGroup
    android:layout_width="wrap_content"
    android:layout_height="wrap_content">

    <RadioButton
    android:id="@+id/johnCena"
    android:layout_width="wrap_content"
    android:layout_height="wrap_content"
    android:layout_marginLeft="20dp"
    android:layout_marginTop="10dp"
    android:checked="true"
    android:text="@string/johnCena"
    android:textColor="#154"
    android:textSize="20sp"
    android:textStyle="bold" />

    <RadioButton
    android:id="@+id/randyOrton"
    android:layout_width="wrap_content"
    android:layout_height="wrap_content"
    android:layout_marginLeft="20dp"
    android:layout_marginTop="10dp"
    android:checked="false"
    android:text="@string/randyOrton"
    android:textColor="#154"
    android:textSize="20sp"
    android:textStyle="bold" />

    <RadioButton
    android:id="@+id/romanReigns"
    android:layout_width="wrap_content"
    android:layout_height="wrap_content"
    android:layout_marginLeft="20dp"
    android:layout_marginTop="10dp"
    android:checked="false"
    android:text="@string/romanReigns"
    android:textColor="#154"
    android:textSize="20sp"
    android:textStyle="bold" />

    <RadioButton
    android:id="@+id/goldBerg"
    android:layout_width="wrap_content"
    android:layout_height="wrap_content"
    android:layout_marginLeft="20dp"
    android:layout_marginTop="10dp"
    android:checked="false"
    android:text="@string/goldBerg"
    android:textColor="#154"
    android:textSize="20sp"
    android:textStyle="bold" />


    <RadioButton
    android:id="@+id/sheamus"
    android:layout_width="wrap_content"
    android:layout_height="wrap_content"
    android:layout_marginLeft="20dp"
    android:layout_marginTop="10dp"
    android:checked="false"
    android:text="@string/sheamus"
    android:textColor="#154"
    android:textSize="20sp"
    android:textStyle="bold" />

    </RadioGroup>

    <Button
    android:id="@+id/submitButton"
    android:layout_width="wrap_content"
    android:layout_height="wrap_content"
    android:layout_gravity="center"
    android:layout_margin="20dp"
    android:background="#0f0"
    android:padding="10dp"
    android:text="Submit"
    android:textColor="#fff"
    android:textSize="20sp"
    android:textStyle="bold" />
    </LinearLayout>


    </LinearLayout>
الخطوة 3: افتح src -> package -> MainActivity. جافا
في هذه الخطوة نفتح MainActivity ونضيف الكود لبدء RadioButton والزر العادي. نقوم أيضًا بإجراء حدث النقر على الزر وعرض اسم النجم المحدد باستخدام Toast.
package example.gb.radiobuttonexample;

    import android.support.v7.app.AppCompatActivity;
    import android.os.Bundle;
    import android.view.View;
    import android.widget.Button;
    import android.widget.RadioButton;
    import android.widget.Toast;

    public class MainActivity extends AppCompatActivity {

    RadioButton johnCena, randyOrton, goldBerg, romanReigns, sheamus;
    String selectedSuperStar;
    Button submit;

    @Override
    protected void onCreate(Bundle savedInstanceState) {
    super.onCreate(savedInstanceState);
    setContentView(R.layout.activity_main);
    johnCena = (RadioButton) findViewById(R.id.johnCena);
    randyOrton = (RadioButton) findViewById(R.id.randyOrton);
    goldBerg = (RadioButton) findViewById(R.id.goldBerg);
    romanReigns = (RadioButton) findViewById(R.id.romanReigns);
    sheamus = (RadioButton) findViewById(R.id.sheamus);
    submit = (Button) findViewById(R.id.submitButton);
    submit.setOnClickListener(new View.OnClickListener() {
    @Override
    public void onClick(View v) {
    if (randyOrton.isChecked()) {
    selectedSuperStar = randyOrton.getText().toString();
    } else if (sheamus.isChecked()) {
    selectedSuperStar = sheamus.getText().toString();
    } else if (johnCena.isChecked()) {
    selectedSuperStar = johnCena.getText().toString();
    } else if (romanReigns.isChecked()) {
    selectedSuperStar = romanReigns.getText().toString();
    } else if (goldBerg.isChecked()) {
    selectedSuperStar = goldBerg.getText().toString();
    }
    Toast.makeText(getApplicationContext(), selectedSuperStar, Toast.LENGTH_LONG).show(); // print the value of selected super star
    }
    });
    }
    }
الخطوة 4: افتح res -> values -> strings. xml
في هذه الخطوة ، نفتح ملف String الذي يستخدم لتخزين بيانات سلسلة التطبيق.
<resources>
    <string name="app_name">RadioButtonExample</string>
    <string name="hello_world">Hello world!</string>
    <string name="action_settings">Settings</string>
    <string name="randyOrton">Randy Orton</string>
    <string name="johnCena">John Cena</string>
    <string name="romanReigns">Roman Reigns</string>
    <string name="goldBerg">Gold Berg</string>
    <string name="sheamus">Sheamus</string>
    </resources>
قم بتشغيل التطبيق:
الآن قم بتشغيل التطبيق في Emulator وسترى 5 RadioButton في RadioGroup يسرد اسم WWE superstar. اختر الآن المفضل لديك وانقر على زر إرسال. سيتم عرض الاسم على الشاشة.