برنامج ProgressBar التعليمي مع مثال في Android Studio
في Android ، يتم استخدام ProgressBar لعرض حالة العمل الذي يتم إجراؤه مثل تحليل حالة العمل أو تنزيل ملف وما إلى ذلك. في Android ، بشكل افتراضي ، سيتم عرض شريط التقدم كعجلة دوارة ولكن إذا أردنا عرضه على أنه ثم نحتاج إلى استخدام سمة النمط على أنها أفقية. وهي تستخدم أساسًا فئة "android.widget.ProgressBar" .
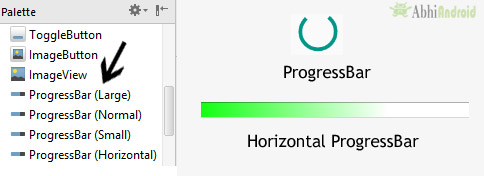
لإضافة شريط تقدم إلى ملف تخطيط ( xml ) ، يمكنك استخدام عنصر < ProgressBar >. بشكل افتراضي ، يكون شريط التقدم عبارة عن عجلة دوارة (مؤشر غير محدد). للتغيير إلى شريط تقدم أفقي ، قم بتطبيق النمط الأفقي لشريط التقدم.
كود ProgressBar:
<ProgressBar
    android:id="@+id/simpleProgressBar"
    android:layout_width="wrap_content"
    android:layout_height="wrap_content" />
كود التقدم الأفقي Horizontal ProgressBar :
<ProgressBar
    android:id="@+id/simpleProgressBar"
    android:layout_width="fill_parent"
    android:layout_height="wrap_content"
    style="@style/Widget.AppCompat.ProgressBar.Horizontal"/>
جدول المحتويات
الطرق والدوال الهامة المستخدمة في شريط التقدم ProgressBar :
1. getMax () - تُرجع القيمة القصوى لشريط التقدم
يمكننا الحصول على الحد الأقصى لقيمة شريط التقدم في فئة جافا . هذه الطريقة ترجع قيمة عدد صحيح. يوجد أدناه الرمز للحصول على أقصى قيمة من شريط التقدم.
ProgressBar simpleProgressBar=(ProgressBar) findViewById(R.id.simpleProgressBar); // initiate the progress bar
    int maxValue=simpleProgressBar.getMax(); // get maximum value of the progress bar
2. getProgress () - إرجاع قيمة التقدم الحالية
يمكننا الحصول على قيمة التقدم الحالية من شريط التقدم في فئة جافا . ترجع هذه الطريقة أيضًا قيمة عدد صحيح. يوجد أدناه رمز للحصول على قيمة التقدم الحالية من شريط التقدم.
ProgressBar simpleProgressBar=(ProgressBar)findViewById(R.id.simpleProgressBar); // initiate the progress bar
    int progressValue=simpleProgressBar.getProgress(); // get progress value from the progress bar
سمات وخصائص ProgressBar في Android:
الآن دعنا نناقش السمات المهمة التي تساعدنا في تكوين شريط التقدم في ملف xml (التخطيط).
1. id: id هي سمة تُستخدم لتعريف شريط التقدم بشكل فريد.
<ProgressBar
    android:id="@+id/simpleProgressBar"
    android:layout_width="fill_parent"
    android:layout_height="wrap_content"
    style="@style/Widget.AppCompat.ProgressBar.Horizontal"/>
2. max: max هي سمة مستخدمة في android لتحديد القيمة القصوى التي يمكن أن يستغرقها التقدم. يجب أن تكون قيمة عددية مثل 100 ، 200 وما إلى ذلك.
أدناه قمنا بتعيين 100 قيمة قصوى لشريط التقدم.
<ProgressBar
    android:id="@+id/simpleProgressBar"
    android:layout_width="fill_parent"
    android:layout_height="wrap_content"
    style="@style/Widget.AppCompat.ProgressBar.Horizontal"
    android:max="100" /><!--set 100 maximum value for the progress bar-->
قم بتعيين الحد الأقصى لقيمة ProgressBar في فئة Java:
ProgressBar simpleProgressBar=(ProgressBar) findViewById(R.id.simpleProgressBar); // initiate the progress bar
    simpleProgressBar.setMax(100); // 100 maximum value for the progress bar

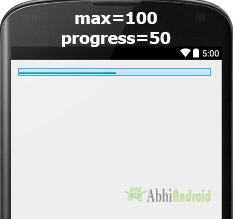
أدناه قمنا بتعيين القيمة القصوى 100 ثم قمنا بتعيين 50 تقدمًا افتراضيًا.
<ProgressBar
    android:id="@+id/simpleProgressBar"
    android:layout_width="fill_parent"
    android:layout_height="wrap_content"
    android:max="100"
    style="@style/Widget.AppCompat.ProgressBar.Horizontal"
    android:progress="50"/><!--// 50 default progress value-->
ProgressBar simpleProgressBar=(ProgressBar)findViewById(R.id.simpleProgressBar); // initiate the progress bar
    simpleProgressBar.setMax(100); // 100 maximum value for the progress value
    simpleProgressBar.setProgress(50); // 50 default progress value for the progress bar
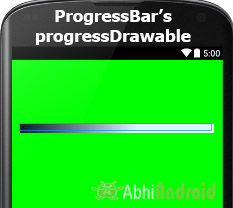
4. ProgressDrawable : يُعد التقدم القابل للرسم سمة مستخدمة في Android لتعيين الرسم المخصص لوضع التقدم.
أدناه قمنا بتعيين تدرج مخصص قابل للرسم لوضع التقدم لشريط التقدم. قبل أن تجرب الرمز أدناه ، تأكد من تنزيل رمز تقدم من الويب وإضافته في مجلدك القابل للرسم.
الخطوة 1: أضف هذا الرمز في activity_main. xml أو main.xml داخل التخطيط.
<ProgressBar
    android:id="@+id/simpleProgressBar"
    android:layout_width="fill_parent"
    android:layout_height="wrap_content"
    android:max="100"
    android:progress="60"
    android:layout_marginTop="100dp"
    style="@style/Widget.AppCompat.ProgressBar.Horizontal"
    android:progressDrawable="@drawable/custom_progress"/><!--custom progress drawable for progress mode-->
الخطوة 2: قم بإنشاء مورد قابل للرسم xml جديد في مجلد قابل للرسم وقم بتسميته custom_progress. أضف هنا الكود أدناه الذي ينشئ تأثير التدرج في شريط التقدم .
<?xml version="1.0" encoding="utf-8"?>
    <layer-list xmlns:android="http://schemas.android.com/apk/res/android" >

    <item>
    <shape>
    <gradient
    android:endColor="#fff"
    android:startColor="#1f1"
    android:useLevel="true" />

    </shape>
    </item>


    </layer-list>
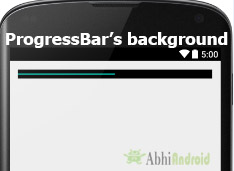
أدناه قمنا بتعيين اللون الأسود لخلفية شريط التقدم.
<ProgressBar
    android:id="@+id/simpleProgressBar"
    android:layout_width="fill_parent"
    android:layout_height="wrap_content"
    android:max="100"
    android:progress="50"
    style="@style/Widget.AppCompat.ProgressBar.Horizontal"
    android:background="#000"/><!-- black background color for progress bar-->
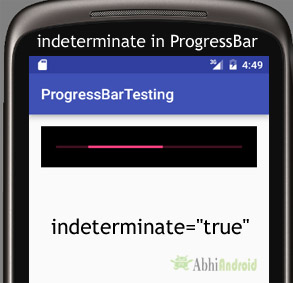
في الكود أدناه قمنا بتعيين غير المحدد على صحيح.
<ProgressBar
    android:id="@+id/simpleProgressBar"
    android:layout_width="fill_parent"
    android:layout_height="wrap_content"
    android:max="100"
    android:progress="50"
    android:background="#000"
    android:padding="20dp" style="@style/Widget.AppCompat.ProgressBar.Horizontal"
    android:indeterminate="true"/><!--true value for indeterminate-->
ProgressBar simpleProgressBar=(ProgressBar)findViewById(R.id.simpleProgressBar); // initiate the progress bar
    simpleProgressBar.setBackgroundColor(Color.BLACK); // black background color for the progress bar
7. padding : يتم استخدام خاصية padding لتعيين المساحة المتروكة من اليسار أو اليمين أو أعلى أو أسفل شريط التقدم.
- padding إلى اليمين : اضبط المساحة المتروكة من الجانب الأيمن من شريط التقدم .
- المساحة المتروكة إلى اليسار : اضبط المساحة المتروكة من الجانب الأيسر لشريط التقدم .
- paddingTop: اضبط المساحة المتروكة من الجانب العلوي لشريط التقدم .
- paddingBottom: اضبط المساحة المتروكة من الجانب السفلي لشريط التقدم .
- الحشوة : اضبط المساحة المتروكة من جميع جوانب شريط التقدم .
أدناه قمنا بتعيين حشوة 20dp من جميع جوانب شريط التقدم.
<ProgressBar
    android:id="@+id/simpleProgressBar"
    android:layout_width="fill_parent"
    android:layout_height="wrap_content"
    android:max="100"
    android:progress="50"
    android:background="#000"
    style="@style/Widget.AppCompat.ProgressBar.Horizontal"
    android:padding="20dp"/><!--// 20dp padding from all the sides of the progress bar-->

مثال على ProgressBar في Android Studio:
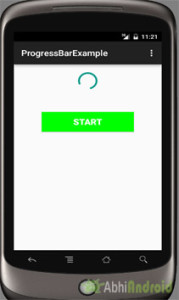
في المثال الأول من ProgressBar ، قمنا بعرض شريط تقدم افتراضي للعجلة الدوارة وزر بدء عندما ينقر المستخدم على الزر ، يتم عرض شريط التقدم. فيما يلي الإخراج النهائي ، تنزيل الكود والشرح خطوة بخطوة:

حدد ملف -> جديد -> مشروع جديد ... ثم املأ النماذج وانقر فوق الزر "إنهاء".
الخطوة 2: افتح res -> layout -> activity_main.xml (أو) main.xml وأضف الكود التالي:
في هذه الخطوة ، نفتح ملف xml ونضيف الكود لعرض شريط التقدم ونضبط رؤيته على زر غير مرئي وزر بدء واحد .
<RelativeLayout xmlns:android="http://schemas.android.com/apk/res/android"
    xmlns:tools="http://schemas.android.com/tools"
    android:layout_width="match_parent"
    android:layout_height="match_parent"
    android:paddingBottom="@dimen/activity_vertical_margin"
    android:paddingLeft="@dimen/activity_horizontal_margin"
    android:paddingRight="@dimen/activity_horizontal_margin"
    android:paddingTop="@dimen/activity_vertical_margin"
    tools:context=".MainActivity">

    <ProgressBar
    android:id="@+id/simpleProgressBar"
    android:layout_width="wrap_content"
    android:layout_height="wrap_content"
    android:visibility="invisible"
    android:layout_centerHorizontal="true"/>

    <Button
    android:id="@+id/startButton"
    android:layout_width="200dp"
    android:layout_height="wrap_content"
    android:text="Start"
    android:textSize="20sp"
    android:textStyle="bold"
    android:layout_centerHorizontal="true"
    android:layout_marginTop="100dp"
    android:padding="10dp"
    android:background="#0f0"
    android:textColor="#fff"/>

    </RelativeLayout>
الخطوة 3: الآن افتح src -> package -> MainActivity.java
في هذه الخطوة ، نفتح MainActivity حيث نضيف الرمز لبدء شريط التقدم والزر ثم ننفذ حدث النقر فوق الزر الذي يعرض شريط التقدم.
package example.gb.progressbarexample;

    import android.graphics.Color;
    import android.support.v7.app.AppCompatActivity;
    import android.os.Bundle;
    import android.view.Menu;
    import android.view.MenuItem;
    import android.view.View;
    import android.widget.ProgressBar;
    import android.widget.Button;

    public class MainActivity extends AppCompatActivity {

    @Override
    protected void onCreate(Bundle savedInstanceState) {
    super.onCreate(savedInstanceState);
    setContentView(R.layout.activity_main);
    // initiate progress bar and start button
    final ProgressBar simpleProgressBar = (ProgressBar) findViewById(R.id.simpleProgressBar);
    Button startButton = (Button) findViewById(R.id.startButton);
    // perform click event on button
    startButton.setOnClickListener(new View.OnClickListener() {
    @Override
    public void onClick(View v) {
    // visible the progress bar
    simpleProgressBar.setVisibility(View.VISIBLE);
    }
    });
    }


    }
المخرجات :
الآن ابدأ تشغيل AVD في Emulator وقم بتشغيل التطبيق. انقر فوق زر البدء وسيتم عرض شريط التقدم على الشاشة.
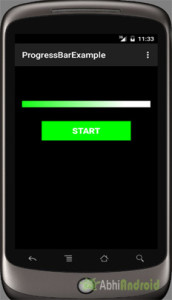
مثال على شريط التقدم الأفقي في Android Studio:
في المثال الثاني نعرض شريط تقدم أفقي بخلفية قابلة للرسم وزر بدء. هنا عندما ينقر المستخدم على زر ، يتم استخدام موضوع لبدء التقدم. فيما يلي الإخراج النهائي ، تنزيل الكود والشرح خطوة بخطوة:
حدد ملف -> جديد -> مشروع جديد ... ثم املأ النماذج وانقر فوق الزر "إنهاء".
الخطوة 2: افتح res -> layout -> activity_main.xml (أو) main.xml وأضف الكود التالي:
في هذه الخطوة ، نفتح ملف xml ونضيف الكود لعرض شريط تقدم أفقي باستخدام خاصية النمط والتقدم القابل للرسم xml وزر بدء واحد.
<RelativeLayout xmlns:android="http://schemas.android.com/apk/res/android"
    xmlns:tools="http://schemas.android.com/tools"
    android:layout_width="match_parent"
    android:layout_height="match_parent"
    android:background="#000"
    android:paddingBottom="@dimen/activity_vertical_margin"
    android:paddingLeft="@dimen/activity_horizontal_margin"
    android:paddingRight="@dimen/activity_horizontal_margin"
    android:paddingTop="@dimen/activity_vertical_margin"
    tools:context=".MainActivity">

    <ProgressBar
    android:id="@+id/simpleProgressBar"
    style="@style/Widget.AppCompat.ProgressBar.Horizontal"
    android:layout_width="fill_parent"
    android:layout_height="wrap_content"
    android:layout_centerHorizontal="true"
    android:layout_marginTop="70dp"
    android:max="100"
    android:progress="0"
    android:progressDrawable="@drawable/custom_progress" />

    <Button
    android:id="@+id/startButton"
    android:layout_width="200dp"
    android:layout_height="wrap_content"
    android:layout_centerHorizontal="true"
    android:layout_marginTop="120dp"
    android:background="#0f0"
    android:padding="10dp"
    android:text="Start"
    android:textColor="#fff"
    android:textSize="20sp"
    android:textStyle="bold" />

    </RelativeLayout>
الخطوة 3: قم بإنشاء ملف xml في drawable -> custom_progress.xml
في هذه الخطوة ، نقوم بإنشاء ملف xml قابل للرسم مخصص لشريط التقدم. في xml هذا ، نقوم بإنشاء قائمة طبقات نقوم فيها بإنشاء عنصر ثم تعيين ألوان التدرج لشريط التقدم المخصص الخاص بنا.
<?xml version="1.0" encoding="utf-8"?>
    <layer-list xmlns:android="http://schemas.android.com/apk/res/android" >

    <item>
    <shape>
    <gradient
    android:endColor="#fff"
    android:startColor="#1f1"
    android:useLevel="true" />

    </shape>
    </item>


    </layer-list>
الخطوة 4: افتح التطبيق -> الحزمة -> MainActivity.java
في هذه الخطوة ، نفتح MainActivity ونضيف الكود لبدء شريط التقدم والزر ثم تنفيذ حدث النقر على الزر. بعد ذلك نبدأ التقدم في شريط التقدم باستخدام مؤشر ترابط.
package example.gb.progressbarexample;

    import android.app.Dialog;
    import android.content.DialogInterface;
    import android.content.Intent;
    import android.graphics.Color;
    import android.provider.Settings;
    import android.support.v7.app.AlertDialog;
    import android.support.v7.app.AppCompatActivity;
    import android.os.Bundle;
    import android.view.Menu;
    import android.view.MenuItem;
    import android.view.View;
    import android.widget.ProgressBar;
    import android.widget.Button;
    import android.widget.Toast;

    public class MainActivity extends AppCompatActivity {

    int progress = 0;
    ProgressBar simpleProgressBar;

    @Override
    protected void onCreate(Bundle savedInstanceState) {
    super.onCreate(savedInstanceState);
    setContentView(R.layout.activity_main);
    // initiate progress bar and start button
    simpleProgressBar = (ProgressBar) findViewById(R.id.simpleProgressBar);
    Button startButton = (Button) findViewById(R.id.startButton);
    // perform click event on button
    startButton.setOnClickListener(new View.OnClickListener() {
    @Override
    public void onClick(View v) {
    // call a function
    setProgressValue(progress);

    }
    });
    }

    private void setProgressValue(final int progress) {

    // set the progress
    simpleProgressBar.setProgress(progress);
    // thread is used to change the progress value
    Thread thread = new Thread(new Runnable() {
    @Override
    public void run() {
    try {
    Thread.sleep(1000);
    } catch (InterruptedException e) {
    e.printStackTrace();
    }
    setProgressValue(progress + 10);
    }
    });
    thread.start();
    }


    @Override
    public boolean onCreateOptionsMenu(Menu menu) {
    // Inflate the menu; this adds items to the action bar if it is present.
    getMenuInflater().inflate(R.menu.menu_main, menu);
    return true;
    }

    @Override
    public boolean onOptionsItemSelected(MenuItem item) {
    // Handle action bar item clicks here. The action bar will
    // automatically handle clicks on the Home/Up button, so long
    // as you specify a parent activity in AndroidManifest.xml.
    int id = item.getItemId();

    //noinspection SimplifiableIfStatement
    if (id == R.id.action_settings) {
    return true;
    }

    return super.onOptionsItemSelected(item);
    }
    }
انتاج:
الآن قم بتشغيل التطبيق في AVD ، انقر فوق زر البدء وسترى شريط تقدم أفقي.
موضوع ذو صلة - ProgressDialog في Android
Android Progress Dialog هو واجهة مستخدم تعرض تقدم مهمة كما تريد أن ينتظر المستخدم حتى تكتمل المهمة السابقة المخططة ولهذا الغرض يمكنك استخدام مربع حوار التقدم . اقرأ برنامج Progressdialog التعليمي الخاص بنا مع مثال .
