برنامج تعليمي CheckBox مع مثال في Android Studio
في Android ، يعتبر CheckBox نوعًا من الأزرار ذات الحالتين إما غير محدد أو محدد في Android. أو يمكنك القول إنه نوع من مفتاح التشغيل / الإيقاف يمكن للمستخدمين تبديله. يجب عليك استخدام مربع الاختيار عند تقديم مجموعة من الخيارات القابلة للتحديد للمستخدمين غير الحصريين بشكل متبادل. CompoundButton هي الفئة الأصل لفئة CheckBox .
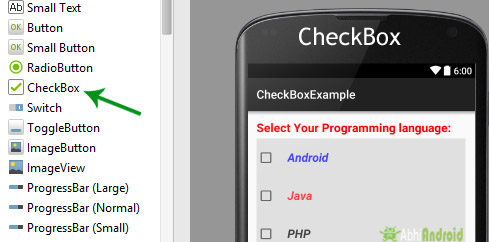
كود CheckBox في XML:
<CheckBox
    android:id="@+id/simpleCheckBox"
    android:layout_width="wrap_content"
    android:layout_height="wrap_content"
    android:text="Simple CheckBox"/>

//initiate a check box
    CheckBox simpleCheckBox = (CheckBox) findViewById(R.id.simpleCheckBox);

    //check current state of a check box (true or false)
    Boolean checkBoxState = simpleCheckBox.isChecked();
سمات وخصائص CheckBox :
الآن دعنا نناقش السمات المهمة التي تساعدنا في تكوين خانة اختيار في ملف XML (التخطيط).
1.id: id هي سمة تُستخدم لتعريف خانة اختيار بشكل فريد. أدناه قمنا بتعيين معرف زر الصورة.
<CheckBox
    android:id="@+id/simpleCheckBox"
    android:layout_width="wrap_content"
    android:layout_height="wrap_content"
    android:text="Simple CheckBox"/>
2. تم التحديد CheckBox : المحدد هو سمة من سمات خانة الاختيار المستخدمة لتعيين الحالة الحالية لمربع الاختيار. يجب أن تكون القيمة صحيحة أو خاطئة حيث تُظهر القيمة true الحالة المحددة بينما تُظهر القيمة false الحالة غير المحددة لخانة الاختيار. القيمة الافتراضية للسمة المحددة خاطئة. يمكننا أيضًا ضبط الوضع الحالي برمجيًا.
يوجد أدناه مثال على رمز قمنا فيه بتعيين القيمة الحقيقية للسمة المحددة التي تعين الحالة الحالية على التحقق.
<CheckBox
    android:id="@+id/simpleCheckBox"
    android:layout_width="wrap_content"
    android:layout_height="wrap_content"
    android:text="Simple CheckBox"
    android:checked="true"/> <!--set the current state of the check box-->

أدناه قمنا بتعيين الحالة الحالية لـ CheckBox في فئة java .
/*Add in Oncreate() funtion after setContentView()*/
    // initiate a check box
    CheckBox simpleCheckBox = (CheckBox) findViewById(R.id.simpleCheckBox;

    // set the current state of a check box
    simpleCheckBox.setChecked(true);
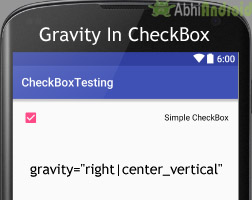
3. الجاذبية gravity: سمة الجاذبية هي سمة اختيارية تُستخدم للتحكم في محاذاة النص في CheckBox مثل اليسار واليمين والوسط والأعلى والأسفل والمركز الرأسي والمركز الأفقي وما إلى ذلك.
أدناه قمنا بتعيين الجاذبية اليمنى والمركزية الرأسية لنص مربع الاختيار.
<CheckBox
    android:id="@+id/simpleCheckBox"
    android:layout_width="fill_parent"
    android:layout_height="wrap_content"
    android:text="Simple CheckBox"
    android:checked="true"
    android:gravity="right|center_vertical"/>  <!-- gravity of the check box-->
يوجد أدناه مثال للكود مع شرح مضمن حيث قمنا بتعيين النص "Text Attribute Of Check Box" لخانة الاختيار.
<CheckBox
    android:id="@+id/simpleCheckBox"
    android:layout_width="wrap_content"
    android:layout_height="wrap_content"
    android:checked="true"
    android:text="Text Attribute Of Check Box"/> <!--displayed text of the check box-->

فيما يلي رمز المثال الذي قمنا بتعيين نص مربع الاختيار فيه يعني برمجيًا في فئة java .
/*Add in Oncreate() funtion after setContentView()*/
    // initiate check box
    CheckBox simpleCheckBox = (CheckBox) findViewById(R.id.simpleCheckBox);

    // displayed text of the check box
    simpleCheckBox.setText("Text Attribute Of Check Box");
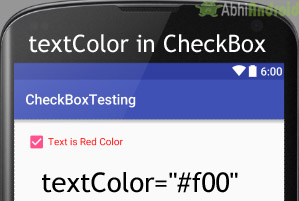
5. لون النص : تستخدم سمة لون النص لتعيين لون النص لخانة الاختيار. تكون قيمة اللون بصيغة "#argb" أو "#rgb" أو "#rrggbb" أو "#aarrggbb".
أدناه قمنا بتعيين اللون الأحمر للنص المعروض في خانة الاختيار.
<CheckBox
    android:id="@+id/simpleCheckBox"
    android:layout_width="wrap_content"
    android:layout_height="wrap_content"
    android:text="Text is Red Color"
    android:textColor="#f00"
    android:checked="true"/> <!-- red color for the text of check box-->
أدناه نقوم بتعيين لون نص مربع الاختيار برمجيًا.
/*Add in Oncreate() funtion after setContentView()*/
    //initiate the checkbox
    CheckBox simpleCheckBox = (CheckBox) findViewById(R.id.simpleCheckBox);

    //red color for displayed text
    simpleCheckBox.setTextColor(Color.RED);
6. textSize: يتم استخدام سمة textSize لتعيين حجم نص خانة الاختيار. يمكننا ضبط حجم النص في sp (مقياس بكسل مستقل) أو dp (كثافة بكسل).
يوجد أدناه مثال الكود الذي قمنا بتعيين حجم 20sp فيه لنص مربع الاختيار.
<CheckBox
    android:id="@+id/simpleCheckBox"
    android:layout_width="wrap_content"
    android:layout_height="wrap_content"
    android:text="Text size Attribute Of Check Box"
    android:textColor="#00f"
    android:checked="false"
    android:textSize="20sp"/><!--set Text Size of text in CheckBox-->
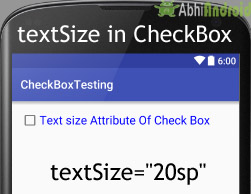
أدناه قمنا بتعيين حجم النص لمربع الاختيار في فئة جافا.
/*Add in Oncreate() funtion after setContentView()*/
    CheckBox simpleCheckBox = (CheckBox) findViewById(R.id.simpleCheckBox);
    //set 20sp displayed text size
    simpleCheckBox.setTextSize(20);
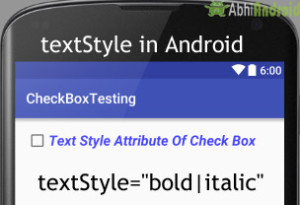
7. textStyle: يتم استخدام سمة textStyle لتعيين نمط النص لنص خانة الاختيار. أنماط النص الممكنة هي غامقة ومائلة وعادية. إذا احتجنا إلى استخدام نمطين أو أكثر لعرض النص ، فحينئذٍ "|" عامل يستخدم لذلك.
أدناه نقوم بتعيين أنماط النص الغامق والمائل لنص خانة الاختيار.
<CheckBox
    android:id="@+id/simpleCheckBox"
    android:layout_width="wrap_content"
    android:layout_height="wrap_content"
    android:text="Text Style Attribute Of Check Box"
    android:textColor="#44f"
    android:textSize="20sp"
    android:checked="false"
    android:textStyle="bold|italic"/>
أدناه قمنا بتعيين اللون الأسود للخلفية ، واللون الأبيض للنص المعروض في خانة الاختيار.
<CheckBox
    android:id="@+id/simpleCheckBox"
    android:layout_width="wrap_content"
    android:layout_height="wrap_content"
    android:text="Text size Attribute Of Check Box"
    android:textColor="#fff"
    android:textSize="20sp"
    android:textStyle="bold|italic"
    android:checked="true"
    android:background="#000" /><!-- black background for the background of check box-->
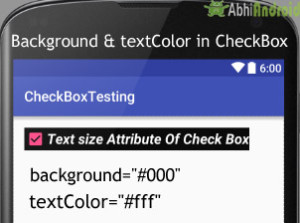
فيما يلي رمز المثال الذي قمنا بتعيين لون خلفية مربع الاختيار فيه يعني برمجيًا في فئة java.
/*Add in Oncreate() funtion after setContentView()*/
    CheckBox simpleCheckBox = (CheckBox) findViewById(R.id.simpleCheckBox);
    // set background in CheckBox
    simpleCheckBox.setBackgroundColor(Color.BLACK);
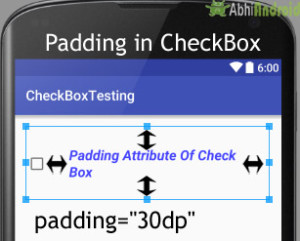
9. padding: يتم استخدام خاصية padding لتعيين المساحة المتروكة من اليسار أو اليمين أو أعلى أو أسفل.
- المساحة المتروكة لليمين: اضبط المساحة المتروكة من الجانب الأيمن لخانة الاختيار .
- المساحة المتروكة على اليسار : قم بتعيين المساحة المتروكة من الجانب الأيسر لخانة الاختيار .
- paddingTop: قم بتعيين المساحة المتروكة من الجانب العلوي لخانة الاختيار .
- paddingBottom: عيّن المساحة المتروكة من الجانب السفلي لخانة الاختيار .
- المساحة المتروكة : قم بتعيين المساحة المتروكة من جميع جوانب خانة الاختيار .
يوجد أدناه مثال لرمز الحشو حيث قمنا بتعيين مساحة 30dp من جميع جوانب مربع الاختيار.
<CheckBox
    android:id="@+id/simpleCheckBox"
    android:layout_width="wrap_content"
    android:layout_height="wrap_content"
    android:text="Padding Attribute Of Check Box"
    android:textColor="#44f"
    android:textSize="20sp"
    android:textStyle="bold|italic"
    android:checked="false"
    android:padding="30dp"/> <!--30dp padding from all side’s-->
مثال على CheckBox في Android Studio:
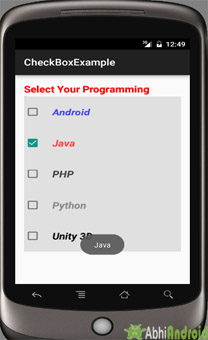
يوجد أدناه مثال CheckBox في Android ، حيث نعرض خمسة مربعات اختيار باستخدام الخلفية والسمات الأخرى التي ناقشناها سابقًا في هذا المنشور. تمثل كل خانة اختيار اسم موضوع مختلف ، وكلما نقرت على مربع اختيار ، يتم عرض نص خانة الاختيار المحددة في نخب. فيما يلي الإخراج النهائي ، والتعليمات البرمجية والشرح خطوة بخطوة للمثال:
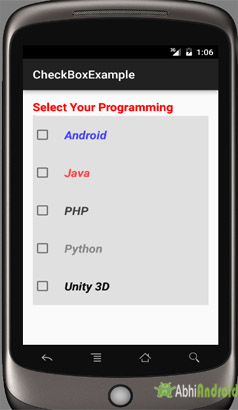
في هذه الخطوة ، نقوم بإنشاء مشروع جديد في android studio عن طريق ملء جميع التفاصيل الضرورية للتطبيق مثل اسم التطبيق واسم الحزمة وإصدارات api وما إلى ذلك.
حدد ملف -> جديد -> مشروع جديد واملأ النماذج وانقر فوق الزر "إنهاء".
الخطوة 2: الآن افتح res -> layout -> activity_main. xml (or) main.xml وأضف الكود التالي:
في هذه الخطوة ، نفتح ملف xml ونضيف الكود لعرض خمسة من TextView وخانات الاختيار.
<RelativeLayout xmlns:android="http://schemas.android.com/apk/res/android"
    xmlns:tools="http://schemas.android.com/tools"
    android:layout_width="match_parent"
    android:layout_height="match_parent"
    android:paddingBottom="@dimen/activity_vertical_margin"
    android:paddingLeft="@dimen/activity_horizontal_margin"
    android:paddingRight="@dimen/activity_horizontal_margin"
    android:paddingTop="@dimen/activity_vertical_margin"
    tools:context=".MainActivity">

    <TextView
    android:layout_width="wrap_content"
    android:layout_height="wrap_content"
    android:text="Select Your Programming language: "
    android:textColor="#f00"
    android:textSize="20sp"
    android:textStyle="bold" />

    <LinearLayout
    android:id="@+id/linearLayout"
    android:layout_width="fill_parent"
    android:layout_height="wrap_content"
    android:layout_marginTop="30dp"
    android:background="#e0e0e0"
    android:orientation="vertical">

    <CheckBox
    android:id="@+id/androidCheckBox"
    android:layout_width="wrap_content"
    android:layout_height="wrap_content"
    android:layout_centerHorizontal="true"
    android:checked="false"
    android:padding="20dp"
    android:text="@string/android"
    android:textColor="#44f"
    android:textSize="20sp"
    android:textStyle="bold|italic" />

    <CheckBox
    android:id="@+id/javaCheckBox"
    android:layout_width="wrap_content"
    android:layout_height="wrap_content"
    android:layout_centerHorizontal="true"
    android:checked="false"
    android:padding="20dp"
    android:text="@string/java"
    android:textColor="#f44"
    android:textSize="20sp"
    android:textStyle="bold|italic" />

    <CheckBox
    android:id="@+id/phpCheckBox"
    android:layout_width="wrap_content"
    android:layout_height="wrap_content"
    android:layout_centerHorizontal="true"
    android:checked="false"
    android:padding="20dp"
    android:text="@string/php"
    android:textColor="#444"
    android:textSize="20sp"
    android:textStyle="bold|italic" />

    <CheckBox
    android:id="@+id/pythonCheckBox"
    android:layout_width="wrap_content"
    android:layout_height="wrap_content"
    android:layout_centerHorizontal="true"
    android:checked="false"
    android:padding="20dp"
    android:text="@string/python"
    android:textColor="#888"
    android:textSize="20sp"
    android:textStyle="bold|italic" />

    <CheckBox
    android:id="@+id/unityCheckBox"
    android:layout_width="wrap_content"
    android:layout_height="wrap_content"
    android:layout_centerHorizontal="true"
    android:checked="false"
    android:padding="20dp"
    android:text="@string/unity"
    android:textColor="#101010"
    android:textSize="20sp"
    android:textStyle="bold|italic" />
    </LinearLayout>

    </RelativeLayout>
الخطوة 3: الآن افتح التطبيق -> java-> package -> MainActivity. جافا
في هذه الخطوة نضيف الكود لبدء مربعات الاختيار التي أنشأناها. وبعد ذلك نقوم بالنقر فوق الحدث على الزر وعرض النص لمربعات الاختيار المحددة باستخدام الخبز المحمص.
package example.abhiandriod.checkboxexample;

    import android.graphics.Color;
    import android.support.v7.app.AppCompatActivity;
    import android.os.Bundle;
    import android.view.Menu;
    import android.view.MenuItem;
    import android.view.View;
    import android.widget.Button;
    import android.widget.CheckBox;
    import android.widget.Toast;

    public class MainActivity extends AppCompatActivity implements View.OnClickListener {

    CheckBox android, java, python, php, unity3D;

    @Override
    protected void onCreate(Bundle savedInstanceState) {
    super.onCreate(savedInstanceState);
    setContentView(R.layout.activity_main);
    // initiate views
    android = (CheckBox) findViewById(R.id.androidCheckBox);
    android.setOnClickListener(this);
    java = (CheckBox) findViewById(R.id.javaCheckBox);
    java.setOnClickListener(this);
    python = (CheckBox) findViewById(R.id.pythonCheckBox);
    python.setOnClickListener(this);
    php = (CheckBox) findViewById(R.id.phpCheckBox);
    php.setOnClickListener(this);
    unity3D = (CheckBox) findViewById(R.id.unityCheckBox);
    unity3D.setOnClickListener(this);
    }

    @Override
    public void onClick(View view) {

    switch (view.getId()) {
    case R.id.androidCheckBox:
    if (android.isChecked())
    Toast.makeText(getApplicationContext(), "Android", Toast.LENGTH_LONG).show();
    break;
    case R.id.javaCheckBox:
    if (java.isChecked())
    Toast.makeText(getApplicationContext(), "Java", Toast.LENGTH_LONG).show();
    break;
    case R.id.phpCheckBox:
    if (php.isChecked())
    Toast.makeText(getApplicationContext(), "PHP", Toast.LENGTH_LONG).show();
    break;
    case R.id.pythonCheckBox:
    if (python.isChecked())
    Toast.makeText(getApplicationContext(), "Python", Toast.LENGTH_LONG).show();
    break;
    case R.id.unityCheckBox:
    if (unity3D.isChecked())
    Toast.makeText(getApplicationContext(), "Unity 3D", Toast.LENGTH_LONG).show();
    break;
    }
    }
    }
الخطوة 5: افتح res -> values -> strings. xml
في هذه الخطوة ، نعرض ملف سلسلة يستخدم لتخزين بيانات سلسلة من التطبيق.
<resources>
    <string name="app_name">CheckBoxExample</string>
    <string name="hello_world">Hello world!</string>
    <string name="action_settings">Settings</string>
    <string name="android">Android</string>
    <string name="java">Java</string>
    <string name="php">PHP</string>
    <string name="python" >Python</string>
    <string name="unity">Unity 3D</string>
    </resources>
المخرجات :
الآن ابدأ تشغيل AVD في Emulator وقم بتشغيل التطبيق. سترى 5 خيار مربع يطلب منك اختيار لغة البرمجة الخاصة بك. حدد وسيظهر نص هذا CheckBox المحدد على الشاشة.
